
Beautiful Plants For Your Interior
Beautiful Plants For Your Interior
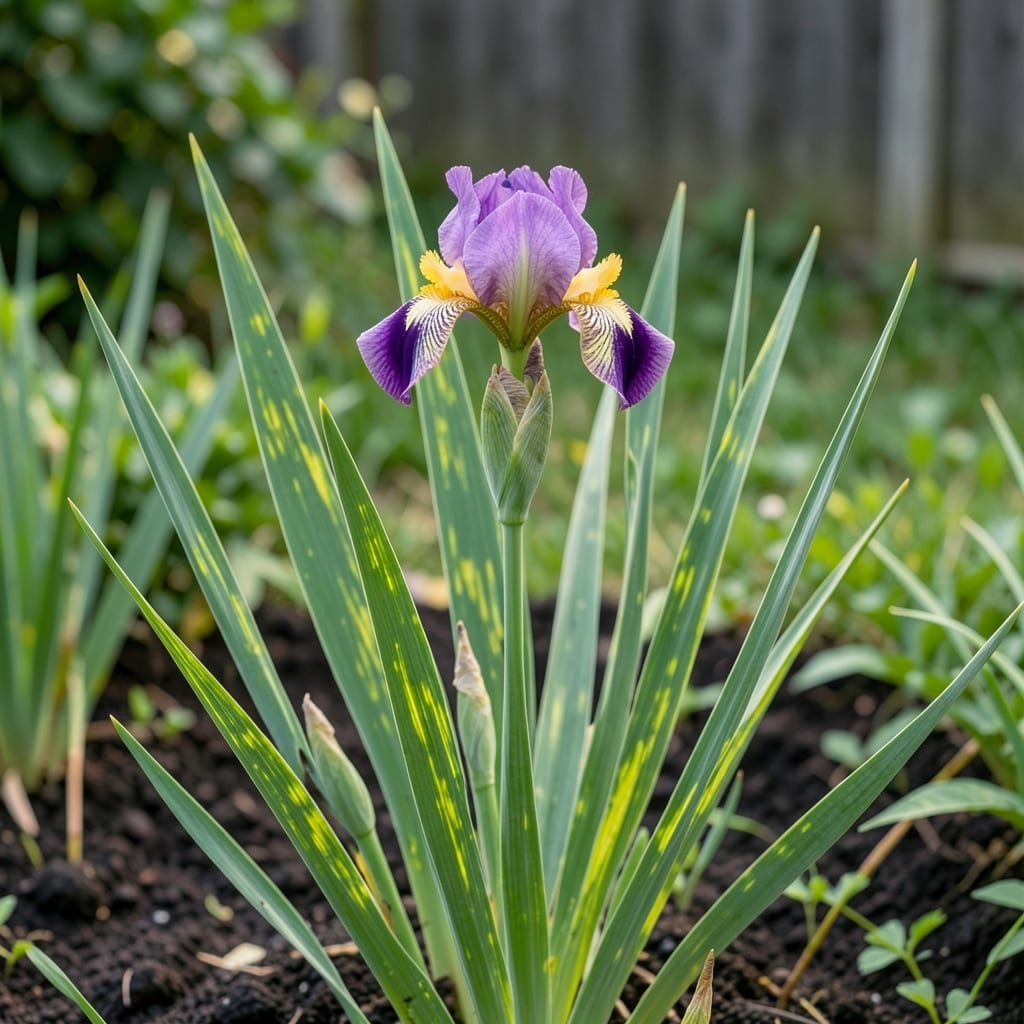
Yellow mottling on iris leaves caught my attention last spring. 🌿 It wasn’t just unsightly—it was iris mosaic virus, a silent spreader that weakens plants over time.
I learned the hard way that early identification and removal of infected plants can save the rest of your garden. Healthy irises start with vigilance and quick action.
📚 In This Guide
Here’s how I keep my iris beds healthy and virus-free with simple, proven techniques.
Start by examining your irises for mottled or streaked leaves, often yellow or light green against darker green. These patterns appear on new growth first, usually in early spring as plants emerge. I check the youngest leaves carefully—this is where symptoms show up before spreading to older foliage.
Another red flag is stunted growth compared to healthy plants. Infected irises often produce smaller blooms or fail to flower at all. Real talk: it’s easy to overlook early signs, but catching them now prevents the virus from spreading to your entire bed.
As soon as you confirm the virus, dig up and destroy the affected plant—do not compost it. The virus can survive in plant debris and spread through aphids. I use a clean spade and remove the entire rhizome, making sure not to leave any pieces in the soil.
Wash your tools with a 10% bleach solution between cuts to prevent contamination. This is the moment that matters: acting fast protects your healthy irises. Bag and dispose of infected material with your household trash to contain the spread.
After removing infected specimens, create a 10-foot buffer zone around the area where they grew. I plant a barrier of non-host plants like marigolds or petunias here—they don’t attract the aphids that spread the virus.
For the next growing season, keep your irises well-spaced (12-18 inches apart) to improve air circulation. Good airflow discourages aphid populations from building up. You’ll notice fewer pests when plants aren’t crowded together.
Control aphids aggressively, as they’re the primary carriers of this virus. I spray with insecticidal soap every 7-10 days during active growth periods. Focus on the undersides of leaves where aphids like to hide.
Always start with virus-free rhizomes from reputable suppliers. Inspect new plants carefully before introducing them to your garden. This ensures you’re not accidentally bringing the problem home with you.
Monitor your iris bed weekly during the growing season, especially after rain when aphid populations can explode. I keep a garden journal with notes on plant health—this helps me spot patterns and catch problems early.
At the end of each season, clean up all plant debris thoroughly. The virus can overwinter in dead foliage, so removing it by late fall reduces next year’s risk. You’ll see healthier plants when you’re consistent with this practice.
These simple adjustments will keep your irises thriving and virus-free all season long.
Early Detection Tip: Focus on the youngest leaves in Step 1—mottling appears here first, often in early spring. I missed this for years until I started inspecting new growth daily during the first warm weeks. Catching it early saves your entire bed.
Cleanup Critical: After removing infected plants in Step 2, always use that 10% bleach solution on your tools between cuts. I learned this the hard way when I accidentally spread the virus to three healthy rhizomes with contaminated pruners.
Barrier Strategy: For Step 3, that 10-foot buffer zone works best when you plant marigolds or petunias as a barrier. These don’t attract aphids and create a natural shield around your irises.
Prevention Timing: The 7-10 day insecticidal soap schedule in Step 4 is non-negotiable during active growth. Aphid populations explode quickly, and skipping even one treatment can undo weeks of prevention work.
Early symptoms include yellow or light green streaks on leaves, stunted growth, and mottled patterns on foliage. These signs often appear in spring as new growth emerges.
Yes, it can spread through aphids, contaminated tools, or infected plant material. Isolate affected irises and avoid sharing tools to prevent further contamination.
There’s no cure, so remove and destroy infected plants to stop the spread. Focus on prevention: control aphids, use clean tools, and plant virus-resistant iris varieties.
Check plants in early spring and late summer when symptoms are most visible. Regular monitoring helps catch the virus early before it spreads widely.