
Beautiful Plants For Your Interior
Beautiful Plants For Your Interior
There’s something magical about seeing an orchid clinging to tree bark, thriving without a single speck of soil. I remember the first time I successfully mounted one—it felt like unlocking a secret level of gardening. These epiphytic beauties grow exactly how nature intended, with roots exposed to air and moisture from the environment. The key […]
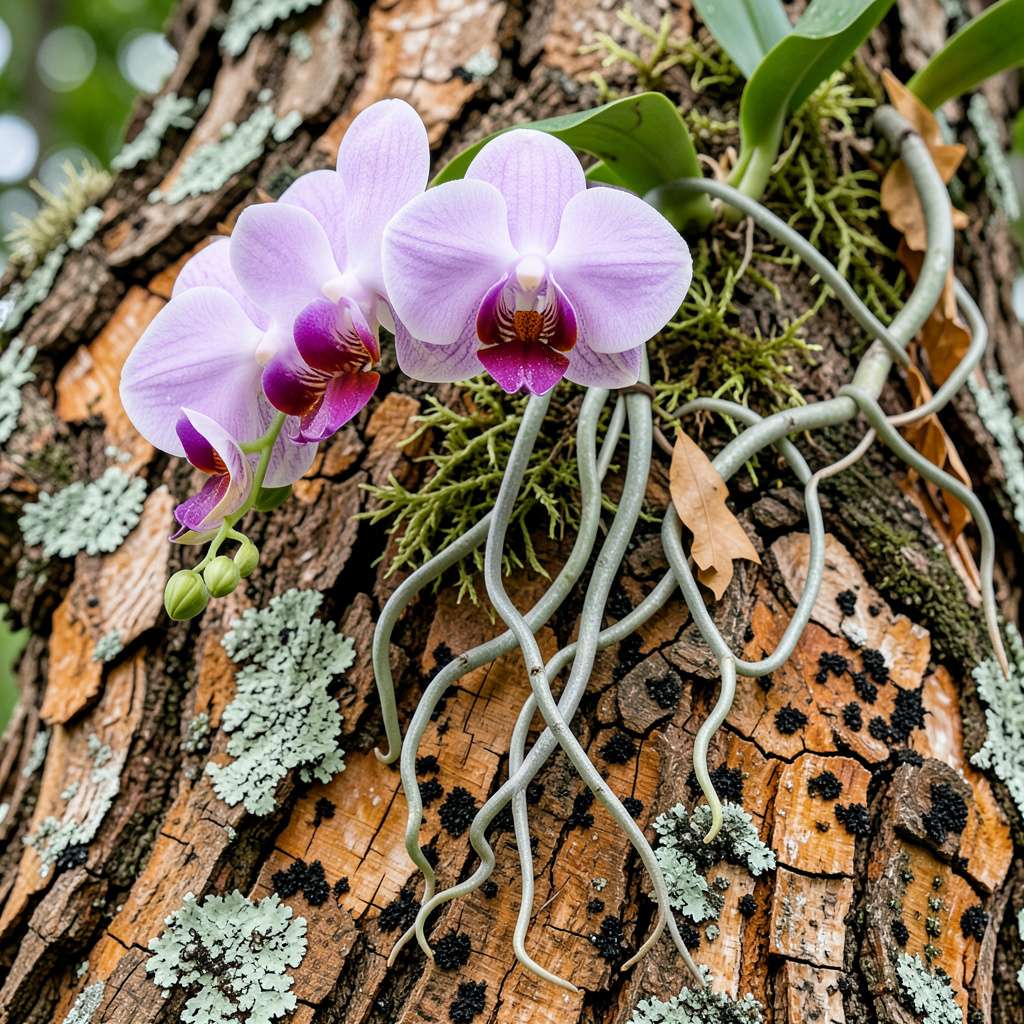
There’s something magical about seeing an orchid clinging to tree bark, thriving without a single speck of soil. I remember the first time I successfully mounted one—it felt like unlocking a secret level of gardening. These epiphytic beauties grow exactly how nature intended, with roots exposed to air and moisture from the environment.
The key is choosing the right bark (rough-textured, moisture-retentive types like oak or redwood work best) and matching it with orchids that naturally grow this way. Phalaenopsis and Cattleya varieties adapt particularly well. You’ll need just a few supplies: the bark, some sphagnum moss for moisture, and a way to secure the plant while roots establish.
Within 4-6 weeks, you’ll see new root growth reaching out to grip the bark. The plants develop stronger, healthier root systems than potted orchids, and the display looks like something from a tropical forest. Watering becomes more intuitive—you’re mimicking rain showers rather than maintaining damp soil.
This method works equally well on patio trees, wooden mounts, or even decorative branches indoors near bright windows. The same principles apply whether you’re in a humid climate or running a humidifier to create the right conditions. Let’s get those orchids climbing!
📚 In This Guide
This method transforms bare bark into a living display—perfect for recreating an orchid’s natural epiphytic habitat.
Choose mature orchids with established root systems—at least 3-5 healthy roots measuring 4-6 inches long. I prefer Phalaenopsis or Dendrobium varieties for beginners, as they adapt readily to bark mounting. Inspect roots carefully: they should appear silvery-green when dry and bright green when hydrated, never mushy or blackened.
The bark surface must be rough enough for roots to grip. I use cork slabs or oak bark sections at least 8 inches wide to accommodate growth. Avoid treated or painted wood—chemicals will damage the orchid’s sensitive velamen root covering over time.
Soak the orchid roots in lukewarm water for 10-15 minutes to make them pliable. This mimics the humidity of their natural environment and prevents root breakage during mounting. Gently untangle any circling roots—you want them to spread naturally across the bark surface.
Using sterilized scissors, trim away any dead or damaged roots. Healthy roots feel firm when squeezed gently; discard any that collapse or ooze fluid. I keep a spray bottle of diluted hydrogen peroxide (1 part peroxide to 10 parts water) handy to disinfect any accidental cuts during this process.
Position the orchid on the bark so the base sits slightly above the mounting point—this prevents water from pooling at the crown. Use soft nylon stockings or specialized orchid mounting clips to hold it in place. Never use wire or string that can cut into the plant as it grows.
The attachment should be snug enough to hold the plant during initial establishment but loose enough to allow root movement. I check the tension by gently tugging the plant—it shouldn’t shift, but the roots shouldn’t appear compressed. The first 4-6 weeks are critical for root attachment.
Mist the mounted orchid daily for the first 2 weeks, keeping the bark consistently damp but never soggy. The velamen roots should transition from silvery to green within 24 hours of watering—this color change indicates proper hydration. After establishment, water when roots show silver again, typically every 5-7 days.
Maintain 50-70% humidity around the mount. I use a humidity tray filled with pebbles and water placed beneath the bark, ensuring the plant never sits in standing water. Good air circulation prevents fungal issues—position near an open window or use a gentle fan on low setting for 2-3 hours daily.
Place the mounted orchid where it receives bright, indirect light—east or north-facing windows work well. Leaves should appear olive green; dark green indicates insufficient light while reddish tones suggest too much exposure. I rotate my mounts quarter-turn weekly to ensure even growth.
Fertilize every 2-3 weeks during active growth with a balanced 20-20-20 orchid fertilizer diluted to half strength. Apply the solution directly to the roots and bark surface, never to the leaves. You’ll see new root growth within 4-6 weeks if conditions are ideal—these will appear as bright green tips emerging from existing roots.
Mounting orchids on bark creates a stunning natural display, but success depends on understanding their epiphytic nature. Here’s what we’ve learned through years of trial and error.
Root Preparation Insight: The 10-15 minute soak in lukewarm water during Step 2 isn’t just about hydration—it’s critical for root flexibility. I’ve found that water temperature matters: aim for 75-80°F (about body temperature). Too hot damages the velamen, too cold won’t soften the roots sufficiently. Gently massage the roots during soaking to encourage them to unfurl naturally across the bark surface.
Attachment Technique: When securing the orchid in Step 3, resist the urge to make it too tight. The roots need room to breathe and move as they attach. I use old nylon stockings cut into strips—they’re gentle, stretch slightly as the plant grows, and decompose harmlessly over time. Check the tension after 24 hours; roots may swell slightly after their first hydration.
Critical Establishment Period: The first 4-6 weeks after mounting are make-or-break. During this time, maintain higher humidity (closer to 70%) and mist twice daily rather than once. I place new mounts in a clear plastic bag with small ventilation holes for the first week—this creates a mini greenhouse effect that dramatically improves success rates. Watch for the roots to change from silvery to bright green within 24 hours of watering, as mentioned in Step 4.
Light Management: The quarter-turn weekly rotation in Step 5 prevents lopsided growth, but here’s what nobody tells you: rotate in the same direction each time (always clockwise or counterclockwise). This creates consistent growth patterns rather than confusing the plant. East-facing windows often provide the most consistent bright, indirect light throughout the year.
Not all orchids thrive on bark! Epiphytic types like Phalaenopsis, Cattleya, Dendrobium, or Vandas adapt best. Terrestrial orchids (e.g., Paphiopedilum) need soil and won’t survive mounted. Always check your orchid’s natural habitat—if it grows on trees in the wild, it’s likely a good candidate!
Bark dries faster than potting mix, so water 2–3 times weekly in warm climates (daily in extreme heat ). Mist roots lightly or soak the mount for 5–10 minutes. Let it dry completely between waterings to prevent rot. Humidity matters—aim for 40–70% for most species.
Spring or early summer is ideal! This aligns with active growth, helping roots attach faster. Avoid mounting during dormancy (fall/winter) or extreme temperatures. If repotting, do it just after blooming ends to reduce stress on the plant.
Patience! Roots can take 3–6 months to anchor. If they’re shrinking or turning brown, check for:
Avoid disturbing new roots!
Popular options include:
Avoid treated wood or materials with chemicals. Sterilize alternatives by boiling or baking to prevent pests.
Growing orchids on tree bark unlocks a world of natural beauty while mimicking their wild habitat. 🌿 With the right tree, proper attachment, and consistent care, these epiphytic wonders can thrive without soil—rewarding you with stunning blooms and effortless elegance.
Ready to start? Pick a healthy orchid variety like Phalaenopsis or Dendrobium, gather your materials, and let your green thumb shine! For extra confidence, revisit the FAQ section or join an orchid care community to swap tips with fellow enthusiasts. Happy growing! 🌸
