
Beautiful Plants For Your Interior
Beautiful Plants For Your Interior
Three-inch cuttings turned into full plants in my kitchen window. No soil, no fancy equipment—just water and patience. I’ve propagated dozens of snake plants this way, and the method is so reliable that even my most neglected cuttings eventually root. The secret lies in choosing the right stems and giving them the right conditions from […]
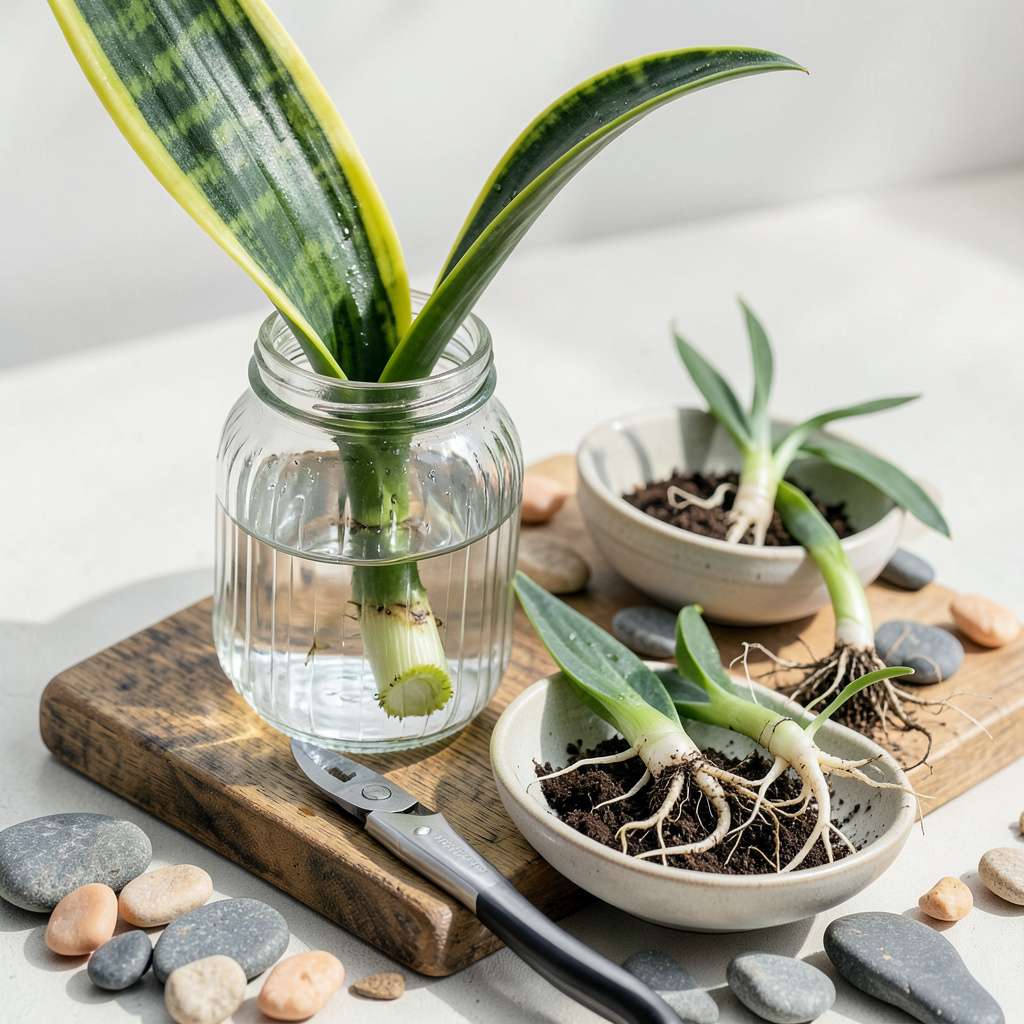
Three-inch cuttings turned into full plants in my kitchen window. No soil, no fancy equipment—just water and patience. I’ve propagated dozens of snake plants this way, and the method is so reliable that even my most neglected cuttings eventually root. The secret lies in choosing the right stems and giving them the right conditions from day one.
You’ll watch white roots emerge within 4-6 weeks, transforming plain cuttings into viable plants ready for soil. I ruined my first batch by changing the water too often—turns out, snake plants prefer consistency over freshness. Now I know the ideal water level, light exposure, and when to make the critical move to potting mix.
The process feels like magic until you understand the biology: these plants evolved to survive drought, so they root aggressively when given the chance. Your cuttings will develop thick, healthy roots that transition to soil with almost zero shock. I’ve gifted more propagated snake plants than I can count, all from that first successful batch.
Works equally well for neglected office plants or intentional propagation projects. The same technique scales from a single cutting to filling entire pots—once you see those first roots, you’ll be hooked on watching them grow.
📚 In This Guide
Rooting hormone (gel/powder) – A pinch to speed up growth (not required but helpful!).
This simple water propagation method delivers new plants with minimal effort—just patience and clean water.
Choose a mature snake plant leaf that’s at least 6 inches tall and free from damage. I prefer the outer leaves since they’re older and root more reliably. Use clean scissors or pruners to make a straight cut at the base of the leaf, as close to the soil line as possible.
Let the cutting sit in a dry, shaded spot for 1-2 days until the cut end forms a callus. This white, hardened layer prevents rot when submerged. You’ll feel the difference—fresh cuts are slightly sticky, while callused ends feel dry and smooth.
Fill a small glass or jar with 3-4 inches of room-temperature water. I use filtered or distilled water to avoid chlorine, which can inhibit root growth. The container should be just wide enough to support the cutting upright without tipping—about 2-3 inches in diameter works perfectly.
Place the callused end of the cutting into the water, submerging only the bottom 1 inch. The leaf should stand vertically with the majority above water. If it won’t stay upright, use a small piece of tape to secure it to the container’s rim.
Position the container in bright, indirect light—an east-facing windowsill is ideal. Avoid direct sun, which can overheat the water and damage the cutting. You’ll see the first signs of root growth in 2-3 weeks as tiny white bumps emerge from the callused end.
Change the water every 5-7 days to prevent bacterial growth. I add a drop of hydrogen peroxide (3%) to each water change—this keeps the water fresh and oxygenated. Roots will grow 1-2 inches long within 4-6 weeks when conditions are right.
Once roots reach 2-3 inches long, it’s time to transplant. Prepare a small pot with well-draining cactus or succulent mix. Make a hole in the soil with your finger, then gently place the rooted cutting inside, being careful not to break the delicate new roots.
Water lightly after planting, just enough to settle the soil around the roots. Place the pot in the same bright, indirect light as before. Wait 1 week before watering again—this gives the roots time to acclimate to soil without risk of rot.
These simple adjustments will help you achieve faster, healthier root growth with fewer setbacks.
Cutting Selection: In Step 1, choosing the right leaf makes all the difference. Look for mature outer leaves that are at least 6 inches tall—they have more stored energy to support root development. Avoid variegated leaves if possible; solid green varieties tend to root more reliably. Always make a clean, straight cut to maximize the surface area for callusing.
Water Quality Matters: For Step 2, I’ve found that using filtered or distilled water significantly improves success rates. Tap water often contains chlorine and minerals that can inhibit root growth. If you must use tap water, let it sit uncovered for 24 hours first to allow chlorine to evaporate. The 3-4 inches of water depth is perfect—it provides stability without submerging too much of the cutting.
Light Conditions: The bright, indirect light mentioned in Step 3 is crucial. I’ve noticed that north-facing windows often provide the most consistent light without the intensity that can damage cuttings. If your only option is a south-facing window, place the container a few feet away from the glass or use a sheer curtain to diffuse the light. Watch for any yellowing of the leaf, which indicates too much light.
Patience During Transition: When you reach Step 4, resist the urge to water your newly transplanted cutting too soon. That 1-week waiting period allows the roots to adjust to soil conditions without the stress of excess moisture. I like to mist the soil surface lightly after 3-4 days if it feels very dry, but avoid thorough watering until the full week has passed.
Yes! Snake plants are resilient, so you can propagate them in water anytime. However, spring and summer (growing seasons) speed up root development—expect roots in 4-6 weeks. In winter, growth slows, so patience is key (8-10 weeks). Keep water fresh and warm (65–80°F) for best results!
Aim to transfer your cutting to soil once roots reach 2–3 inches long (usually 6–8 weeks). Leaving it in water too long (beyond 3–4 months) can weaken the plant, as roots adapt to water and struggle to transition to soil. Don’t rush—healthy roots = happy plants!
Rot is usually caused by overwatering (yes, even in propagation!) or dirty water. Fix it by: 1) Using filtered or distilled water (chlorine harms cuts), 2) changing water weekly, and 3) ensuring only the bottom 1–2 inches of the cutting are submerged. Trim rotten parts and restart if needed!
Soil propagation is just as effective (and faster for some gardeners). Simply stick the cut end in well-draining cactus/succulent mix, water lightly, and wait 4–6 weeks. Water propagation lets you watch roots grow, but soil skips the transplant shock. Pick your preference!
Nope! Snake plants root easily without hormone—it’s optional. If you’re propagating tricky varieties (like variegated types) or want to speed things up, a light dusting of rooting powder can help. But for most cuts, clean water and patience work perfectly!
Propagating snake plants in water is a simple, rewarding process that even beginners can master! With just a few cuttings, clean water, and a little patience, you’ll watch roots sprout in 4–6 weeks—no green thumb required. 🌱 Once your new plants are ready, transfer them to soil or keep them thriving in water for a low-maintenance, stylish addition to your home.
Now that you’ve got the know-how, grab those shears and start propagating! Share your progress with fellow plant lovers or experiment with different snake plant varieties for a diverse collection. Happy growing! 🌿
