
Beautiful Plants For Your Interior
Beautiful Plants For Your Interior
Yellowing orchid leaves hit different when you realize it’s usually overwatering. I’ve lost count of how many orchids I’ve saved (and a few I couldn’t) after spotting those telltale limp, translucent leaves. The good news? This is completely fixable if you act fast—most orchids bounce back within 2-3 weeks with the right approach. Here’s the […]
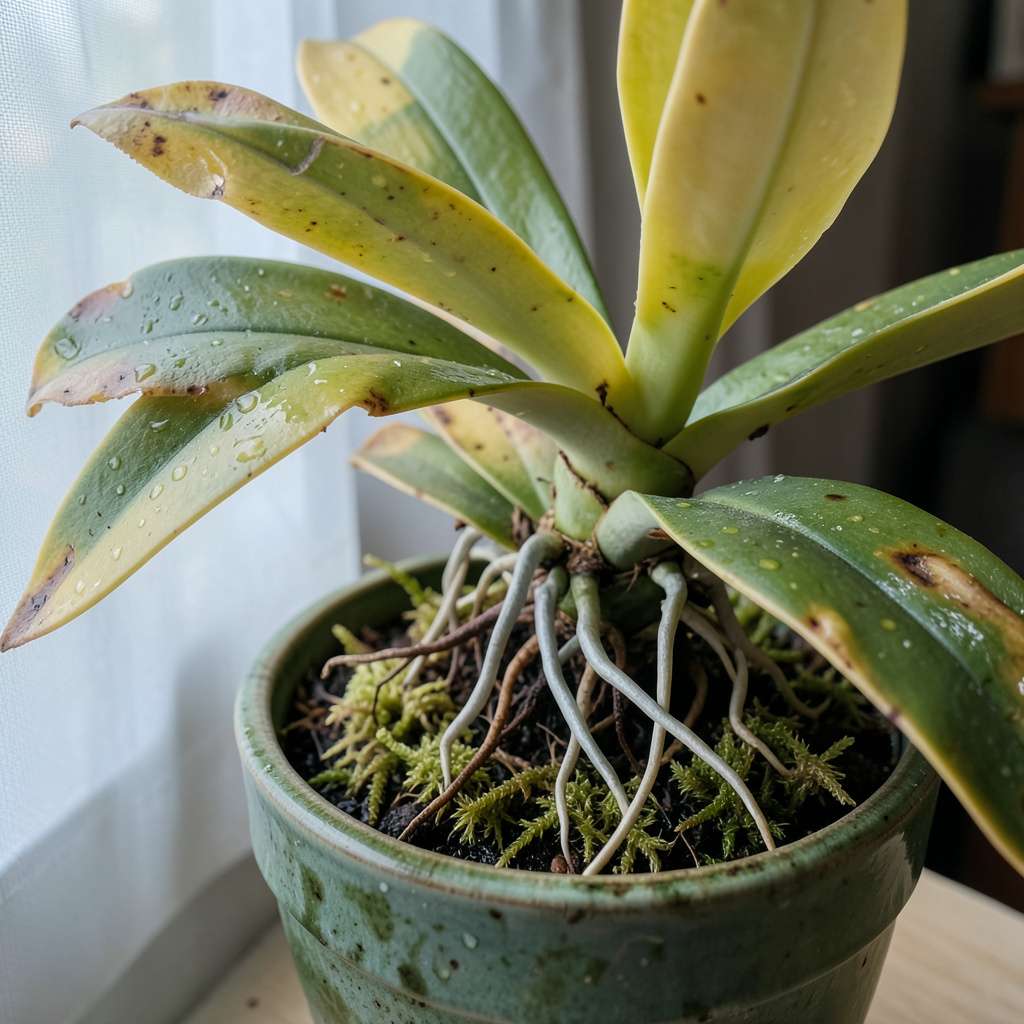
Yellowing orchid leaves hit different when you realize it’s usually overwatering. I’ve lost count of how many orchids I’ve saved (and a few I couldn’t) after spotting those telltale limp, translucent leaves. The good news? This is completely fixable if you act fast—most orchids bounce back within 2-3 weeks with the right approach.
Here’s the thing—orchids drown silently. Their roots need air as much as water, and soggy conditions create the perfect storm for rot. I learned this after watching a prized Phalaenopsis go from vibrant to mushy in under a week. The fix isn’t complicated: it’s about resetting the moisture balance and giving roots a chance to recover.
You’ll see improvement quickly once you adjust your routine. Leaves firm up, new growth emerges, and those dramatic blooms return. I’ve revived orchids that looked beyond hope using simple household supplies and a little patience. The key is understanding what your plant is telling you through those yellowing leaves.
This works for any orchid variety, whether it’s a grocery-store Phalaenopsis or a rare Cattleya. The principles stay the same, and the recovery process is faster than you’d expect. Let’s get those roots breathing again.
📚 In This Guide
Here’s my proven method to rescue your orchid quickly—no guesswork, just clear steps that work.
Gently slide the orchid out of its container by squeezing the pot’s sides to loosen the root ball. If roots resist, run a clean knife around the inner edge to free them. This urgency matters because every hour in soggy conditions worsens root rot and leaf damage.
Inspect the roots as you remove the plant. Healthy roots appear firm and silver-green when dry, bright green when wet. Black, mushy roots with a foul odor indicate advanced rot—these must be trimmed away immediately to save the plant.
Use sterilized scissors to cut away all black, brown, or hollow roots. Make clean cuts just above the damaged area, leaving only firm, healthy tissue. I always disinfect my tools with rubbing alcohol between cuts to prevent spreading pathogens.
Next, remove any yellow or papery leaves by cutting at the base where they meet the stem. These leaves won’t recover and drain the plant’s energy. If a leaf is partially damaged, trim only the affected portion, leaving 1/4 inch of healthy tissue for protection.
Place the orchid on a clean paper towel in a well-ventilated area away from direct sunlight. The roots need 24-48 hours to dry thoroughly—this halts rot progression and prepares the plant for repotting. You’ll know it’s ready when roots change from dark green to their natural silvery hue.
During this drying period, avoid misting or watering entirely. I check roots hourly for the first 6 hours to ensure they’re drying evenly. If any moisture remains in the crown (where leaves meet), gently dab it with a paper towel to prevent bacterial growth.
Select a clean pot with multiple drainage holes and fill it with fresh orchid bark mix (never reuse old medium). Position the orchid so the base sits just above the mix surface—burying it invites rot. The ideal pot size allows 1-2 inches of space around roots for airflow.
Water lightly after repotting—just enough to settle the medium—then wait 5-7 days before watering again. This break lets roots recover from stress. I place newly potted orchids in bright, indirect light (east-facing windows work well) to encourage recovery without sunburn risk.
Water only when the top inch of bark feels completely dry and roots show their silvery color. I use the “soak and dry” method: submerge the pot in room-temperature water for 10 minutes, then let it drain thoroughly. Never let the plant sit in water.
Monitor leaves daily for 2-3 weeks. New growth indicates recovery, while persistent yellowing means the rot may still be spreading. In that case, repeat the trimming process immediately. Most orchids show improvement within 7-10 days when treated this way.
Here’s what I’ve learned from rescuing dozens of overwatered orchids—small details that make all the difference in recovery.
Critical Timing Insight: The 24-48 hour drying period in Step 3 isn’t just about removing surface moisture—it’s about allowing the plant’s internal systems to reset. I’ve found that orchids dried for the full 48 hours show significantly better recovery rates than those dried for only 24. During the first 6 hours of drying, check the roots every hour as instructed, but also gently rotate the plant to ensure even air exposure to all sides of the root system.
Sterilization Technique: When trimming roots in Step 2, don’t just sterilize your tools before starting—disinfect them between every single cut. I keep a small bowl of rubbing alcohol nearby and dip the scissors after each snip. This prevents cross-contamination between healthy and diseased tissue, which is especially important when dealing with fungal infections that often accompany overwatering. The 1/4 inch of healthy tissue you leave on partially damaged leaves acts as a protective barrier against further infection.
Repotting Wisdom: In Step 4, the instruction to position the orchid so its base sits just above the bark mix surface is crucial for preventing future rot. I use this trick: after placing the orchid in its new pot, I gently lift it about 1/8 inch higher than seems natural—this accounts for the inevitable settling of the bark mix over the first few days. The 1-2 inches of space around roots isn’t just for airflow; it also gives you room to add more bark mix later if needed without disturbing the recovering plant.
Watering Discipline: The 5-7 day waiting period after repotting in Step 4 tests many gardeners’ patience, but it’s non-negotiable for recovery. During this time, I place my orchids on a tray with a thin layer of pebbles and water (not touching the pot) to create a humidity microclimate. This provides moisture to the air around the plant without wetting the roots. When you do resume watering, that 10-minute soak should be timed precisely—set a phone alarm to avoid over-soaking, which can undo all your recovery efforts.
Overwatered leaves feel soft, mushy, or show black/brown spots with a yellow halo. Natural aging affects only 1-2 lower leaves at a time—they’ll turn uniformly yellow (no spots) and stay firm. If multiple leaves yellow rapidly or the stem feels squishy, it’s likely overwatering!
Yes, but act fast! Remove the orchid from its pot, trim rotten roots (mushy/brown) with sterilized scissors, and repot in fresh, chunky bark mix. Skip watering for 5–7 days. Wrinkled leaves may not recover, but new growth will appear if the roots heal.
Wait until the top 1–2 inches of mix are bone-dry (stick your finger in!). For most orchids, that’s every 7–10 days in warm climates or 10–14 days in cooler temps. Use the “ice cube method” (3 cubes/week) for phalaenopsis if you’re nervous about overdoing it.
Ditch dense soil! Opt for chunky, airy mixes like:
Add charcoal to fight rot. Pro tip: Drill extra drainage holes in plastic pots!
New wrinkles often mean underwatering (ironic, right?). Your orchid’s damaged roots can’t absorb water efficiently yet. Mist leaves lightly daily and soak the pot in room-temp water for 10 mins weekly until roots recover (they’ll turn silver-green when healthy).
Spotting overwatered orchid leaves early is half the battle—now you’ve got the tools to turn those sad, yellowing leaves into a thriving, vibrant plant! 🌱 Remember, consistency and patience are key: adjust your watering routine, improve drainage, and give your orchid time to bounce back.
Ready to take action? Start by inspecting your orchid’s roots today—healthy roots mean a healthier plant! For extra support, check out our guide on orchid repotting tips to set your beauty up for long-term success. You’ve got this! ✨
