
Beautiful Plants For Your Interior
Beautiful Plants For Your Interior
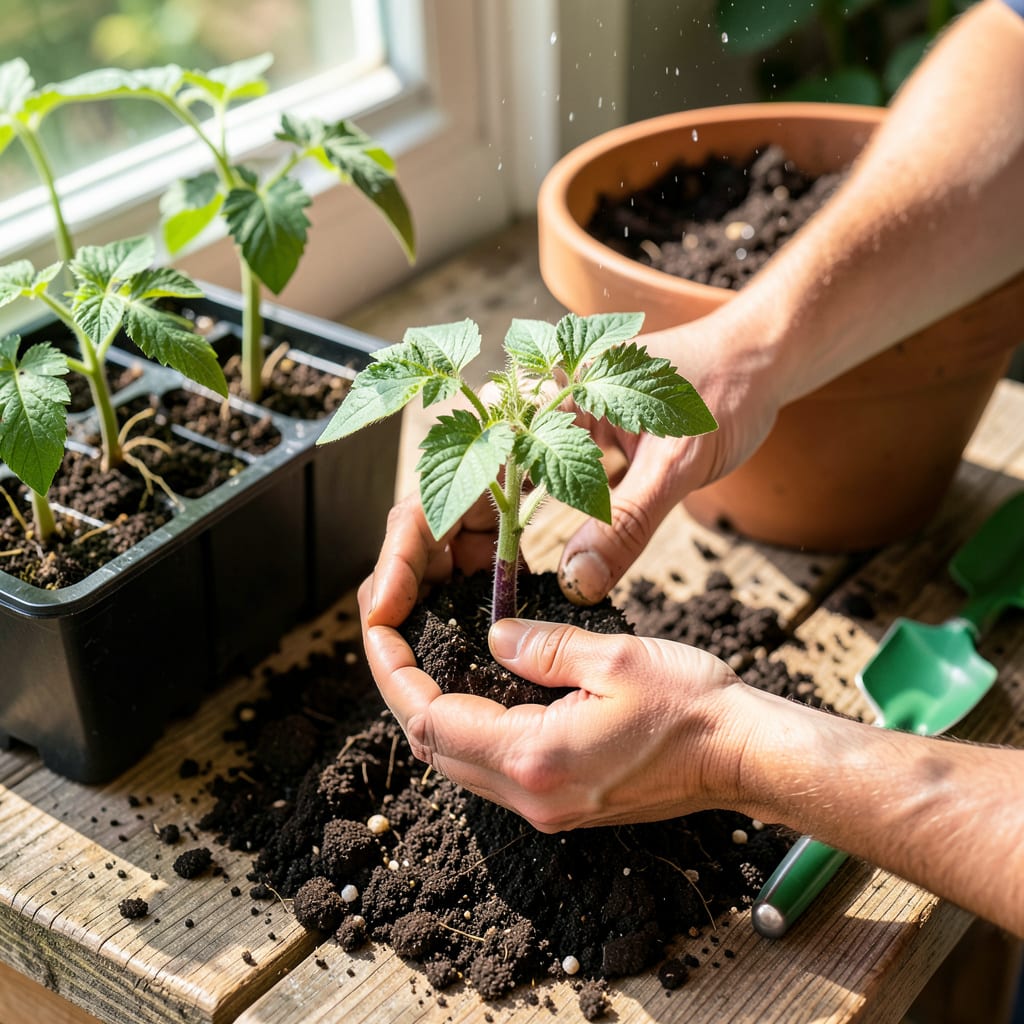
That first time I moved tomato seedlings into the garden, I nearly killed them all. The difference between leggy, struggling plants and thriving ones comes down to three critical steps—timing, technique, and aftercare. After years of trial and error, I’ve landed on a method that gives seedlings a 95% survival rate, even in unpredictable spring weather.
You’ll know they’re ready when they’ve got 2-3 sets of true leaves and roots peeking from the drainage holes. The real magic happens when you bury the stem deep, encouraging extra roots to form. Within a week, you’ll see them stand taller and push out new growth—proof they’ve taken hold. No more wilted, sad transplants.
📚 In This Guide
This is where your tomato plants either thrive or struggle—let’s make sure they get the best possible start.
Wait until seedlings have developed 3-4 true leaves (not counting the initial cotyledons) and reached 6-8 inches tall. This typically occurs 6-8 weeks after germination, depending on variety and growing conditions. Transplanting too early stresses plants, while waiting too long risks root-bound seedlings that never fully recover.
Check nighttime temperatures—tomatoes can’t tolerate anything below 50°F. If you’re moving them outdoors, wait until 2 weeks after your last frost date. For indoor container moves, timing is more flexible, but avoid transplanting during flowering—it disrupts fruit set.
Whether moving to larger containers or garden soil, prepare the site 24 hours before transplanting. For containers, use fresh well-draining potting mix (never reuse old soil) and ensure pots have drainage holes. For garden beds, amend soil with 2-3 inches of compost and test drainage by digging a 12-inch hole—if water pools after filling, improve drainage with perlite.
Water the new location thoroughly the day before. The soil should feel moist 3 inches down when you squeeze it—it should hold shape but not drip. This prevents transplant shock by giving roots immediate access to moisture. For containers, fill to within 1 inch of the rim to allow for watering.
Water seedlings 1 hour before moving to reduce root damage. Gently squeeze the sides of their current container to loosen the root ball, then turn it upside down with your hand supporting the stem between your fingers. If roots are circling, gently tease them apart with your fingertips—this encourages outward growth in the new location.
Dig a hole in the new location twice as wide as the root ball but only as deep. For leggy seedlings, plant them deeper—bury up to ⅔ of the stem (tomatoes develop roots along buried stems). Press soil firmly around the base, eliminating air pockets that could dry roots. Water immediately with 1 pint of water per plant to settle the soil.
Place transplants in bright, indirect light for the first 48 hours—even sun-loving tomatoes need this adjustment period. For outdoor plants, use shade cloth or position them where they’ll get morning sun only. Indoor transplants should go under grow lights set 12-18 inches above the plants for 14-16 hours daily.
Monitor closely for wilting—the first 3-5 days are critical. If leaves droop by afternoon, the roots aren’t established enough; provide temporary shade and mist leaves lightly. Avoid fertilizing for 7-10 days post-transplant—roots need to recover before processing nutrients. The first new growth after transplanting will be slower, but this is normal as the plant redirects energy to root development.
Getting this process right makes all the difference between struggling plants and a thriving tomato harvest. Here’s what I’ve learned from years of trial and error.
Timing Precision: The 6-8 week window mentioned in Step 1 isn’t arbitrary—it’s when seedlings develop the root structure needed to handle transplant shock. I’ve found that varieties like ‘Early Girl’ often hit the 3-4 true leaf stage at 6 weeks, while larger heirlooms may need the full 8 weeks. Don’t rush this; I once transplanted at 4 weeks and lost half my plants to shock. The 2-week post-frost guideline is equally critical—tomatoes exposed to temperatures below 50°F will stunt permanently, even if they survive.
Root Handling Technique: When loosening the root ball in Step 3, here’s what nobody tells you: if roots are severely circling (more than one full loop), make three vertical cuts with clean scissors down the sides of the root ball. This sounds drastic, but it forces roots to grow outward in their new home. I also soak my seedlings’ current containers in a tray of water for 10 minutes before moving—they slip out with zero root damage. The 1-hour pre-watering is non-negotiable; dry roots tear like paper.
Environmental Preparation: The 24-hour preparation in Step 2 isn’t just about moisture—it’s about soil biology. When you water the new location the day before, beneficial microbes activate and create a welcoming environment for roots. For garden beds, I take this further by covering the prepared area with black plastic for those 24 hours; this warms the soil by 5-10°F, giving transplants a head start. The 3-inch moisture test is brilliant—most people only check the surface. Stick your finger in: if it comes out clean at 3 inches, water again before transplanting.
Acclimation Strategy: Those first 48 hours of indirect light in Step 4 are when 80% of transplant failures occur. Here’s my protocol: set up a mini greenhouse using clear plastic storage bins (drill holes for airflow) over outdoor transplants. For indoor plants, I use a sheer curtain between grow lights and seedlings during this period. The 14-16 hour light requirement isn’t just about duration—it’s about consistency. I use a timer; even 30 minutes of variation can stress plants. If leaves wilt during this period, resist the urge to water more—it’s usually light stress, not thirst.
Transplant after the last frost date in your area (check local guides) when soil temps hit at least 50°F (10°C) at night. Seedlings should have 2-3 sets of true leaves and be 6-8 inches tall. Morning transplants reduce shock—avoid hot, sunny afternoons!
Bury two-thirds of the stem—up to the first set of leaves! Tomatoes grow roots along the stem, creating a stronger plant. Dig a hole deep enough to accommodate the buried portion, then gently firm the soil. Avoid compacting it too tightly.
Use 5-gallon containers (minimum) with drainage holes. Fill with potting mix (not garden soil) and add a slow-release fertilizer. Dwarf varieties thrive in pots; indeterminate types need sturdy stakes or cages. Place in full sun (6+ hours daily).
Wilting is often transplant shock. Water deeply before/after moving, and shade plants for 2-3 days (use row covers or cardboard). Avoid fertilizing for a week. If wilting persists, check for overwatering or pests like cutworms.
Yes! 7-10 days before transplanting, gradually expose seedlings to outdoor conditions: start with 1-2 hours in shade, increasing sun/wind time daily. Skip this step, and tender plants may suffer sunburn or stunted growth. Never leave them out overnight until hardened!
