
Beautiful Plants For Your Interior
Beautiful Plants For Your Interior
I’ve lost more orchids to overwatering than I’d like to admit. The problem isn’t just too much water—it’s about how orchids actually absorb moisture through their roots and leaves. What looks like thirst to us is often drowning to them. After years of trial and error (and several sad, mushy plants), I’ve learned to spot […]
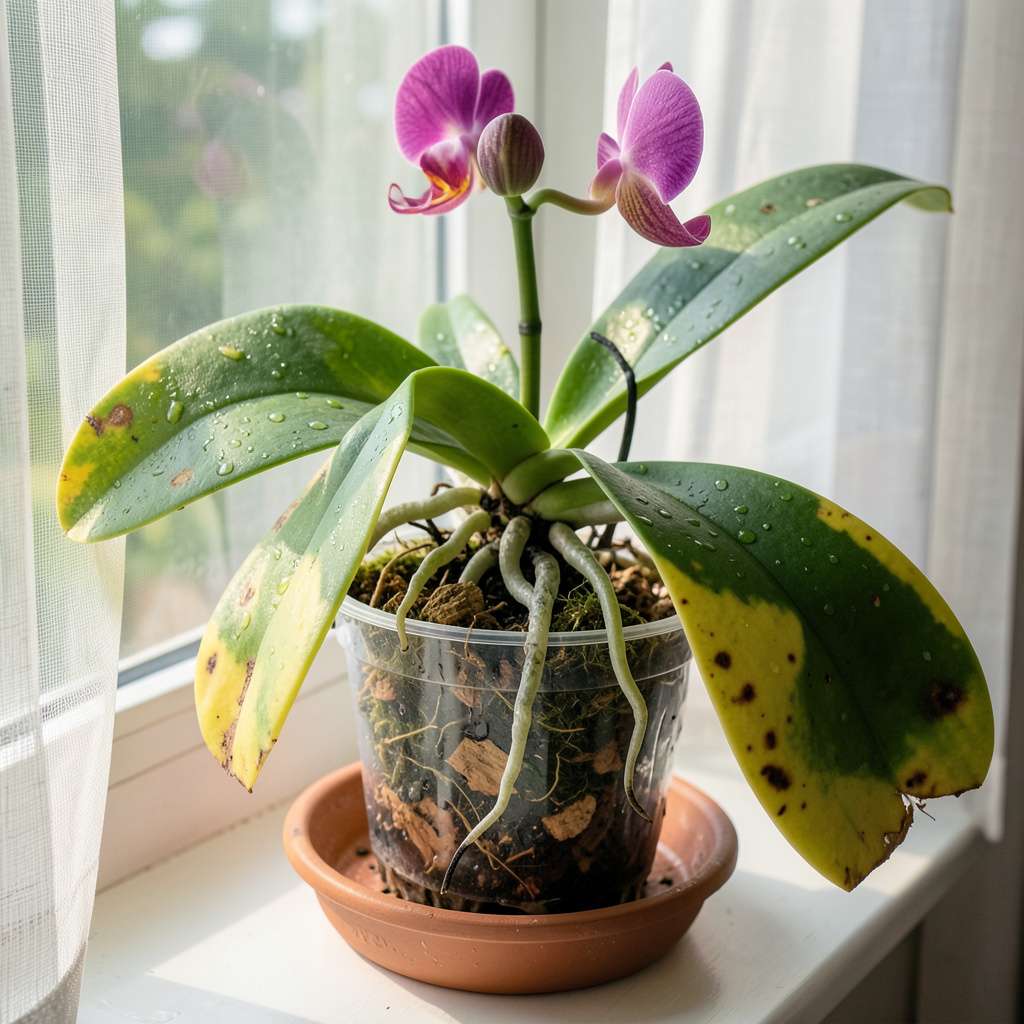
I’ve lost more orchids to overwatering than I’d like to admit. The problem isn’t just too much water—it’s about how orchids actually absorb moisture through their roots and leaves. What looks like thirst to us is often drowning to them. After years of trial and error (and several sad, mushy plants), I’ve learned to spot the warning signs before it’s too late.
Yellowing leaves, limp stems, and roots that look more brown than green are your orchid’s way of screaming for help. I used to think wrinkled leaves meant dehydration, but often it’s the opposite—the roots are so waterlogged they can’t deliver moisture to the plant. The soil should never stay soggy for more than a day, no matter what the care tag says.
Here’s the thing—most orchid problems start with watering habits, not the plant itself. I keep a moisture meter in my orchid pots now, but you can use your finger too. If the top inch feels damp, wait. If the roots look gray-green and firm, you’re doing it right. When they turn brown and mushy, you’ve crossed into dangerous territory.
The good news? Orchids are surprisingly forgiving if you catch the signs early. I’ve revived plants that looked beyond hope by adjusting my watering routine and giving their roots some air. You’ll see new growth within weeks once you get the balance right—firm roots, vibrant leaves, and maybe even a new flower spike.
📚 In This Guide
Let me show you exactly what to look for—these signs will help you catch problems before they become serious.
Start by looking at the leaves, which show the first visible signs of overwatering. Healthy orchid leaves should feel firm and appear bright green. If you notice leaves that are yellowing, particularly from the base outward, this is your first warning sign. The yellowing often begins at the leaf edges and moves inward.
Gently press the leaves between your fingers. Overwatered leaves will feel soft or mushy rather than firm. You might also see black or brown spots developing, which indicate that the cells have burst from too much water pressure. Don’t ignore these spots—they spread quickly if the watering issue continues.
Healthy orchid roots should be silver-green when dry and bright green when wet. Carefully remove the orchid from its pot to examine the roots. Overwatered roots will appear dark brown or black instead of green, and they’ll feel slimy or mushy to the touch. This is a sign of root rot, which can kill your plant if not addressed immediately.
Pay attention to the smell as well. Healthy roots have little to no odor, but rotting roots emit a foul, musty smell. If you detect this odor, it’s a clear indication that the roots have been sitting in water for too long. The longer roots stay in this condition, the harder it is for the plant to recover.
Orchid potting medium should dry out between waterings. Stick your finger about 1 inch deep into the medium. If it feels soggy or wet after more than a week, you’re watering too frequently. The medium might also develop a sour smell, which is another red flag that moisture levels are too high.
Look at the pot itself. If you see standing water in the saucer or the medium is compacted and waterlogged, drainage is inadequate. Orchids need air circulation around their roots, and waterlogged medium prevents this. I always recommend using pots with multiple drainage holes to prevent this issue.
An overwatered orchid will show stunted growth or no new growth at all. Check the base of the plant where new leaves and spikes emerge. If you don’t see any new growth after several weeks, or if existing leaves are dropping prematurely, overwatering is likely the culprit. The plant is too busy trying to survive to focus on growth.
Watch for bud blast, where flower buds yellow and drop before opening. This often happens when the plant is stressed from overwatering. I’ve seen this happen overnight—one day the buds look fine, and the next they’re shriveling. It’s heartbreaking but preventable with proper watering habits.
Overwatering creates the perfect environment for pests like fungus gnats and scale insects. If you notice tiny black flies around your orchid or see white cottony patches on the leaves, these pests have likely moved in because of the excess moisture. They’re not just annoying—they can weaken your plant further.
Check the undersides of leaves and the base of the plant for any signs of infestation. If you spot pests, isolate the plant immediately to prevent them from spreading. The presence of these pests is often a secondary sign that your watering routine needs adjustment.
Learning to read your orchid’s signals takes practice, but these insights will help you catch overwatering before it becomes a serious problem.
Early Detection Tip: Don’t wait for obvious signs like yellow leaves to appear. I’ve found that checking the roots weekly (as described in Step 2) catches problems much earlier than just watching the leaves. Healthy roots should bounce back when gently squeezed – if they stay indented or feel slimy, you’ve caught the issue before it affects the leaves. This simple habit has saved many of my orchids from irreversible damage.
Moisture Check Technique: The finger test in Step 3 works best when you check multiple spots in the potting medium. Sometimes the top inch feels dry while the bottom remains soggy. I always test near the pot’s edge and center – if either feels wet after more than a week, it’s time to adjust your watering schedule. Remember that bark-based mixes dry out faster than moss-based ones, so your testing frequency might need adjustment based on your specific medium.
Growth Pattern Insight: When monitoring for stunted growth in Step 4, pay special attention to the growing tips. New leaves should emerge with a crisp, firm texture. If they appear wrinkled or feel papery when unfolding, this often indicates water stress before you notice any yellowing. I’ve noticed this subtle sign appears about 2-3 weeks before more obvious symptoms like leaf drop or bud blast occur.
Prevention Strategy: After dealing with multiple cases of bud blast, I developed a simple prevention method: when you see flower spikes forming, reduce watering by about 20% until the buds open. The plant needs slightly drier conditions to focus energy on blooming rather than survival. This small adjustment has dramatically reduced bud blast in my collection, especially during humid weather when evaporation slows down.
Most orchids thrive with watering once every 7–10 days, but it depends on your environment. Check the roots—water only when they turn silvery-gray (for Phalaenopsis) or the potting mix feels almost dry. Pro tip: Use a wooden skewer to test moisture deep in the pot!
Yes! While soggy roots often cause yellow leaves, other culprits include too much direct sunlight, nutrient deficiencies, or natural aging (older leaves yellow first). Check the roots—if they’re firm and green, overwatering isn’t the issue.
Opt for a chunky, fast-draining mix like fir bark, sphagnum moss, or coconut husk chips. Avoid dense soil! Add perlite or charcoal for extra airflow. Orchids hate “wet feet,” so ensure pots have drainage holes.
Act fast!
Patience is key—new roots take time!
Misting alone isn’t enough—orchids need thorough root hydration. However, light misting (especially in dry climates) can supplement humidity between waterings. Just avoid soaking leaves overnight to prevent fungal issues.
Spotting the signs of overwatered orchids doesn’t have to be stressful! Remember: yellowing leaves, mushy roots, and a soggy potting mix are your biggest red flags. With a little observation and adjustments to your watering routine, your orchids will thrive in no time. 🌱
Now that you’re armed with knowledge, grab your watering can and check your orchids today! For extra peace of mind, consider investing in a moisture meter—it’s a game-changer for perfect hydration every time.
