
Beautiful Plants For Your Interior
Beautiful Plants For Your Interior
Root rot nearly claimed my favorite phalaenopsis last winter. The limp leaves and blackened roots looked hopeless—until I learned the right way to intervene. This isn’t just repotting; it’s emergency surgery for your orchid, and timing matters more than you’d think. I’ve saved dozens of orchids using this method after killing my first three from […]
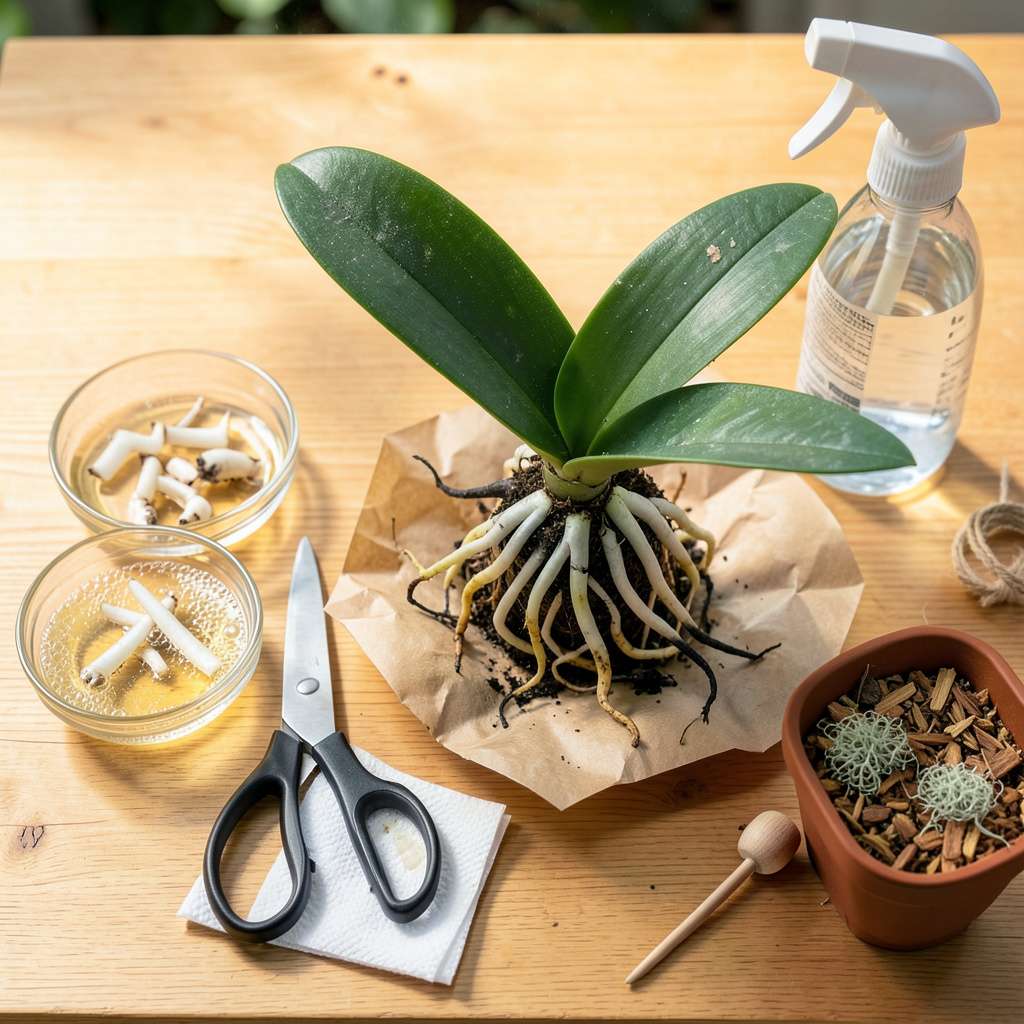
Root rot nearly claimed my favorite phalaenopsis last winter. The limp leaves and blackened roots looked hopeless—until I learned the right way to intervene. This isn’t just repotting; it’s emergency surgery for your orchid, and timing matters more than you’d think.
I’ve saved dozens of orchids using this method after killing my first three from well-meaning but wrong advice. The key lies in three critical steps: proper root assessment (most people cut too much), the right medium mix (never regular potting soil), and post-repotting conditions that mimic their natural habitat.
You’ll see new root growth within 2-3 weeks if done correctly, with the first signs of recovery appearing as firm white root tips. The same orchid that looked dead yesterday will push out fresh leaves and eventually rebloom—often stronger than before.
Works for any orchid variety showing root rot symptoms, from grocery-store phalaenopsis to prized cattleyas. Here’s exactly how to do it without the guesswork that costs plants their lives.
📚 In This Guide
This method has saved dozens of my orchids—follow it carefully, and you’ll see new growth within weeks.
Gently slide the orchid out of its pot by squeezing the sides to loosen the root ball. If roots cling stubbornly, run lukewarm water over the pot’s edges to release them. Lay the plant on a clean surface and examine the roots under bright light.
Healthy roots are firm and silvery-green when dry, turning bright green when wet. Rotten roots appear mushy, black, or hollow when squeezed. Use sterilized scissors to trim away all compromised tissue—cut 1/2 inch above the rot to ensure no pathogens remain. Don’t hesitate; leaving even a small section of rot guarantees recurrence.
Soak the remaining roots in a solution of 1 part 3% hydrogen peroxide to 3 parts water for 10 minutes. This kills lingering fungi and bacteria without harming the plant. While roots soak, wipe your scissors and new pot with 70% isopropyl alcohol to prevent recontamination.
After soaking, rinse roots under tepid water and pat dry with a clean paper towel. Look for any hidden rot in the crown where leaves meet—this area is particularly vulnerable. If you spot brown, soft tissue there, use a sterile cotton swab dipped in hydrogen peroxide to clean it gently.
Select a pot with 4-6 drainage holes and 1-2 inches larger than the previous one. Orchid roots need airflow, so avoid glass or glazed ceramic unless it has ample ventilation. Fill the bottom third with fresh orchid bark mix—never reuse old medium, as it harbors pathogens.
Position the orchid in the pot so the base sits 1 inch below the rim, allowing room for new roots to grow upward. Hold it steady while adding bark around the roots, tapping the pot occasionally to settle the medium. Don’t pack it tightly; roots need space to breathe and expand.
Secure the orchid with a stake if it wobbles—unstable plants divert energy from root regrowth. Place it in bright, indirect light (east-facing windowsill ideal) with temperatures between 65-75°F. Avoid direct sun, which stresses recovering roots.
Water sparingly: submerge the pot in room-temperature water for 10 seconds once a week, letting excess drain completely. You’ll see new root tips (bright green nubs) in 3-4 weeks if conditions are right. Mist leaves lightly every 2-3 days to maintain humidity without soggy roots.
Check roots weekly by lifting the pot—healthy new growth feels firm and silvery. If existing roots darken or soften, reduce watering immediately. After 6-8 weeks, when you see 3-4 inches of new root growth, resume normal orchid care.
Expect the first post-repotting bloom cycle to take longer. The plant is rebuilding its root system before focusing on flowers. I’ve found that orchids often produce stronger, longer-lasting blooms after recovering from root rot—it’s their way of thanking you for the rescue.
After rescuing countless orchids from root rot, I’ve learned that small details make all the difference between recovery and relapse.
The Trimming Technique: In Step 1, when cutting away rotten roots, always sterilize your scissors between cuts with 70% isopropyl alcohol. This prevents cross-contamination, especially if you’re working with multiple plants. I cut 1/2 inch above the rot as instructed, but I also make clean, angled cuts—this increases surface area for new root growth while ensuring no pathogens remain hidden in the vascular tissue.
Hydrogen Peroxide Precision: During Step 2’s 10-minute soak, use fresh 3% hydrogen peroxide—it loses potency once opened. The solution should bubble slightly when you add the roots; if it doesn’t, your hydrogen peroxide has degraded. I keep a dedicated bottle just for orchid care, stored in a cool, dark place to maintain its effectiveness.
Pot Selection Strategy: For Step 3, avoid the temptation to oversize the pot. While the instructions specify 1-2 inches larger, I’ve found that orchids recover fastest when the new pot feels just slightly snug. Too much space encourages the medium to stay wet longer, which stresses recovering roots. Clear plastic pots with 4-6 drainage holes are ideal—they let you monitor root health without disturbing the plant.
Environmental Control: The 65-75°F temperature range in Step 4 isn’t just a suggestion—it’s critical. Orchids recovering from root rot are particularly sensitive to temperature fluctuations. I use a small digital thermometer near my orchids to track conditions, and I avoid placing them near drafty windows or heating vents. Consistency accelerates that 3-4 week recovery timeline for new root tips.
No, never reuse the old mix! Root rot fungi and bacteria linger in the medium. Always use fresh, sterile orchid mix (bark-based or sphagnum moss) to prevent reinfection. If saving costs, bake used mix at 200°F for 30 minutes to sterilize—but fresh is safest for recovery.
Inspect roots every 2–3 weeks for the first 2 months. Gently tug the plant to check stability and look for black/mushy roots. Healthy new roots (silver-green tips) mean success! Reduce checks to monthly once the orchid stabilizes.
Don’t panic! Sphagnum moss soaking can help. Trim all rot, soak the base in diluted hydrogen peroxide (1 tsp/1 cup water) for 10 minutes, then place in a humid, warm spot (70–80°F). Mist daily—new roots may sprout in 4–8 weeks!
Bark (fir or orchid-specific) is best for most cases—it drains well and resists compaction. Use sphagnum moss only if humidity is very low (below 40%) or for rootless orchids. Avoid peat moss; it stays too wet!
Yellowing leaves post-repot are often stress-related, not rot. Check for:
Trim only fully yellow leaves—green ones may recover!
Repotting an orchid with root rot doesn’t have to be intimidating—just remember, patience and precision are key! 🌱 By trimming damaged roots, choosing the right potting mix, and providing gentle aftercare, you’ve given your orchid a fresh start. Most plants bounce back with proper attention, so don’t lose hope if progress feels slow.
Now that your orchid is repotted, keep a close eye on its moisture levels and adjust your watering routine to prevent future rot. Ready to take your orchid care to the next level? Explore our guide on ideal lighting and humidity to help your plant thrive long-term! 💚
