
Beautiful Plants For Your Interior
Beautiful Plants For Your Interior
Those wild, wandering air roots on your orchid aren’t a problem—they’re a sign your plant is ready for a fresh start. I used to panic when I saw them escaping the pot, thinking I’d done something wrong. Turns out, orchids with air roots are just telling you they need more space to thrive. The first […]
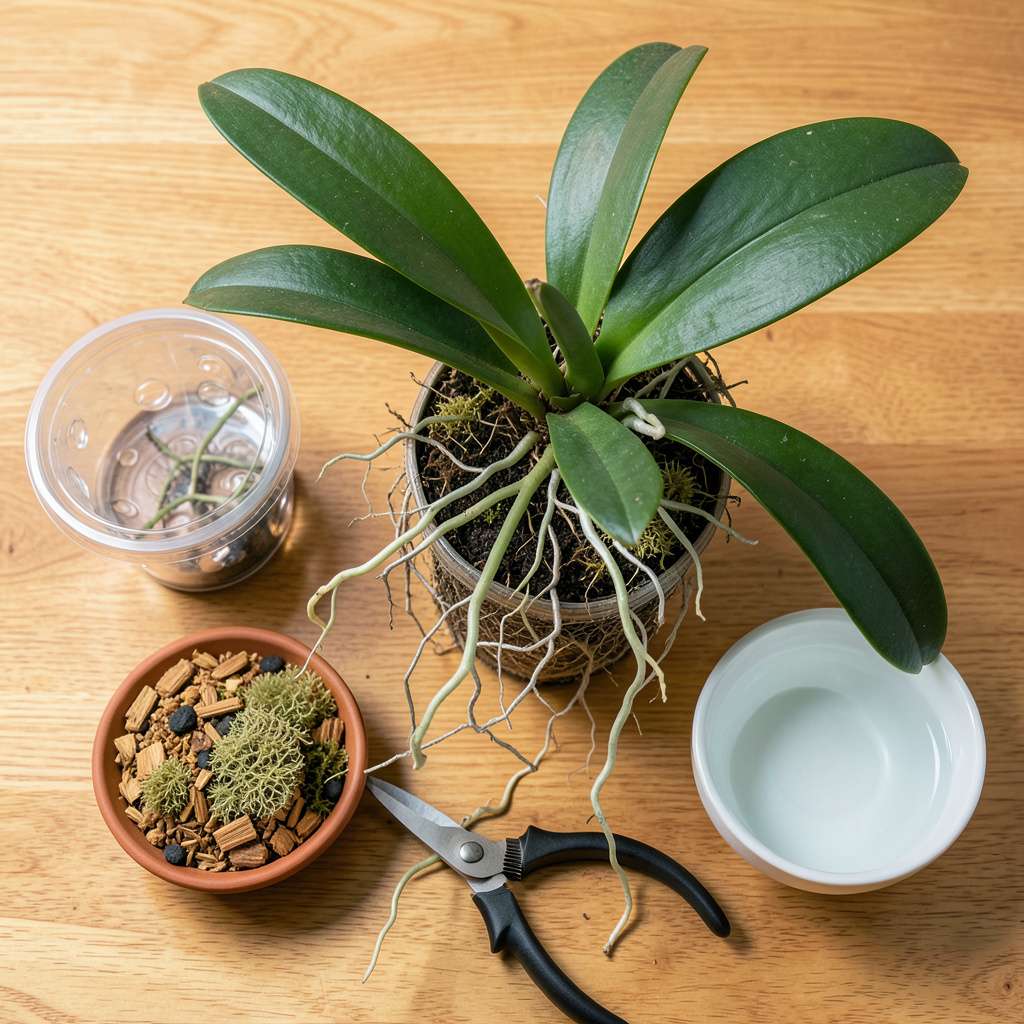
Those wild, wandering air roots on your orchid aren’t a problem—they’re a sign your plant is ready for a fresh start. I used to panic when I saw them escaping the pot, thinking I’d done something wrong. Turns out, orchids with air roots are just telling you they need more space to thrive.
The first time I repotted one, I made every mistake possible: wrong pot size, too-dense soil mix, and I even tried to bury those air roots (spoiler: don’t do that). Now I’ve got a foolproof method that keeps my orchids blooming for years. The key is working with those air roots, not against them.
You’ll end up with a healthier plant that rewards you with more flowers and stronger growth. The process takes less than 30 minutes once you know the tricks—like when to trim roots and how to position them in the new container. I’ll walk you through each step so you don’t repeat my early disasters.
Works for any orchid variety, whether you’re dealing with a phalaenopsis from the grocery store or a prized cattleya. Here’s exactly how to give your plant the fresh home it’s asking for.
📚 In This Guide
This gentle process will help your orchid transition smoothly while protecting those delicate air roots.
Gather a clean 6-8 inch orchid pot with ample drainage holes—clear plastic works best so you can monitor root health. I use a pot just 1-2 inches larger than the current one to prevent overpotting, which leads to root rot. Lay out sterilized orchid bark mix, sharp scissors or pruners, and a bowl of lukewarm water.
Choose a well-lit workspace where you can spread out. I like working on a clean towel to catch debris and prevent slipping. Soak the orchid bark in water for 10 minutes to hydrate it before potting—this prevents it from stealing moisture from the roots later.
Gently squeeze the sides of the old pot to loosen the root ball, then slide the orchid out. If it resists, run a butter knife around the inner edge to free stubborn roots. Hold the plant by the base of the stem—not the leaves—to avoid damage.
Rinse the roots under lukewarm water to remove old media. Healthy air roots should feel firm and appear silvery-green when wet. Trim any black, mushy, or hollow roots with sterilized scissors—these won’t recover. Don’t worry if you see lots of air roots; they’re normal and should never be buried.
Place a 1-inch layer of pre-moistened bark in the new pot. Position the orchid so the base of the stem sits just below the rim, allowing air roots to drape naturally over the sides. The goal is stability without forcing roots downward.
Hold the plant steady with one hand while using the other to tuck bark around the base. Don’t pack it tightly—orchid roots need airflow. Leave the top third of the pot empty to accommodate future growth. Air roots should remain exposed; burying them causes rot.
Use a bamboo stake and soft tie to support the stem if needed, but avoid restricting air roots. Water the orchid immediately after repotting by placing the pot in a bowl of water for 10-15 minutes, allowing the bark to absorb moisture through the drainage holes.
Let excess water drain completely before returning the plant to its decorative pot or saucer. Place it in bright, indirect light (east or north window) and avoid direct sun for 5-7 days while it recovers. You’ll see new root growth in 2-4 weeks if conditions are right.
Check the plant daily for the first week. Healthy air roots will plump up and turn green when hydrated. Mist exposed roots lightly every 2-3 days if your home is dry, but never let water pool in the crown.
Resume normal watering (every 7-10 days) once you see active new growth. The first bloom cycle after repotting may take 6-12 months, but you’ll be rewarded with stronger, healthier flowers. I’ve found repotted orchids often produce more blooms than neglected ones.
Repotting orchids with air roots can feel intimidating, but these practical insights will help you avoid common pitfalls and set your plant up for success.
Hydration Preparation: The 10-minute soak for orchid bark in Step 1 isn’t just a suggestion—it’s crucial. Dry bark will pull moisture from your orchid’s roots during that critical first week. I learned this the hard way after losing two orchids to dehydration. Trust me, those 10 minutes make all the difference in helping your plant transition smoothly.
Root Handling Technique: When you’re inspecting roots in Step 2, work quickly but gently. Healthy air roots should feel firm like cooked spaghetti, not mushy or hollow. I use a spray bottle with lukewarm water to keep roots moist during inspection—this prevents them from drying out while you work. Never force roots downward into the pot; let them drape naturally over the sides.
Positioning for Growth: In Step 3, leaving the top third of the pot empty isn’t just about aesthetics—it’s about future growth. Orchids grow upward, and that space allows new roots and leaves to emerge without crowding. I’ve found that plants in properly spaced pots show new root growth within those 2-4 weeks mentioned in Step 4, while crowded orchids take much longer to recover.
Recovery Period Insight: The 5-7 days of indirect light in Step 4 is when your orchid is most vulnerable. This isn’t the time to move it around your house. Find a stable spot with consistent bright, indirect light (an east-facing window works perfectly) and leave it there. I check my orchids daily during this period, looking for those plump, green air roots that signal successful recovery.
No, never trim healthy air roots! They absorb moisture and nutrients. Only remove roots that are mushy, black, or completely dried out using sterilized scissors. Healthy air roots (silver-green or white) should be gently tucked into the new pot or left exposed—they’ll adapt naturally.
How often should I repot an orchid with lots of air roots?
Repot every 1–2 years or when roots overflow the pot. Air roots signal it’s time for a larger home! Spring (after blooming) is ideal, but act immediately if roots look crowded or the medium breaks down. Over-repotting stresses orchids, so stick to this schedule.
Use a chunky, fast-draining mix like fir bark, sphagnum moss, or coconut husk chips. Avoid dense soil—it suffocates roots! For air roots, leave some exposed or choose a slotted pot. Pre-moisten the mix to prevent root shock during repotting.
Brown roots often mean overwatering or poor drainage. Check the mix isn’t compacted and ensure the pot has drainage holes. Trim damaged roots, let the plant dry slightly between waterings, and avoid direct sun until it recovers.
It’s not ideal, but you can if roots are in crisis (rot/mold). Expect some flower drop—prioritize the plant’s health! If possible, wait until blooms fade. Post-repot, keep conditions stable (indirect light, 60–70°F) to reduce stress.
Repotting an orchid with air roots doesn’t have to be intimidating! 🌱 By choosing the right pot, handling roots gently, and providing proper aftercare, you’re setting your plant up for healthier growth and stunning blooms. Remember, those air roots are a natural part of your orchid’s beauty—just give them space to thrive.
Now that your orchid is snug in its new home, keep an eye on its progress and adjust your care routine as needed. Ready to take your skills further? Explore our guide on orchid fertilization to keep that growth going strong! 💐
