
Beautiful Plants For Your Interior
Beautiful Plants For Your Interior
That sad-looking orchid from the grocery store? It’s not doomed—it just needs a fresh start. I’ve revived dozens of store-bought orchids by giving them a proper home, and the transformation is shocking. Within weeks, limp leaves perk up, roots plump with health, and new flower spikes emerge. The secret isn’t magic; it’s timing, technique, and […]
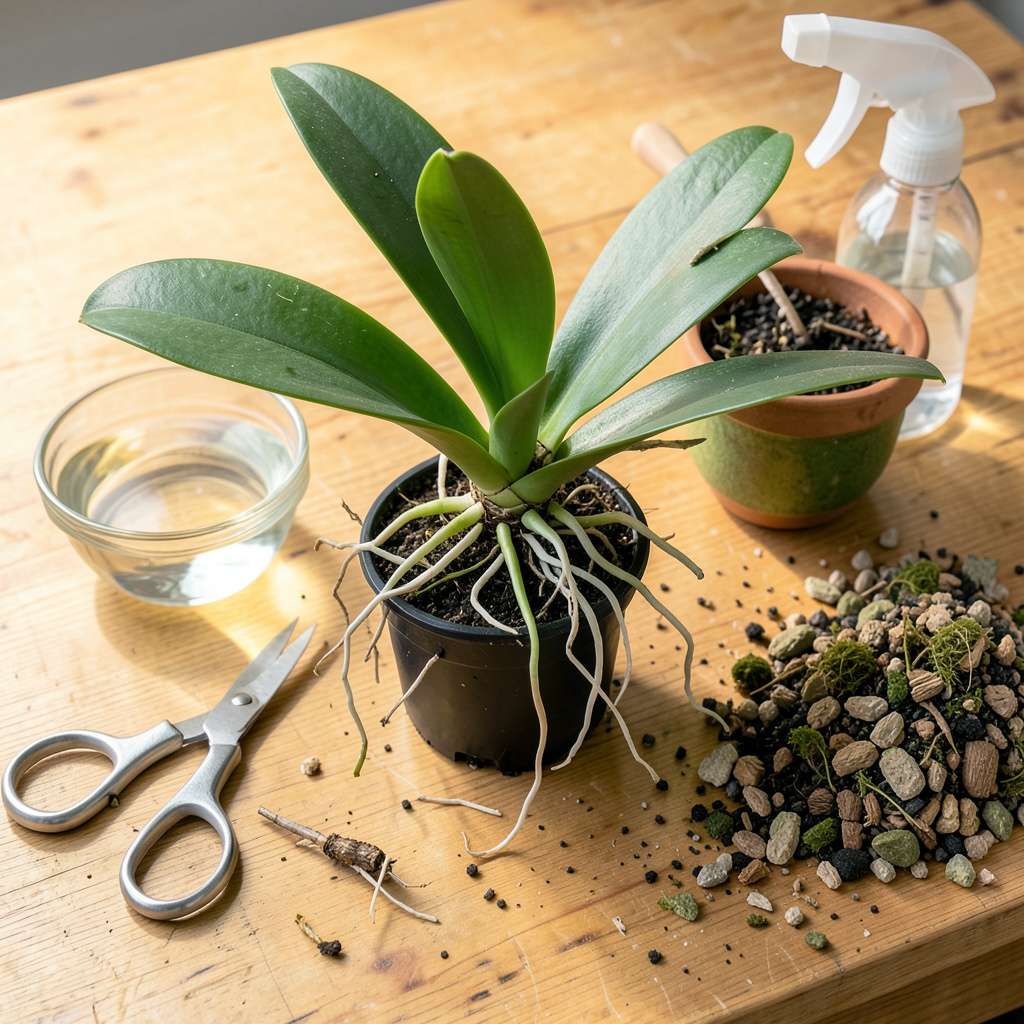
That sad-looking orchid from the grocery store? It’s not doomed—it just needs a fresh start. I’ve revived dozens of store-bought orchids by giving them a proper home, and the transformation is shocking. Within weeks, limp leaves perk up, roots plump with health, and new flower spikes emerge. The secret isn’t magic; it’s timing, technique, and the right materials.
Most store orchids suffocate in soggy, compacted bark that’s past its prime. Repotting isn’t just about aesthetics—it’s about survival. I use a simple mix of fresh orchid bark, a pot with drainage holes, and a gentle touch to avoid damaging delicate roots. The process takes 20 minutes and costs less than replacing a dying plant.
You’ll know it worked when you see firm, silver-green roots snaking through the new medium. First-time blooms after repotting feel like winning the lottery—especially when neighbors ask how you keep yours alive. Even my once-crisis-prone phalaenopsis now reblooms reliably every 8-10 months.
Works for any store-bought orchid, from big-box finds to fancy nursery specimens. The key is acting before the roots rot—here’s exactly how to do it right.
📚 In This Guide
This gentle process will give your orchid fresh growing space while protecting its delicate roots—follow these steps after blooming ends.
Carefully slide the orchid from its plastic grower pot by squeezing the sides gently to loosen the root ball. If roots cling stubbornly, run warm water over the pot’s sides for 30 seconds to ease removal. Never pull forcefully—orchid roots break easily when dry or tangled.
Shake off the old bark mix and examine the roots. Healthy roots appear silver-green when dry and bright green when wet. Trim any black, mushy, or hollow roots with sterilized scissors, cutting 1/4 inch above the damaged section. This prevents rot from spreading to healthy tissue.
Select a pot with 1-2 inches of extra diameter and multiple drainage holes—orchids suffocate in stagnant moisture. Clear plastic lets you monitor root health, while clay provides stability for top-heavy plants. Soak the new pot in warm water for 10 minutes if using clay to prevent it from wicking moisture away from roots.
Use a chunky orchid bark mix (never regular potting soil). Pre-moisten it by soaking in room-temperature water for 15 minutes, then drain thoroughly. The mix should feel damp but not dripping—soggy medium leads to root rot. Add a 1-inch layer of mix to the pot’s base for elevation.
Place the orchid in the pot so the base of the lowest leaf sits just above the rim—this prevents water from pooling at the crown, which causes fatal rot. Spread the roots evenly over the base layer, letting thicker roots drape naturally. Avoid bending or forcing roots into unnatural positions.
Hold the plant steady and fill the pot with moistened bark, tapping gently to settle it around roots. The mix should anchor the plant firmly but not compact tightly—orchid roots need air circulation. For extra stability, thread a bamboo stake through the mix beside the stem and secure the plant with a loose twist tie.
After repotting, water thoroughly until water runs freely from the drainage holes. Let the pot drain completely—never let the orchid sit in a saucer of water. The first watering helps the bark settle around roots and removes air pockets that could dry out delicate root tips.
Place the orchid in bright, indirect light (east or north windows work well) and avoid direct sun for 7-10 days. Skip fertilizer for 2-3 weeks—fresh roots are sensitive to salt burn. Mist the leaves lightly every 2-3 days to maintain humidity while the plant adjusts to its new home.
Repotting orchids doesn’t have to be intimidating—these key insights will help you avoid common pitfalls and set your plant up for success.
Root Handling Technique: When removing the orchid in Step 1, those 30 seconds of warm water are crucial. I learned the hard way that dry roots snap like twigs, while properly hydrated ones become pliable. If roots still resist, soak the entire pot in room-temperature water for 5 minutes—this gives stubborn roots time to detach without damage. Always use sterilized scissors for trimming, and remember that 1/4 inch buffer above damaged sections prevents rot from spreading to healthy tissue.
Medium Preparation Secret: The 15 minutes of soaking bark in Step 2 isn’t just about moisture—it’s about removing dust and fine particles that could compact and suffocate roots. After draining, squeeze a handful: it should hold shape briefly then crumble. If it drips, spread it on a tray for 10 minutes to achieve that critical damp-but-not-soggy consistency. This precise moisture level mimics orchids’ natural epiphytic environment where roots breathe between rain showers.
Positioning Precision: In Step 3, that instruction about keeping the base of the lowest leaf above the pot rim is your insurance against crown rot. I use a simple trick: place a ruler across the pot—where it crosses the rim is your maximum planting depth. When spreading roots, think of arranging them like spokes on a wheel rather than stuffing them in. Thicker roots can drape over the sides; they’ll find their way into the medium naturally as you add bark.
Acclimation Wisdom: The 7-10 day indirect light period in Step 4 isn’t just caution—it’s when orchids rebuild their root system’s moisture regulation. During this time, I’ve found that misting leaves every 2 days (rather than the maximum 3) prevents the stress of humidity fluctuations. Skip that temptation to fertilize during these 2-3 weeks; new roots are as sensitive as newborn skin, and even diluted fertilizer can cause microscopic burns that stunt growth for months.
Repot within 1-2 weeks of purchase if the roots look crowded or the medium is degraded (e.g., moss breaking down). If the orchid is actively blooming, wait until the flowers fade to avoid stressing the plant. Healthy roots in fresh medium can wait 3-6 months.
No—store-bought orchids often come in low-quality sphagnum moss or bark that retains too much moisture. Always use fresh, orchid-specific mix (bark/fiber blend) to prevent rot and improve airflow. Old mix may harbor fungi or salts from fertilizers.
Trim all soft, black, or foul-smelling roots with sterilized scissors. Healthy roots are firm and green/silver. Soak the remaining roots in 3% hydrogen peroxide (1:10 dilution) for 10 minutes to disinfect before repotting.
Skip watering for 5-7 days to let roots heal from handling. Mist lightly if humidity is low. After a week, resume normal watering (soak for 10 minutes, then drain). Overwatering post-repot is the #1 cause of shock!
Never! Orchids suffocate in soil—use orchid bark mix only. For decorative pots, place a plastic nursery pot inside the cachepot and remove it for watering. No drainage = root rot risk.
Repotting your store-bought orchid doesn’t have to be intimidating! 🌱 With the right materials, gentle handling, and a little patience, you’ve given your plant a fresh start for healthier roots and stunning blooms. Remember, the key is timing—wait until after flowering and use a well-draining mix to mimic its natural habitat.
Now that your orchid is snug in its new home, keep an eye on its progress and adjust your care routine as needed. Ready to take your orchid game further? Explore our guide on post-repotting care to ensure your beauty thrives for years to come! 💐
