
Beautiful Plants For Your Interior
Beautiful Plants For Your Interior
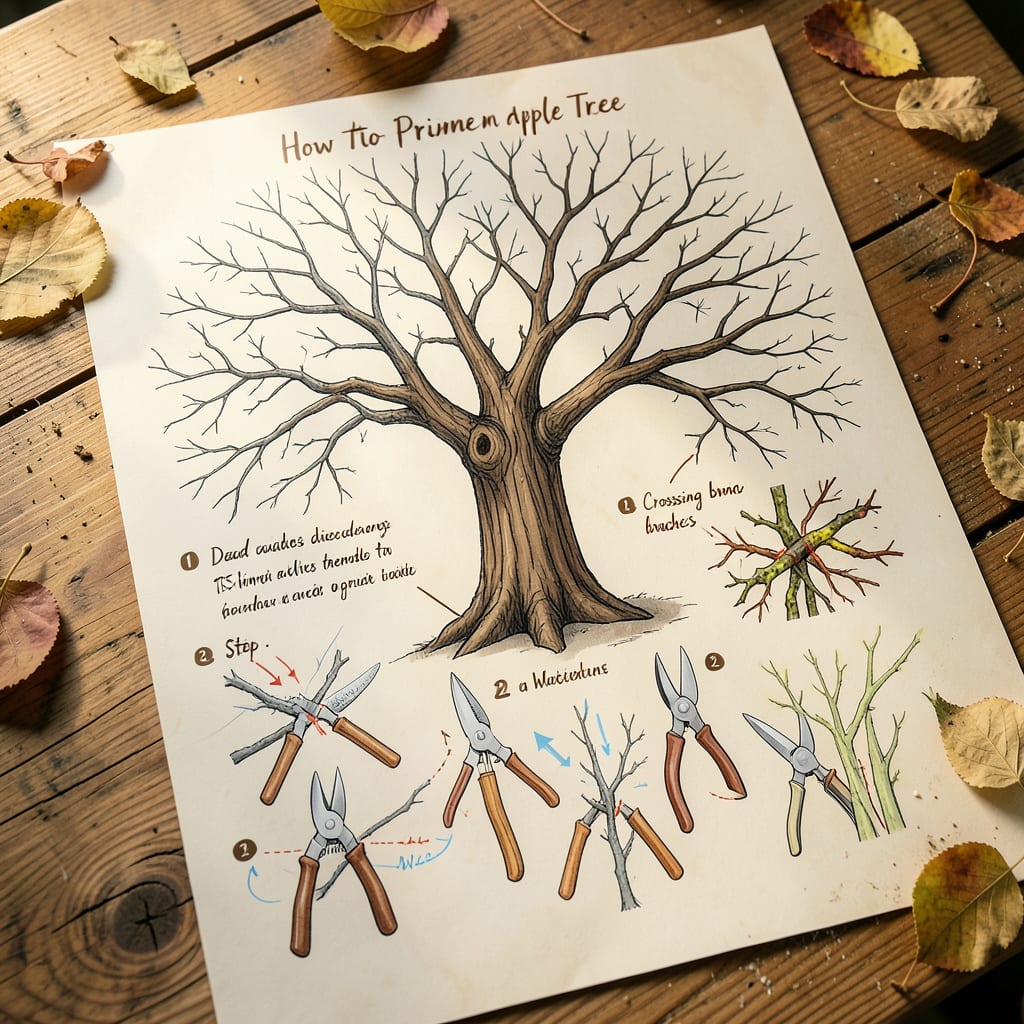
That first time I stood under my overgrown apple tree with pruners in hand, I froze. What if I cut the wrong branch? What if I ruined next year’s harvest? Turns out, pruning isn’t about guesswork—it’s about following a few simple rules that actually make the tree stronger and more productive.
Done right in late winter, you’ll see more fruit, fewer diseases, and a tree that practically thanks you with vigorous new growth. The diagram I’m sharing breaks it down visually—where to cut, what to remove, and how to shape the tree for years of better harvests. No horticulture degree required, just sharp tools and about 30 minutes of focused work.
📚 In This Guide
Pruning transforms your tree’s health and fruit production—here’s my field-tested approach to do it right.
Late winter or early spring—when the tree is still dormant but before buds swell—is ideal. I always prune on a dry day when temperatures stay above 32°F to prevent frost damage to fresh cuts. Stand back and examine the tree’s overall shape first. Look for dead, diseased, or crossing branches that need immediate removal.
Identify the tree’s central leader (the main upward-growing trunk) and primary scaffold branches (the main side branches). Your goal is to maintain an open “vase” shape that allows sunlight and air to reach the center. I like to walk completely around the tree before making any cuts—you’ll spot different issues from each angle.
Start with the “3 D’s”: dead, diseased, and damaged wood. Cut these back to healthy tissue using clean, sharp bypass pruners. For larger branches (over 1 inch diameter), use a pruning saw. Make cuts at a 45-degree angle just outside the branch collar (the swollen area where the branch meets the trunk).
Next tackle crossing branches that rub against each other, and any that grow straight up (called “water sprouts”) or straight down. Remove about one-third of the oldest branches each year to encourage new, productive growth. I always step back after every few cuts to check my progress—the tree should look more open but not skeletal.
Focus on branches growing toward the tree’s center or those that create dense clusters. Remove entire branches rather than just trimming tips—this prevents excessive regrowth. Leave 6-12 inches of space between remaining branches to improve air circulation and light penetration.
Pay special attention to the tree’s interior. You should be able to see through the canopy when you’re done. I like to visualize throwing a softball through the branches—if it wouldn’t pass easily, I need to remove more. Remember that fruit develops on spurs (short, stubby growths), so preserve these while removing excess wood.
Shorten last year’s growth on remaining branches by about one-third to encourage fruiting spurs. Make these “heading back” cuts just above an outward-facing bud. This directs new growth away from the tree’s center. Leave the strongest, most horizontally-growing branches—they’ll produce the best fruit.
Maintain the central leader as the tallest point, with scaffold branches arranged in a spiral pattern up the trunk. I aim for branches that are 18-24 inches apart vertically to prevent shading. Step back frequently to check your work—the tree should have a balanced, slightly conical shape when finished.
Remove all cut branches from the area and dispose of them (don’t compost diseased wood). Apply a thin coat of pruning sealer to cuts larger than 1 inch in diameter to prevent pests and disease. Water the tree deeply after pruning to help it recover from the stress.
Watch for new growth in spring. If you see excessive water sprouts, rub them off when they’re small. The tree may look drastic at first, but you’ll see vigorous new growth within 4-6 weeks. I always mark my calendar to check for regrowth after 30 days—that’s when you can make any necessary adjustments.
Pruning apple trees is both an art and a science—these practical insights will help you avoid common pitfalls and get better results.
Timing is Everything: The window for pruning in late winter or early spring is crucial because the tree is still dormant but about to wake up. I’ve found that waiting until temperatures consistently stay above 32°F prevents frost damage to fresh cuts, which can invite disease. If you prune too early in winter, the cold can shock the tree. Too late, and you risk removing potential fruit buds that have already formed.
Tool Selection Matters: Using the right tool for the job makes all the difference. Bypass pruners work beautifully for branches under 1 inch diameter, but trying to force them on thicker branches will leave ragged cuts that heal poorly. For anything larger, switch to a pruning saw—it gives you the clean, precise cuts that help the tree recover faster. I keep both tools sanitized with rubbing alcohol between cuts to prevent spreading disease.
The Angle Secret: Those 45-degree angle cuts in Step 2 aren’t just for looks—they help water run off instead of pooling on the cut surface, which can lead to rot. Make sure you’re cutting just outside the branch collar (that swollen area where the branch meets the trunk) but not leaving a stub. I like to visualize the cut as a gentle slope away from the trunk, which gives the tree the best chance to heal properly.
Visualizing the End Result: Before making any cuts, I literally close one eye and squint at the tree to visualize its final shape. This helps me identify which branches to remove to achieve that open “vase” shape mentioned in Step 1. The softball test in Step 3 is genius—if you can’t imagine throwing a softball through the branches, you haven’t thinned enough. Remember, you want sunlight and air to reach the center, which is where some of the best fruit will develop.
The ideal time is late winter to early spring (February–March) while the tree is still dormant. Avoid pruning in fall, as fresh cuts won’t heal before winter. Light summer pruning (June–July) can also help control growth, but avoid heavy cuts during active fruiting.
Yes! While a diagram helps visualize cuts, focus on removing dead/diseased wood, crossing branches, and inward-growing limbs. Follow the “3 D’s” rule: Dead, Damaged, Diseased. For beginners, marking branches with ribbon before cutting can simplify the process.
Over-pruning (removing >25% of the canopy) stresses the tree, reducing fruit production and inviting pests/diseases. Signs include stunted growth, excessive suckers, or sunburned bark. Stick to moderate cuts and spread pruning over 2–3 years if the tree is overgrown.
For younger trees, try espalier training (guiding branches horizontally) or summer pinching (removing new shoot tips). Mature trees benefit from thinning cuts (removing entire branches) over heading cuts (trimming branch tips). Always sanitize tools to prevent disease spread!
Temporary “shock” is normal—leaves may wilt or growth slow for a few weeks. If the tree doesn’t rebound by mid-spring, check for improper cuts (flush to the trunk), disease, or pest infestations. Apply a thin layer of mulch and water deeply to aid recovery.
