
Beautiful Plants For Your Interior
Beautiful Plants For Your Interior
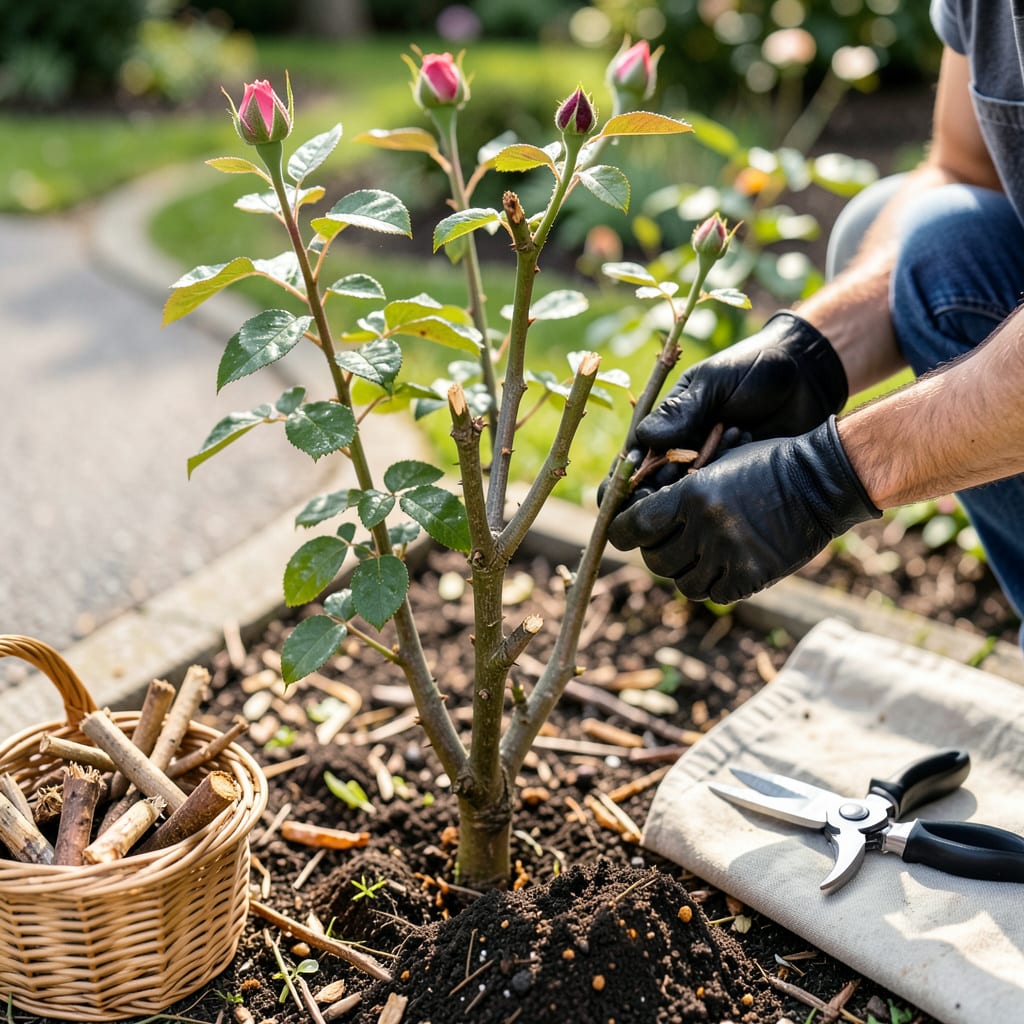
That first time I pruned my rose bush, I nearly chickened out. The idea of cutting back something that was supposed to bloom felt wrong—until I saw the results. Pruning isn’t about hurting your plants; it’s about waking them up. A well-pruned rose bush puts all its energy into producing bigger, healthier blooms instead of struggling with dead or tangled branches.
Timing and technique make all the difference. Do it right, and you’ll get a bush that’s fuller, more vibrant, and covered in flowers come spring. No fancy tools required—just sharp pruners, a little confidence, and knowing where to make the cut. I’ll walk you through exactly how to do it without the guesswork.
📚 In This Guide
This method transforms overgrown bushes into healthy, bloom-packed plants—no guesswork required.
Prune in late winter or early spring, just as new growth begins (you’ll see tiny red buds swelling on the canes). This timing prevents winter damage while giving cuts time to heal before vigorous growth starts. For repeat-blooming roses, I also do a light pruning after the first flush of flowers fades in summer.
Use sharp bypass pruners (the scissor-style ones) that make clean cuts without crushing stems. I keep a small hand saw nearby for thicker canes over ½ inch diameter. Always wipe pruner blades with rubbing alcohol between cuts to prevent disease spread—this simple step saves countless roses from fungal infections.
Start by cutting out all dead wood (it’s brown or black inside when you scratch the bark). Make each cut at a 45-degree angle, about ¼ inch above an outward-facing bud. This angle lets water run off while the bud direction encourages growth away from the bush center for better air circulation.
Next, remove any canes with black spots (black spot fungus) or white powdery coating (powdery mildew). Cut these back to healthy wood—you’ll recognize it by the green layer just under the bark. Don’t hesitate to remove entire canes if needed; I’ve seen bushes rebound beautifully after aggressive removal of diseased growth.
Cut out any canes growing toward the center of the bush. These create crowded conditions where diseases thrive. Aim to create an open vase shape that lets sunlight reach all parts of the plant. I visualize the ideal structure as having 5-7 main canes radiating outward like spokes on a wheel.
Shorten remaining healthy canes by about one-third of their length. For hybrid teas, cut back to 18-24 inches from the ground. Floribundas and shrub roses do best at 2-3 feet. You’ll know you’ve cut enough when the bush looks balanced but not stubby—think of giving it a good haircut, not a buzzcut.
Every cut should be smooth and made in one motion—no jagged edges that invite pests. Cut just above a bud that faces outward from the bush center. This placement ensures new growth extends away from the middle, preventing that tangled look some roses develop over time.
After each cut, check the cane’s pith (the center). If it’s brown or hollow, keep cutting downward until you reach white, firm pith. I’ve found this extra attention to detail prevents dieback later in the season. Seal cuts larger than ½ inch diameter with pruning sealer to protect against borers.
Rake up all debris around the bush—fallen leaves and cut canes can harbor diseases. I like to bag this material rather than compost it, just to be safe. Water the bush deeply after pruning to help it recover from the stress. You’ll see new growth emerging within 2-3 weeks if conditions are right.
Apply a balanced rose fertilizer (10-10-10) around the drip line after pruning. Scratch it lightly into the soil surface—this gives roots immediate access to nutrients. I follow up with a 2-inch layer of mulch to conserve moisture and suppress weeds during the critical regrowth period. Your reward comes in about 6-8 weeks when you’ll see the first flush of bigger, healthier blooms than ever before.
Pruning roses doesn’t have to be intimidating—these practical insights will help you avoid common pitfalls and get the most blooms from your bushes.
Timing is Everything: The late winter to early spring window mentioned in Step 1 is crucial because it allows cuts to heal before the plant puts energy into new growth. I’ve found that pruning too early (before those tiny red buds appear) risks winter damage, while pruning too late can reduce your first bloom cycle. For repeat-blooming varieties, that summer pruning after the first flush really does encourage a second wave of flowers—don’t skip it if you want continuous color.
Cutting Technique Matters: When making those 45-degree angle cuts in Step 2, I can’t stress enough how important it is to find an outward-facing bud. This isn’t just about aesthetics—it actually directs new growth away from the center, which improves airflow and reduces disease risk. I learned the hard way that cutting too close (less than that ¼ inch above the bud) can damage the bud, while cutting too far away leaves a stub that might die back.
Don’t Fear Aggressive Pruning: Many gardeners hesitate to remove as much as one-third of the cane length in Step 3, but trust me—roses are tougher than they look. I’ve seen bushes that looked like stubs after pruning come back stronger than ever. The 5-7 main cane structure creates that ideal vase shape that lets sunlight reach all parts of the plant, which means more blooms and fewer disease problems. For hybrid teas, sticking to that 18-24 inch height really does produce the best flower quality.
Tool Maintenance Tip: The instruction to wipe pruner blades with rubbing alcohol in Step 1 isn’t just good advice—it’s a game-changer for preventing disease spread between cuts. I keep a small spray bottle of alcohol with my tools and wipe after every few cuts, especially when dealing with diseased wood. This one simple habit has dramatically reduced fungal problems in my garden. Also, don’t underestimate the value of that small hand saw for thicker canes—trying to force pruners through wood over ½ inch diameter can damage both your tools and the plant.
The ideal time depends on your climate! For most regions, late winter or early spring (just before new growth starts) is best. In warmer zones, prune in January or February; colder areas should wait until March or April. Avoid pruning in fall—it can stimulate tender growth that winter may damage.
Yes, but only for light maintenance! Summer pruning (called “deadheading”) removes spent blooms to encourage more flowers. Avoid heavy pruning—it can stress the plant in heat. If you must cut back overgrown canes, do it early summer and water well afterward.
Don’t panic—roses are resilient! Over-pruning may delay blooming or reduce vigor, but it rarely kills a healthy bush. Focus on removing no more than ⅓ of the plant at once. If you’ve gone overboard, water deeply, fertilize lightly, and give it time to recover.
Skip the scissors—they crush stems! Use sharp bypass pruners (for canes under ½-inch thick) or lopping shears (for thicker stems). Clean tools with rubbing alcohol between cuts to prevent disease. A pruning saw helps for old, woody growth. Pro tip: Dull tools make jagged cuts that heal slower!
Climbers bloom on old wood, so timing matters! Prune right after flowering (usually summer). Remove dead/diseased canes, then thin out crowded stems. Keep 5–7 strong main canes and tie them horizontally to encourage side shoots (more blooms!). Avoid heavy winter pruning—it cuts off next year’s flowers.
