
Beautiful Plants For Your Interior
Beautiful Plants For Your Interior
My balcony went from cluttered plant graveyard to vertical jungle in one weekend. The secret? A sturdy DIY trellis that turns potted plants into space-saving climbers instead of floor-hogging messes. I’ve built these for everything from pole beans to passionflowers, and the difference is shocking—same plants, half the footprint, twice the harvest. You don’t need […]
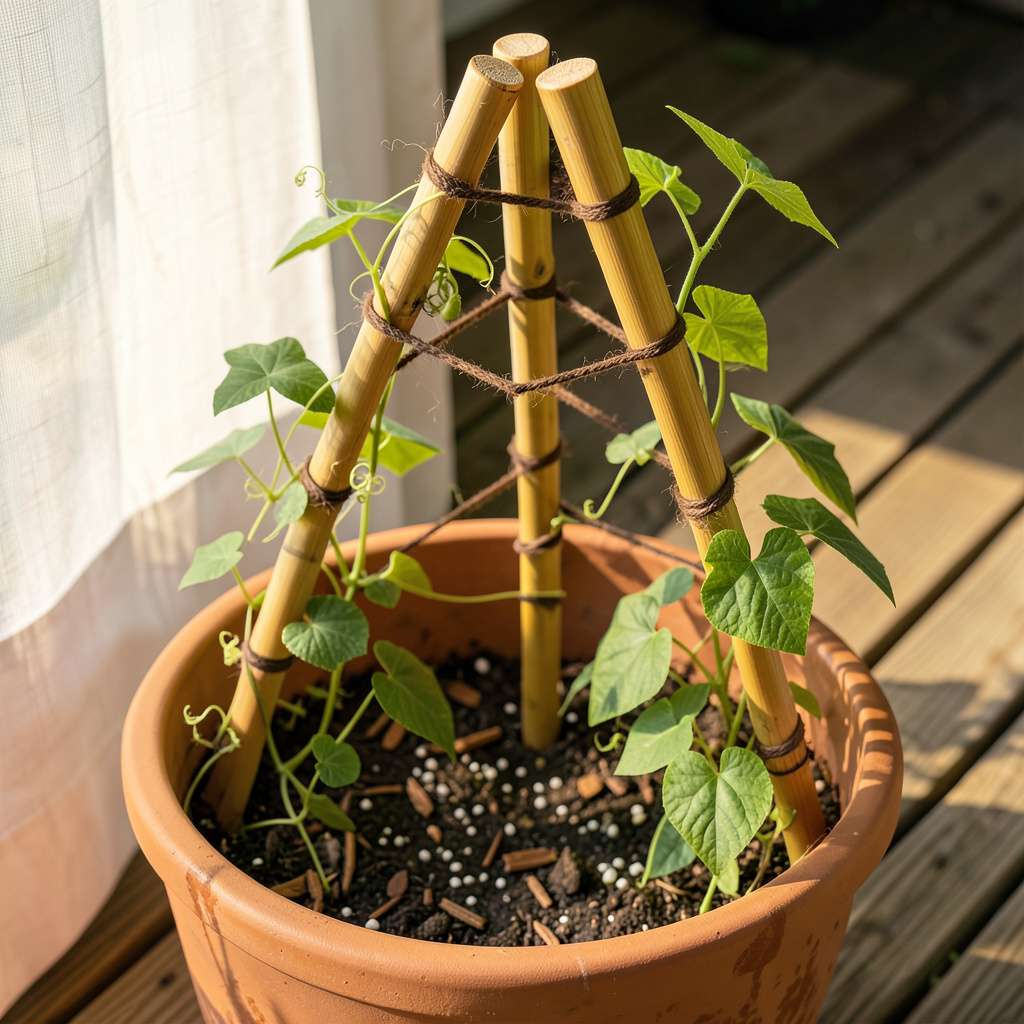
My balcony went from cluttered plant graveyard to vertical jungle in one weekend. The secret? A sturdy DIY trellis that turns potted plants into space-saving climbers instead of floor-hogging messes. I’ve built these for everything from pole beans to passionflowers, and the difference is shocking—same plants, half the footprint, twice the harvest.
You don’t need fancy tools or carpentry skills. The best designs use simple materials like bamboo stakes, wooden dowels, or even repurposed metal fencing. My first attempt with zip ties and tomato cages lasted three seasons (and cost under $15). The key is anchoring it properly so it handles wind and the weight of mature plants without tipping your pots.
Within weeks, you’ll watch tendrils wrap around the structure, leaves fill empty space, and flowers appear at eye level instead of hiding behind foliage. My morning coffee now comes with a view of climbing jasmine and cucumber vines—all in the same square footage where I used to keep two sad geraniums.
Works for renters (no permanent installation), small patios, or anyone tired of plants sprawling across walkways. The design adapts to any container size, and you can rebuild it each season with different materials as your plants’ needs change.
📚 In This Guide
4–6 wooden dowels or bamboo stakes (½-inch diameter, 4–6 ft tall)
Scissors or wire cutters (for trimming twine/wire)
A healthy climbing plant (e.g., ivy, peas, or jasmine)
This simple vertical solution transforms your potted plants into a thriving, space-efficient garden—no special skills required.
Start by assessing your plant’s needs. Vining plants like cucumbers or pole beans need sturdy support (think bamboo stakes or wooden dowels), while lighter climbers like sweet peas thrive on thin wire or twine. I prefer a simple A-frame design for most containers—it’s stable and maximizes vertical space.
Measure your pot’s diameter and height. Your trellis should be at least 6 inches taller than the mature plant height to prevent overcrowding. For a standard 12-inch pot, aim for a trellis about 3-4 feet tall. Gather materials like untreated wood, bamboo poles, or metal rods—whatever fits your aesthetic and budget.
For a basic A-frame, cut two equal-length poles (I use ½-inch bamboo stakes) to your desired height—usually 36-48 inches. Lay them parallel on the ground, about 8-12 inches apart at the base (matching your pot’s width). Tie them together at the top with garden twine or zip ties, leaving 2-3 inches extending above the tie for stability.
Spread the legs to form an inverted V shape. The base should sit snugly inside the pot’s rim, with the legs angled outward slightly for balance. If using wood, sand any rough edges to protect your hands and plant stems. For extra stability, add a horizontal crossbar about 12 inches from the top—this prevents the structure from splaying outward as plants grow heavier.
Place the trellis into your potted plant, pressing the legs 1-2 inches into the soil at the pot’s edge. The base should feel firm but not forced—if it wobbles, widen the leg stance slightly. For top-heavy plants, anchor the trellis by tying the legs to the pot handles or rim with soft plant ties.
As you position it, visualize the plant’s growth pattern. Train existing vines by gently weaving them through the trellis framework. For new growth, you’ll want to guide stems early—once they’re 6-8 inches long, they become less flexible. The trellis should support the plant without restricting its natural climbing tendency.
Check your plants weekly as they grow. Use soft plant ties or twine to gently secure stems to the trellis, creating a 45-degree angle for optimal support. Avoid tying too tightly—leave room for the stem to thicken. I like to use strips of old nylon stockings; they’re gentle and stretch as the plant grows.
Monitor the trellis stability as plants mature. Heavy fruit or wind can shift the structure, so reinforce connections as needed. Prune any side shoots that extend beyond the trellis framework—this keeps the plant focused on upward growth and prevents tangling. By mid-season, you’ll notice the trellis disappearing under lush foliage, which means it’s working perfectly.
For lightweight climbers like nasturtiums or ivy, a simple twine grid works beautifully. Stretch horizontal lines between two vertical supports spaced 6-8 inches apart. The plants will naturally weave through the grid with minimal guidance from you.
Heavier producers like cucumbers or small squash need stronger support. Reinforce your trellis with additional crossbars or use a cattle panel arch (bend a 4-foot section of wire panel into a half-circle and secure the ends in the pot). The key is checking the structure weekly—you’ll feel any weakness before it becomes a problem, usually when fruits start forming.
Building a sturdy trellis is simpler than you think—here’s what we’ve learned from years of supporting everything from delicate peas to sprawling cucumbers.
Material Selection: For the 36-48 inch poles mentioned in Step 2, I always recommend untreated bamboo or cedar—they resist rot better than pine. The ½-inch thickness is perfect for most climbers, but for heavy producers like small squash, consider upgrading to ¾-inch diameter stakes. Remember that 2-3 inches extending above the tie point makes all the difference in stability as plants mature.
Stability Secret: When positioning your trellis in Step 3, don’t just press the legs 1-2 inches into the soil—angle them outward slightly at the base. This creates a wider footprint that prevents toppling as plants grow heavier. For extra insurance with top-heavy plants, I tie the trellis legs to the pot handles using soft nylon stockings (they stretch as stems thicken).
Training Technique: The 6-8 inch guideline in Step 4 is critical—once stems exceed this length, they become woody and resistant to training. I use a 45-degree angle when tying stems, which mimics how vines naturally climb. For delicate plants, twist the stem gently around the support rather than tying; they’ll often secure themselves within a week.
Maintenance Insight: That weekly check mentioned in Step 4 isn’t just about stability—it’s your chance to redirect growth before stems harden. I keep a small pair of pruners handy to trim any side shoots that extend beyond the trellis framework. This isn’t just about neatness; it focuses the plant’s energy upward where you want it.
Most potted plants thrive with a trellis 18–36 inches tall, but adjust based on your plant’s mature height. Vining plants like peas or cucumbers may need 4–6 feet, while compact herbs (e.g., thyme) do well with 12–18 inches. Measure your pot’s depth and add 6+ inches for root stability.
Repurpose wooden dowels, old ladders, or even sturdy branches as trellises. Bamboo skewers, wire mesh, or PVC pipes work too. Just ensure the material is weather-resistant (or seal it) and strong enough to support plant weight. Recycling saves money and reduces waste!
When’s the best time to add a trellis to my potted plant?
Install the trellis at planting time or when vines are 4–6 inches long. Early support prevents root disturbance later and guides growth upward. For transplanting, add the trellis 1–2 weeks after repotting to let roots settle. Procrastinating? Gently tie existing vines to the trellis with soft twine.
Common culprits: smooth surfaces (add grip with jute netting), weak ties (use stretchy plant tape), or insufficient anchor points. Space trellis rungs 4–6 inches apart for easy climbing. For heavy fruits (like squash), reinforce with horizontal supports every 12 inches.
Not always! Trellises help floppy stems (e.g., tomatoes, roses) or maximize space, but bushy plants (like basil) usually don’t need them. Exceptions: Use small stakes for top-heavy plants or to train ornamental shapes. Skip it if your plant grows compactly—over-support can restrict airflow.
Building a DIY trellis for potted plants is a simple, budget-friendly way to maximize space while helping your plants thrive. 🌱 With just a few materials and a little creativity, you can create a sturdy, stylish support that encourages healthier growth and adds charm to your garden.
Now that you’ve got the know-how, why not pick a design and start building? Grab your tools, gather your supplies, and give your potted plants the upward boost they deserve! Happy gardening! 🌿
