
Beautiful Plants For Your Interior
Beautiful Plants For Your Interior
Neem oil works wonders—until you realize your buds are coated in more residue than protection. We’ve all been there: eager to prevent pests, only to end up with sticky, dull-looking flowers that seem more oily than healthy. The good news? You can safely remove that excess without harming your plants or losing the protective benefits. […]
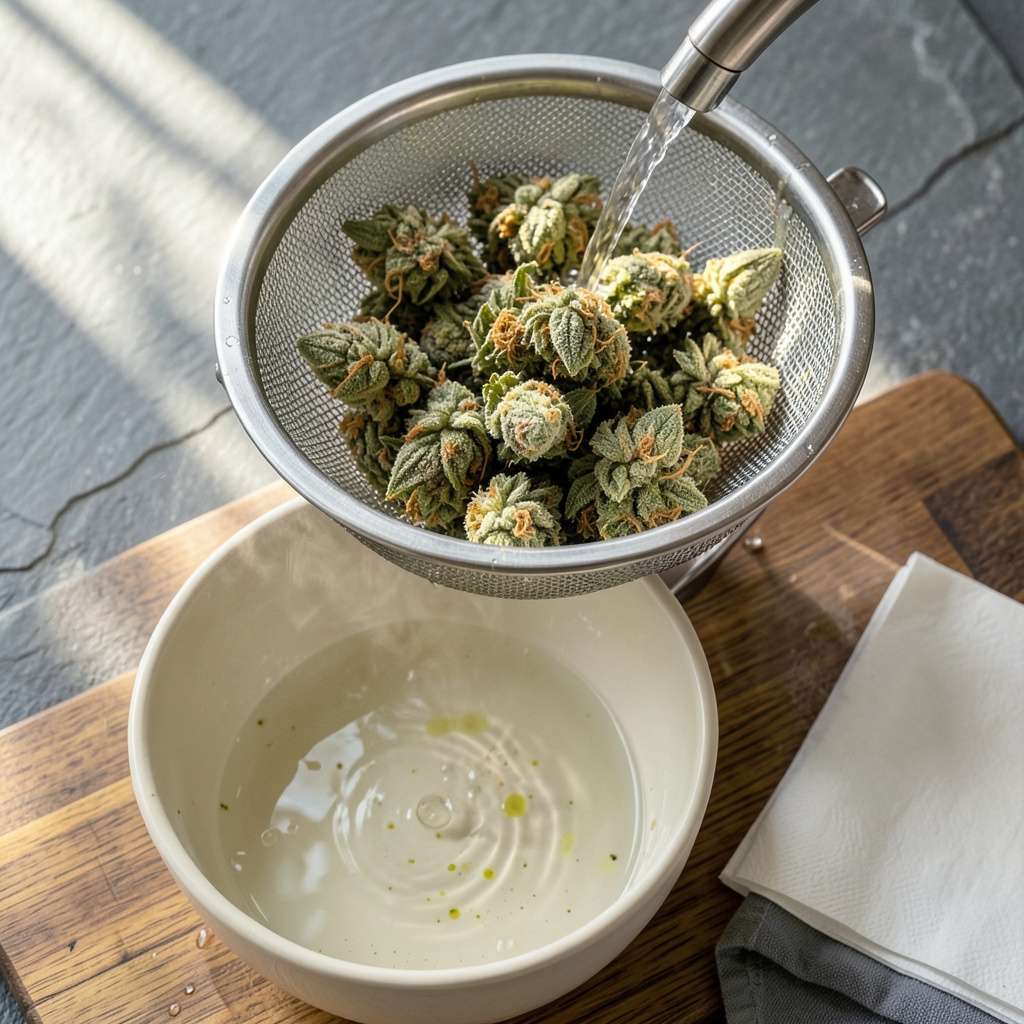
Neem oil works wonders—until you realize your buds are coated in more residue than protection. We’ve all been there: eager to prevent pests, only to end up with sticky, dull-looking flowers that seem more oily than healthy. The good news? You can safely remove that excess without harming your plants or losing the protective benefits.
I learned this the hard way after overapplying neem oil to my prized roses last summer. The buds developed a white film that refused to fade, and I worried I’d ruined the blooms. Turns out, a gentle wash with the right technique restores their natural appearance while keeping pests at bay. The key is timing and method—do it wrong, and you might strip away all the good neem oil does.
You’ll need just three simple supplies and about 15 minutes to fix this. The process is straightforward once you understand how neem oil interacts with plant surfaces. We’ll walk through exactly when to wash, what to use, and how to prevent this issue next time.
This isn’t about abandoning neem oil—it’s about using it smarter. Proper application means you get all the pest protection without the unwanted residue. Your buds will look vibrant again, and you’ll gain confidence in managing this powerful organic treatment.
📚 In This Guide
Removing neem oil residue doesn’t have to be complicated—here’s my proven method for clean, safe results every time.
Start by gathering everything you’ll need in a clean, well-ventilated area. I like to work near a sink with warm running water, but a large bowl of lukewarm water (about 75-85°F) works just as well. Line your workspace with paper towels or a clean cloth to catch drips and prevent slips.
Have your spray bottle with clean water ready for rinsing, and keep a soft-bristle brush or clean toothbrush nearby for stubborn spots. Avoid using any harsh scrubbers—they can damage delicate buds. The key here is gentle but thorough cleaning.
Hold the buds under gentle, warm running water or submerge them briefly in your bowl of water. Let the water flow over and around them for 30-60 seconds. You’ll notice the water beading up at first—that’s the neem oil starting to lift.
Don’t rub or agitate yet. The first rinse is about loosening the residue. If you’re working with dense buds, separate them slightly to let water reach all surfaces. Watch for the water to start running clearer—that’s your signal the surface oil is washing away.
Fill your spray bottle with 1 part white vinegar to 3 parts water (this helps break down oil residues). Lightly mist the buds until damp but not soaked. For stubborn spots, dip your soft brush in the solution and gently swirl it over the surface—think of it like dusting rather than scrubbing.
You’ll see the residue start to emulsify and lift. Work in small sections, rinsing each area immediately after cleaning. The vinegar smell will dissipate completely once dry, but it’s crucial for cutting through the oil without harsh chemicals.
Give the buds one last thorough rinse under cool water for 20-30 seconds. This removes any remaining vinegar solution and helps close the plant’s pores. Shake off excess water gently—don’t wring or squeeze, as this can damage the structure.
Lay them on a clean towel in a single layer, somewhere with good airflow but no direct sunlight. I like to place a small fan nearby on low to speed drying. They should feel completely dry to the touch within 2-4 hours, depending on humidity.
Once fully dry, examine the buds closely under good light. Run your fingers lightly over the surface—it should feel clean and slightly sticky (natural plant resins), not oily or coated. If you spot any remaining residue, repeat the vinegar solution step on just those areas.
Store your cleaned buds in a paper bag for 24 hours before long-term storage. This extra time lets any remaining moisture evaporate completely, preventing mold. You’ll know it worked when the buds maintain their natural color and aroma without any chemical smell.
After years of perfecting this cleaning method, I’ve learned that small details make all the difference between residue-free buds and frustrating results.
Water Temperature Precision: The 75-85°F range in Step 1 isn’t arbitrary—it’s the sweet spot where neem oil begins to lift without damaging delicate plant structures. I’ve ruined batches using water that was too hot (which can degrade terpenes) or too cold (which leaves residue behind). Use a kitchen thermometer if you’re unsure, especially with dense buds that need thorough cleaning.
The Brush Technique: When working with the soft-bristle brush in Step 3, here’s what changed everything for me: use tiny circular motions rather than back-and-forth strokes. Imagine you’re painting a miniature landscape—gentle, deliberate circles lift residue without tearing trichomes. Press just hard enough to feel slight resistance, then ease up. This method cuts cleaning time in half while preserving bud integrity.
Drying Environment Control: That 2-4 hour drying window in Step 4 depends entirely on your environment. In humid climates, I’ve had buds take the full 4 hours, while arid conditions can dry them in 90 minutes. The fan trick helps, but here’s the real secret: place a second dry towel underneath your drying towel. It absorbs moisture from beneath, speeding the process while preventing mold risk during that critical 24-hour paper bag storage period.
Residue Detection: Step 5’s inspection is where most people fail. Don’t just look—use the “white glove test.” After drying, rub buds between clean white paper towels. Any oil residue will leave a faint yellow stain. I also check by breaking open a small piece: the inside should snap cleanly, not feel greasy. If you see stains, repeat only the vinegar solution step on those areas rather than starting over.
Wait at least 24–48 hours Applying Neem Oil? Essential Tips and Guidelines”>after applying neem oil to let it work against pests/fungi. If harvesting soon, rinse 1–2 days before to minimize residue. For heavy infestations, extend to 3 days but avoid leaving it longer—residue can affect flavor and smoke quality.
Plain water won’t fully remove oily residue. Use a mild solution like 1 tsp baking soda per liter of water or lemon juice + water (1:10 ratio). For stubborn residue, try food-grade hydrogen peroxide (3%) diluted in water. Always rinse thoroughly!
If rinsed properly, no major loss occurs. However, harsh scrubbing or soaking can degrade trichomes. Use lukewarm water and gentle agitation. Avoid soaps—residual chemicals can alter taste. Dry buds slowly post-wash to preserve terpenes.
If residue lingers, try curing buds longer (4+ weeks) to break down oils. For immediate use, lightly wipe buds with a damp microfiber cloth (no soaking). Alternatively, use organic pest controls like diatomaceous earth or predatory mites to avoid oil buildup.
Neem oil bonds tightly to plant surfaces. If residue remains, you may need a two-step wash: first with baking soda solution, then a vinegar rinse (1:4 ratio). Ensure water is not too cold (oil hardens). Pat dry with paper towels and air-dry upside down for even drying.
Removing neem oil residue from buds doesn’t have to be stressful! With the right gentle techniques—like using lukewarm water, baking soda, or lemon juice—you can safely clean your harvest while preserving quality. 🌿 Remember, patience and thorough rinsing are key to avoiding lingering tastes or odors.
Now that your buds are fresh and residue-free, why not explore natural pest prevention for future grows? Check out our guide on organic alternatives to neem oil to keep your plants thriving without the hassle!
