
Beautiful Plants For Your Interior
Beautiful Plants For Your Interior
I used to think orchids were too delicate to transplant—until I learned the right way. The first time I successfully moved one, it rewarded me with three new blooms within months. Orchid transplanting isn’t about luck; it’s about understanding what those roots actually need: airflow, the right moisture balance, and a gentle touch. Here’s the […]
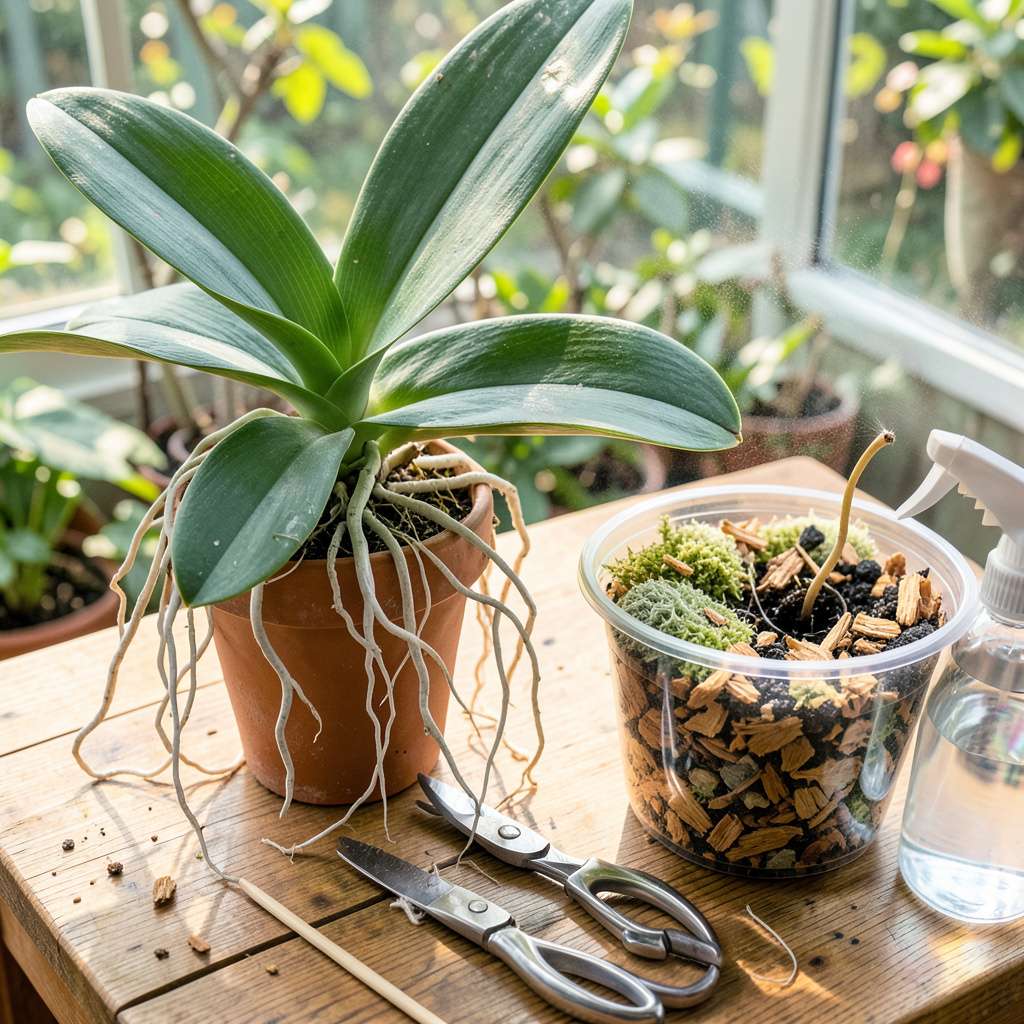
I used to think orchids were too delicate to transplant—until I learned the right way. The first time I successfully moved one, it rewarded me with three new blooms within months. Orchid transplanting isn’t about luck; it’s about understanding what those roots actually need: airflow, the right moisture balance, and a gentle touch.
Here’s the thing—most people kill orchids during transplant by overhandling the roots or using the wrong medium. I’ve found that sphagnum moss or bark chips work best, and the process takes less than 30 minutes once you know the steps. The key is working when the plant is slightly root-bound but not stressed, usually right after flowering.
You’ll see the difference immediately: roots that were circling the old pot will spread out naturally in fresh media. Within weeks, new growth appears—thicker leaves, stronger stems, and the foundation for next season’s flowers. The plants bounce back faster than you’d expect when given the right conditions.
This method works for phalaenopsis, cattleya, or any common household orchid. No fancy tools required, just patience and the right technique. Let’s walk through it step by step—your orchid will thank you with blooms.
📚 In This Guide
This method ensures your orchid transitions smoothly with minimal stress—perfect for encouraging new growth and future blooms.
Begin by watering your orchid 24 hours before transplanting. This hydrates the roots, making them more pliable and less prone to breakage. I use room-temperature water to avoid shocking the plant. While the orchid soaks up moisture, prepare your new container—choose one that’s 1-2 inches larger in diameter than the current pot to allow for root expansion without overwhelming the plant.
If reusing a container, sterilize it with a 10% bleach solution to eliminate any lingering pathogens. For orchids, I prefer clear or slotted pots because they allow you to monitor root health and provide the airflow these plants crave. Avoid dense, non-porous materials like solid plastic or ceramic without drainage—orchid roots suffocate in stagnant conditions.
Gently squeeze the sides of the current pot to loosen the root ball, then tip the orchid onto its side while supporting the base of the plant. If the roots resist, run a clean knife or orchid-safe tool around the inner edge of the pot to free them. Never pull the plant by its leaves or stems—this can snap the delicate crown where new growth emerges.
Once removed, rinse the roots under lukewarm water to clear away old potting medium. Healthy roots are firm and silvery-green when dry, plump and green when hydrated. Trim any mushy, brown, or hollow roots with sterilized scissors—these are dead or diseased and will only rot further. A few snips now prevent systemic issues later, and your orchid will redirect energy to healthy growth.
Place a 1-inch layer of fresh orchid mix in the bottom of the new pot. I use a blend of fir bark, perlite, and charcoal for ideal drainage and airflow. Position the orchid so the base of the lowest leaf sits just above the pot’s rim—this prevents water from pooling at the crown, which causes rot. Spread the roots evenly over the base layer, letting them cascade naturally rather than forcing them downward.
Hold the plant steady and fill the pot with additional medium, working it gently between the roots. Don’t pack it tightly—orchid roots need breathing room. Tap the pot lightly to settle the mix, then check that the plant sits upright without wobbling. The goal is stability without compression. Leave ½ inch of space at the top to make watering easier and prevent overflow.
After transplanting, water the orchid thoroughly until water runs freely from the drainage holes. This removes air pockets and ensures the medium is evenly moist. I place the pot in a tray of water for 10-15 minutes, then let it drain completely—no orchid should sit in standing water. The roots should transition from silvery-green to plump green, a sign they’re hydrated and recovering.
Move the orchid to a spot with bright, indirect light and temperatures between 65-75°F. Avoid direct sun for the first 5-7 days—transplant shock makes leaves more susceptible to burning. Mist the leaves lightly every 2-3 days to maintain humidity, but don’t water again until the medium feels nearly dry to the touch. You’ll see new root tips emerging within 2-3 weeks, a clear sign your orchid is thriving in its fresh home.
Transplanting orchids can feel intimidating, but these practical insights will help you avoid common pitfalls and ensure your plant thrives.
Hydration Timing: The 24-hour pre-transplant watering in Step 1 is non-negotiable. I learned this the hard way after losing an orchid to root shock—those extra hours allow roots to become supple and resilient. Use room-temperature water exactly as specified; cold water can send the plant into shock, while warm water may encourage premature new growth that’s vulnerable during transplanting.
Root Health Assessment: When inspecting roots in Step 2, don’t just look for brown or mushy sections. Pay equal attention to root firmness—healthy roots should feel like al dente pasta, not limp spaghetti. I keep a spray bottle of 3% hydrogen peroxide handy to sterilize my scissors between cuts, which prevents cross-contamination between healthy and diseased root sections.
Medium Composition: The 1-inch base layer of orchid mix in Step 3 isn’t arbitrary. This depth creates crucial airflow pockets that prevent root suffocation. I’ve experimented with ratios and found 50% fir bark, 30% perlite, and 20% charcoal gives optimal drainage while retaining just enough moisture. The charcoal is particularly important—it absorbs impurities that could otherwise build up in the confined pot environment.
Acclimation Period: Those 5-7 days of indirect light in Step 4 are when most people accidentally undo all their good work. Even if your orchid looks perky after 3 days, resist the urge to return it to its normal spot. The leaves may appear fine, but the roots are still establishing their new microclimate. I use a sheer curtain to filter light during this period, which provides protection without complete shade.
The ideal time is right after blooming or in early spring when new growth starts. Avoid transplanting while flowering or during winter dormancy—this stresses the plant. Look for healthy roots (firm and green/silver) as a sign it’s ready!
Nope! Old mix breaks down, loses drainage, and may harbor pests/diseases. Always use fresh orchid-specific mix (bark, sphagnum moss, or coconut husk). Think of it like giving your orchid a clean, airy home!
How do I know if my orchid needs transplanting?
Watch for these signs: roots spilling over the pot, mix decomposing into mush, or slow growth despite good care. If roots look brown/mushy (rot) or gray/white (dehydrated), it’s time! A healthy orchid should have 1–2 inches of root space to grow.
Don’t panic! Mild stress is normal. Keep it in indirect light, maintain humidity (50–70%), and skip fertilizer for 2–3 weeks. If leaves stay limp or turn yellow, check for overwatering or root damage. Patience is key—most bounce back in 4–6 weeks!
Yes! Only trim dead/damaged roots (mushy or hollow) with sterilized shears. Healthy roots (plump and green/silver) should stay intact. Gently loosen tangled roots with your fingers—no need to force it. Less trauma = faster recovery!
Transplanting your orchid doesn’t have to be intimidating—with the right tools, timing, and gentle care, you’re giving your plant a fresh start for stronger roots and vibrant blooms! 🌸 Remember: patience is key as your orchid adjusts to its new home.
Now that you’re equipped with the know-how, grab your supplies and pick a calm afternoon to get started. After transplanting, keep an eye on moisture levels and light exposure—your orchid will thank you with stunning growth! For next steps, check out our guide on post-transplant orchid care to keep the momentum going. Happy growing! 🌱
