
Beautiful Plants For Your Interior
Beautiful Plants For Your Interior
I used to think orchids were divas that would die at the slightest provocation—until I learned the right way to transplant them. The difference between a struggling plant and one that rewards you with months of blooms often comes down to that first repotting. After killing three orchids my first year (RIP, beautiful victims), I […]
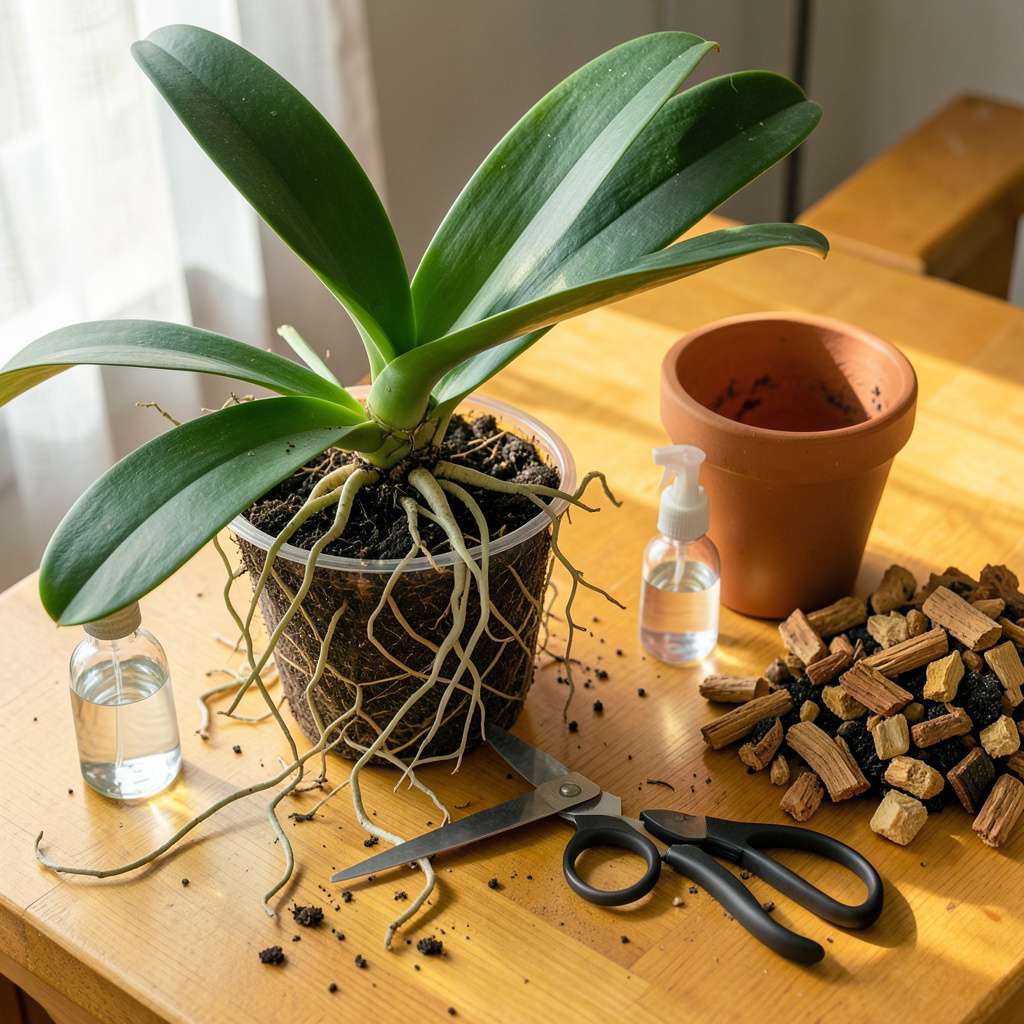
I used to think orchids were divas that would die at the slightest provocation—until I learned the right way to transplant them. The difference between a struggling plant and one that rewards you with months of blooms often comes down to that first repotting. After killing three orchids my first year (RIP, beautiful victims), I finally nailed the technique that keeps roots happy and flowers coming.
Here’s the thing—orchids don’t need fancy tools or expensive mixes, just the right approach. A clean pair of scissors, fresh bark-based medium, and 20 minutes of careful work can transform a root-bound plant into one that grows stronger every season. The key is timing: do it when new roots start appearing, not when the plant is stressed or blooming. I mark my calendar for early spring now, right as growth kicks in.
You’ll know you did it right when those roots turn from mushy gray to firm green within weeks. The first time I saw new aerial roots reaching out after a transplant, I understood why orchid growers get obsessed. Plants establish faster, hold onto moisture better, and—most importantly—produce those dramatic flowers we all want.
Fair warning: the first attempt might feel nerve-wracking (I still talk to mine during the process). But once you understand what those roots actually need, you’ll stop seeing orchids as disposable gifts and start treating them like the long-term investments they are. Let’s get those roots settled properly.
📚 In This Guide
Orchid transplanting doesn’t have to be intimidating—follow my proven approach for stress-free repotting and healthier blooms.
Begin by sterilizing your tools with rubbing alcohol to prevent disease transmission. You’ll need sharp scissors or pruning shears, a clean pot (preferably 1-2 inches larger than the current one), and fresh orchid bark mix. I work on a clean towel to prevent slipping and contain the mess.
Soak the new bark mix in lukewarm water for 30 minutes before using—this prevents it from drawing moisture away from the roots during transplant. The ideal time to repot is just after flowering when new root growth begins, which you’ll recognize by bright green root tips emerging.
Gently squeeze the sides of the plastic pot to loosen the root ball, then turn it upside down while supporting the base of the plant. If roots are stuck, run tepid water around the pot edges to help release them. Never pull on leaves or stems—this damages the plant’s vascular system.
Once removed, place the orchid in a bowl of room-temperature water for 10-15 minutes to hydrate the roots. This makes them more pliable and easier to work with. You’ll notice the difference immediately—healthy roots become firm and silvery-green when properly hydrated.
Examine the roots carefully, using your fingers to separate them. Healthy roots appear plump and green or silver, while dead roots are brown, mushy, or hollow. With sterilized scissors, trim away all dead or damaged roots, cutting just above the affected area at a 45-degree angle.
Be ruthless—keeping dead roots invites rot and pests. I’ve found that removing up to 30% of the root mass during transplant doesn’t harm established plants if the remaining roots are healthy. The cut ends will callous over within 24-48 hours if kept dry.
Place a 1-inch layer of damp bark mix in the bottom of the new pot. Position the orchid so the base sits just below the rim, then spread the roots evenly over the bark. The crown (where leaves meet) should remain 1 inch above the medium to prevent rot.
Fill the pot with bark mix, gently tapping the sides to settle it around the roots. Don’t press down—orchid roots need air pockets. The plant should sit firmly but not tightly; you should be able to lift it slightly by the leaves without it coming out. This balance ensures proper air circulation while keeping the plant stable.
After repotting, place the orchid in bright, indirect light (east or north-facing windows work well) and maintain 60-70°F temperatures. Don’t water for 5-7 days—this allows any damaged roots to callous. You’ll know it’s time to water when the bark feels dry and the pot becomes noticeably lighter.
Resist fertilizing for 3-4 weeks post-transplant. The fresh bark contains enough nutrients initially, and fertilizing too soon burns tender new roots. Mist the leaves lightly every 2-3 days to maintain humidity without saturating the medium. New root growth should appear within 4-6 weeks, signaling successful transplant.
Transplanting orchids becomes much easier when you understand these subtle but important details.
Hydration Strategy: The 10-15 minute root soak in Step 2 is more critical than it appears. I’ve found that orchids with severely dehydrated roots (appearing wrinkled or gray) benefit from extending this soak to 20 minutes maximum. However, don’t exceed this time—overhydration makes roots overly fragile. The ideal hydration point is when roots transition from papery to firm with a silvery-green sheen.
Pruning Precision: When trimming roots in Step 3, the 45-degree angle cut isn’t just for aesthetics—it creates more surface area for new growth while preventing water pooling at the cut site. I use sharp surgical scissors (sterilized with alcohol) for cleanest cuts. Remember that removing up to 30% of root mass is safe for established plants, but younger orchids should lose no more than 15-20% to maintain stability.
Environmental Control: The 60-70°F temperature range mentioned in Step 5 is non-negotiable for successful recovery. I maintain this by placing orchids on a tray with pebbles and water (not touching the pot) to create a microclimate. Avoid drafty windows or heating vents—temperature fluctuations above 10°F can shock newly transplanted roots. A simple digital thermometer near your orchid helps monitor conditions accurately.
Patience Pays Off: The 5-7 day waiting period before first watering tests many gardeners’ discipline, but this dry period allows cut roots to properly callous. I’ve ruined transplants by watering at day 4 when the bark “looked dry”—trust the weight test instead. A properly calloused orchid will feel slightly lighter when ready for water, typically at the 6-day mark in average home conditions.
The ideal time is right after flowering or when new growth (like fresh roots or leaves) appears—usually in spring or early summer. Avoid transplanting during dormancy or while blooming, as it stresses the plant. If roots are rotting or overcrowded, act immediately regardless of season!
Yes! Use sterilized scissors to trim dead (brown/mushy) or damaged roots. Healthy roots are firm and green/silver. Leave aerial roots intact—they’ll adapt to the new pot. Trim conservatively; over-pruning can shock the plant.
No—orchid mix breaks down over time, losing drainage and aeration. Always use fresh, chunky mix (bark, sphagnum moss, or perlite). Reusing old mix risks fungal growth and poor root health. Toss the old stuff!
Wilting is normal for 1–2 weeks as roots adjust. Check for overwatering (the top killer!) or loose mix. Keep it in bright, indirect light and mist leaves lightly. If wilting persists, inspect for root rot or pests.
Wait 5–7 days before watering to let roots heal and prevent rot. Instead, lightly mist the leaves or place the pot on a humidity tray. When you do water, soak thoroughly and let excess drain—no soggy bottoms!
Transplanting your orchid doesn’t have to be intimidating—just follow the steps, stay patient, and give your plant the love and care it deserves! 🌱 With fresh potting mix, proper drainage, and a little TLC, your orchid will reward you with stunning blooms for seasons to come.
Now that your orchid is settled in its new home, keep an eye on its progress over the next few weeks. Check the roots for healthy growth and adjust your watering routine as needed. Ready to take your orchid care to the next level? Explore our full orchid care guide for tips on fertilizing, light needs, and more!
