
Beautiful Plants For Your Interior
Beautiful Plants For Your Interior
I used to think rocks were just filler—until I saw what they could do for a yard. Three years ago, I transformed my muddy, erosion-prone slope into a terraced rock garden that hasn’t needed maintenance since. The right placement turns functional problems into stunning focal points, and it’s simpler than most people realize. This isn’t […]
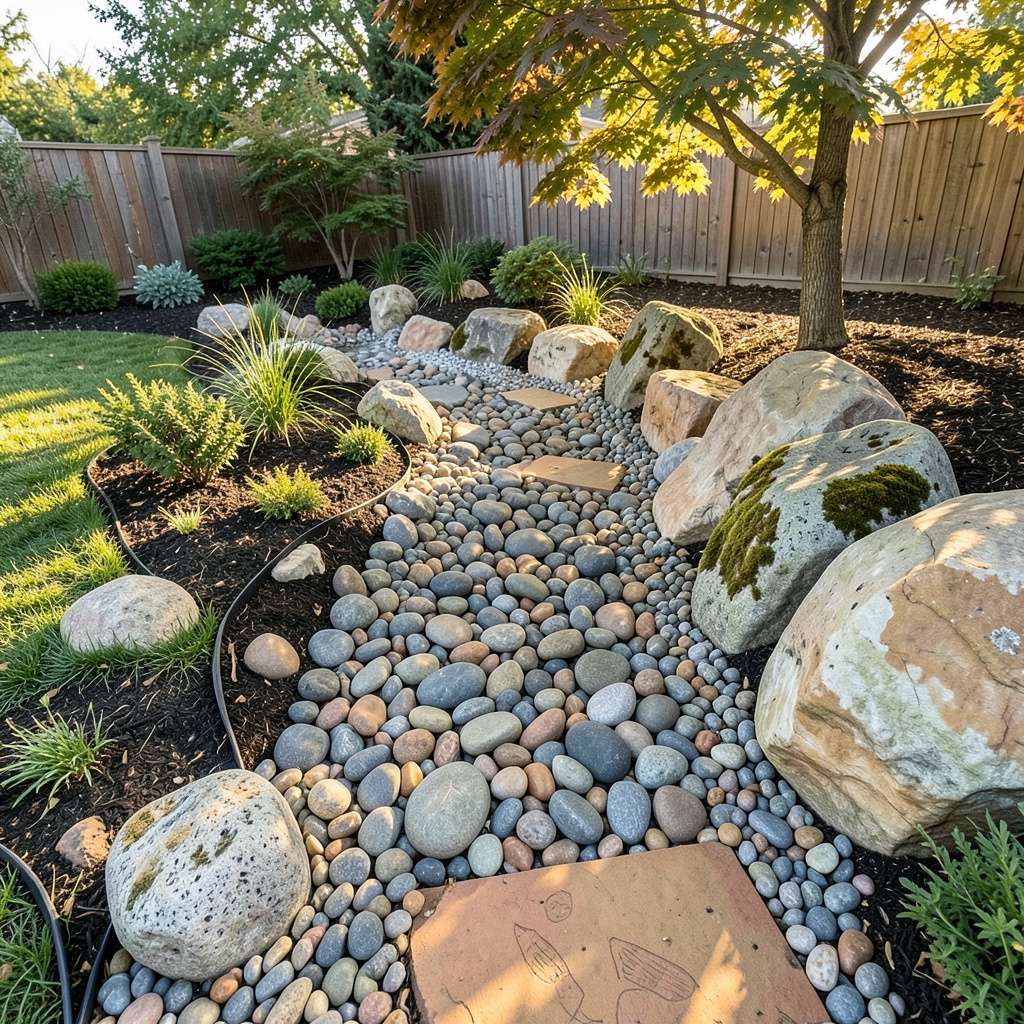
I used to think rocks were just filler—until I saw what they could do for a yard. Three years ago, I transformed my muddy, erosion-prone slope into a terraced rock garden that hasn’t needed maintenance since. The right placement turns functional problems into stunning focal points, and it’s simpler than most people realize.
This isn’t about dumping random stones in your yard. It’s about creating natural-looking drainage, defining garden spaces, and adding texture that makes plants pop. My first attempt looked like a rock pile at a construction site—now I know the 3:1 ratio of rock sizes that makes everything look intentional. You’ll need just basic tools and a weekend to get it right.
The payoff comes when you realize you’ve eliminated weeding, reduced watering needs, and created year-round structure. Rocks stay put through storms, don’t need replacing, and actually improve with age as they settle into the landscape. My favorite part? How the morning light catches the quartz in my river rocks—free sparkle every sunrise.
Works for sloped yards, flat gardens, or even container accents. The same principles apply whether you’re working with a 5-foot border or a half-acre property. Here’s how to make it look like you hired a pro—without the pro price tag.
📚 In This Guide
This method ensures a professional-looking result that lasts for years with minimal upkeep.
Start by sketching your rock layout on paper, considering pathways, plant beds, and drainage. I always use a garden hose or spray paint to outline the exact area where rocks will go—this gives you a visual before committing. Walk through the space to ensure the design flows naturally with your yard’s contours.
For curved edges, use a flexible hose to create smooth lines. Straight edges work best with string lines and stakes. Double-check measurements at this stage—it’s much easier to adjust a painted line than to move rocks later. I like to stand back and view the layout from different angles before proceeding.
Remove all grass, weeds, and topsoil from the marked area, digging down about 2-3 inches. This prevents organic matter from decomposing under your rocks and creating uneven surfaces. Use a flat shovel for clean edges and a rake to level the exposed soil.
Next, lay landscape fabric over the entire area, overlapping seams by 6 inches to block weeds. Secure it with landscape staples every 2-3 feet. The fabric should extend slightly beyond your marked edges. This is the secret to keeping your rock area low-maintenance for years—don’t skip this step.
Add a 1-inch layer of sand over the fabric and level it with a rake. This creates a stable base that allows for minor adjustments as you place rocks. Lightly mist the sand with water to help it settle—you’ll feel it firm up underfoot when it’s ready.
Begin placing your largest rocks first, positioning them where they’ll have the most visual impact. I always place rocks with their most interesting side facing outward. For natural-looking arrangements, cluster rocks in odd numbers (3, 5, or 7) and vary their orientations.
Work from the back of the area forward, stepping on already-placed rocks rather than the prepared base. This prevents disturbing your leveled sand. As you place each rock, press it gently into the sand to anchor it. You’ll hear a satisfying crunch as it settles into place.
For pathways, leave rocks slightly loose so they can be adjusted if needed. For decorative areas, nestle them more firmly. Step back frequently to check the overall pattern—you’ll notice any uneven spacing immediately from a distance.
Once all rocks are in place, walk carefully over the entire area to check for stability. Any rocks that shift underfoot need adjustment. I use a rubber mallet to tap stubborn rocks into position—just a few gentle taps usually does the trick.
For extra stability in high-traffic areas, add a thin layer of decomposed granite between rocks and sweep it into the gaps. This locks everything in place while maintaining drainage. You’ll see the granite disappear between rocks, creating a clean, finished look.
Finally, use a leaf blower or stiff broom to remove any debris from the rock surfaces. The difference this makes in the final appearance always surprises people. Your new rock feature should look polished and intentional, with clean lines and no visible gaps in the fabric underneath.
Every 3-4 months, inspect your rock area for weed growth or displaced rocks. I find that a quick pass with a leaf blower keeps the surface looking fresh and prevents debris buildup. Any weeds that appear will be easy to pull from the landscape fabric.
After heavy rains, check for areas where rocks may have shifted or where sand might have eroded. Simply add more sand as needed and reposition any displaced rocks. This minimal maintenance is why rock landscaping remains so popular—it stays beautiful with very little effort.
Over time, you might notice some rocks settling into the sand. This is normal. Just lift and reset them as needed. The beauty of this system is that it’s designed to be adjustable—your landscape can evolve as your tastes change or your plants grow.
These practical insights will help you avoid common pitfalls and achieve a professional-looking rock installation that lasts for years.
Design Planning: In Step 1, take your time with the layout—this is where most DIYers rush and regret it later. Walk through the space multiple times from different angles, and consider how sunlight and shadows will interact with your rock placement throughout the day. I’ve found that photographing the marked area from various viewpoints helps catch design flaws before you start moving heavy rocks.
Base Preparation: When digging down the 2-3 inches in Step 2, pay special attention to the edges. Use a half-moon edger to create clean, crisp lines where your rock area meets grass or other surfaces. This small extra effort makes the final result look intentionally designed rather than hastily installed. Also, when laying the landscape fabric, make sure to pull it taut—wrinkles will create uneven surfaces in your final rock layer.
Rock Placement Technique: As you work through Step 3, remember that nature isn’t perfectly symmetrical. When clustering rocks in those odd numbers, vary not just their sizes but also their angles. I like to rotate rocks slightly off-center from each other—this creates a more organic, established look. For pathways, test the stability by walking on each rock as you place it; you’ll immediately feel which ones need adjustment.
Long-Term Stability: The decomposed granite mentioned in Step 4 is worth the extra investment, especially for pathways or areas with foot traffic. I’ve seen installations without it develop ruts and uneven surfaces within a year. When applying it, use a push broom to work it deeply into the gaps—you want it to fill about halfway up the sides of your rocks for maximum stability without being visible.
Got questions about laying landscape rocks? You’re not alone! Here are the most common concerns—and quick answers—to help you tackle your project with confidence.
Aim for 2–3 inches of depth for small decorative rocks (like pea gravel) and 3–4 inches for larger river rocks or boulders. This ensures proper drainage, weed suppression, and stability. For pathways, compact a 1-inch base layer first for extra durability.
Yes—almost always! Fabric blocks weeds and prevents soil from mixing into the rocks over time. Skip it only if you’re using rocks in a dry creek bed (for natural drainage) or on top of solid pavers. Pro tip: Use heavy-duty fabric for sharp-edged rocks like lava rock.
Spring or early fall are ideal—mild temps make digging and leveling easier. Avoid extreme heat (rocks retain heat) or freezing conditions (fabric may shift). If you’re in a hurry, early morning summer sessions work too—just stay hydrated!
Absolutely! Mixing textures (e.g., smooth river rocks + jagged lava rock) or colors adds visual interest. Stick to a cohesive color palette (e.g., earth tones or grays) and vary sizes for depth. Avoid clashing colors (like bright red and white) unless it’s intentional.
Install a physical edging barrier like metal, plastic, or stone borders, buried at least 2 inches deep. For a natural look, dig a shallow trench (3–4 inches wide) between the rocks and grass. Check edges annually—rocks shift over time!
Laying landscape rocks doesn’t have to be intimidating—with the right prep, materials, and a little patience, you can create a stunning, low-maintenance yard that lasts for years. 🌿 Whether you’re defining garden beds, building a pathway, or adding texture to your space, the key is planning ahead and taking it step by step.
Now that you’ve got the know-how, grab your gloves and get started! For extra inspiration, sketch a quick design or browse local garden centers to pick rocks that match your vision. Your dream landscape is just a weekend project away. 💪
