
Beautiful Plants For Your Interior
Beautiful Plants For Your Interior
I’ll be real with you: the first time I stuck a pothos cutting in a jar of water, I didn’t expect much. Three weeks later, roots were spilling out like white spiderwebs. ✨ Water propagation changed how I think about plant care—no soil, no mess, and you can watch roots grow in real time. It’s […]
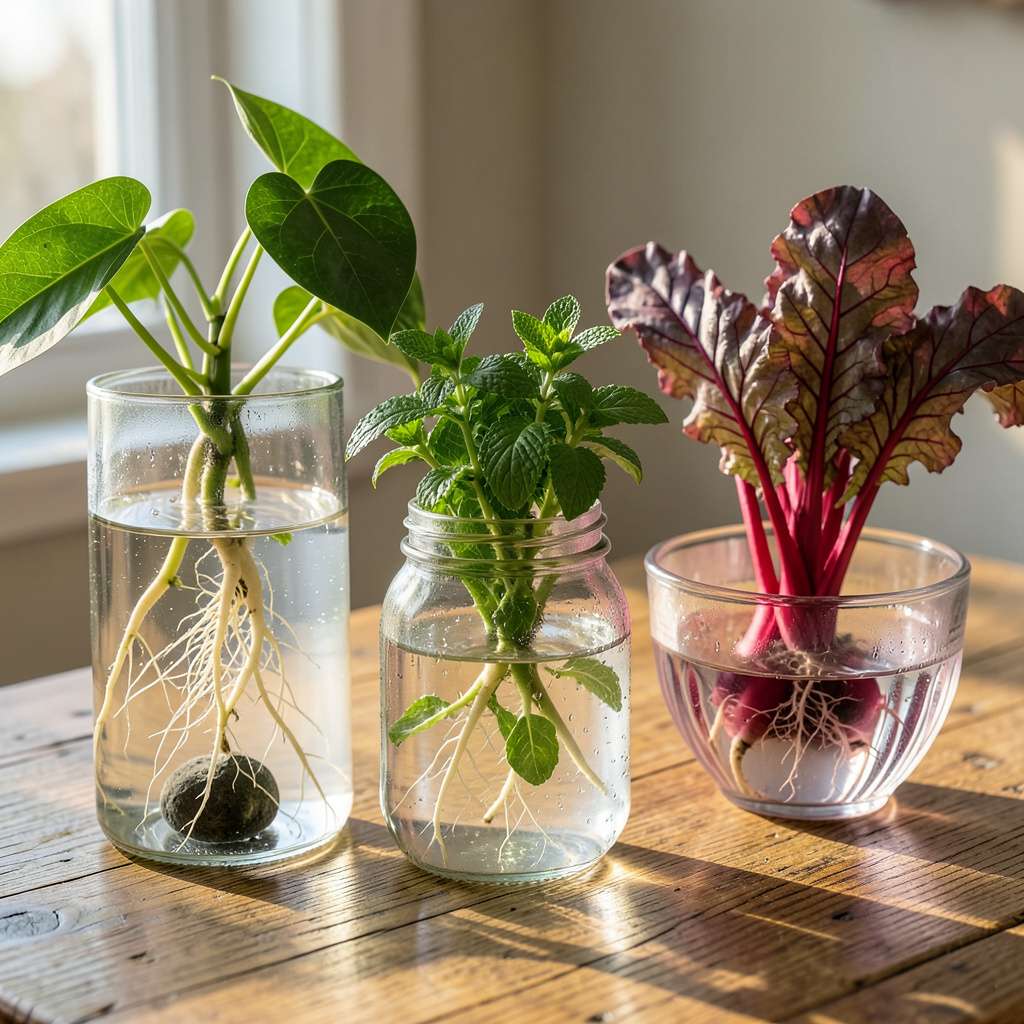
I’ll be real with you: the first time I stuck a pothos cutting in a jar of water, I didn’t expect much. Three weeks later, roots were spilling out like white spiderwebs. ✨ Water propagation changed how I think about plant care—no soil, no mess, and you can watch roots grow in real time. It’s the perfect gateway for anyone who’s ever killed a houseplant (we’ve all been there).
What surprised me most? How many plants actually thrive this way. We’re talking everything from herbs to tropicals, all growing happily in glass jars or recycled containers. The setup takes 5 minutes with stuff you already have—no special equipment, no green thumb required. I’ve propagated more plants in water than I can count, and the success rate is embarrassingly high.
You’ll see the first roots in 7-14 days, depending on the plant. There’s something magical about watching those tiny white tendrils emerge, then explode into full root systems. The plants grow faster than soil-grown cuttings, and you can transplant them whenever you’re ready—or just leave them in water indefinitely.
Between you and me, this method saved my collection during a particularly bad gnat infestation. Now I use it for everything from gift plants to expanding my own jungle. The best part? You’ll never overwater again—because how can you overwater water?
📚 In This Guide
This method is simpler than you think—just follow these steps and watch roots develop right before your eyes.
Start with healthy, disease-free 4-6 inch stem cuttings from plants known to root well in water. I’ve had the best success with pothos, mint, coleus, and philodendron. Look for stems with at least 2-3 leaf nodes—those little bumps where leaves emerge—because that’s where roots will form.
Use clean, sharp scissors or pruners to make a 45-degree angle cut just below a node. This increases the surface area for water absorption and prevents the stem from sitting flat on the container bottom. Remove any lower leaves that would sit underwater (they’ll rot and encourage bacterial growth).
Fill a clear glass jar or vase with room-temperature filtered water—chlorine and extreme temperatures shock cuttings. The container should be tall enough to submerge 1-2 nodes while keeping most leaves above water. I avoid opaque containers because you need to monitor root development and water clarity.
If you’re propagating woody stems (like rosemary or salvia), dip the cut end in rooting hormone powder first to speed up the process. For soft-stemmed plants, this isn’t necessary. Place the cutting in the water so the nodes are submerged but no leaves touch the liquid. Change the water every 3-5 days to prevent stagnation and algae growth.
Set your jar in bright, indirect light—a north or east-facing windowsill works perfectly. Direct sun overheats the water and encourages algae, while low light slows root growth. You’ll know the light is right when you see new root growth within 7-14 days without any discoloration in the water.
Maintain a consistent 65-75°F environment. Cooler temps slow rooting; warmer temps risk rot. If your home runs dry, loosely cover the cutting and jar with a clear plastic bag to retain humidity, but remove it for a few hours daily to prevent mold. Root development is visible as white nubs emerging from the nodes—once they reach 1-2 inches long, your cutting is ready for the next step.
While many plants thrive indefinitely in water, you can transplant rooted cuttings to soil once roots are 2-3 inches long. Prepare a small pot with well-draining potting mix and make a hole deep enough to accommodate the roots without bending them. Gently place the cutting in the hole and firm the soil around it.
Water lightly and keep the soil evenly moist (not soggy) for the first week. Place the pot in the same bright, indirect light as before. You’ll notice new leaf growth within 10-14 days, which signals successful transition. If you prefer to keep the plant in water long-term, refresh the water weekly and add a diluted liquid fertilizer every 4-6 weeks to replace nutrients.
For water-grown plants, trim any yellowing leaves immediately—they’ll foul the water. If roots become overcrowded (you’ll see them circling densely), prune up to one-third of the root mass with clean scissors. This encourages fresh growth and prevents root rot from poor oxygen circulation.
Every 2-3 months, give your plant a “fresh start” by removing it from the water, rinsing the roots gently, and placing it in a clean container with fresh water. This prevents salt buildup from fertilizer and keeps the roots healthy. Watch for rapid new growth and vibrant leaf color—that’s your sign the plant is thriving in its aquatic home.
These simple adjustments will help you achieve faster root growth and healthier plants every time.
Cutting Selection: When choosing stems in Step 1, look for new growth rather than older, woody stems. New growth roots more quickly because it contains higher levels of natural growth hormones. I always select stems that snap cleanly when bent – that’s your sign they’re at the perfect stage for propagation.
Water Quality Matters: In Step 2, using filtered or distilled water makes a noticeable difference. Tap water often contains chlorine and minerals that can inhibit root growth. If you must use tap water, let it sit uncovered for 24 hours first to allow chlorine to evaporate. I’ve found this simple step reduces the time it takes to see those first white root nubs.
Temperature Control: Maintaining that 65-75°F range mentioned in Step 3 is crucial. If your home runs cooler, try placing your propagation station on top of the refrigerator or near a warm (not hot) appliance. The gentle warmth from these spots can speed up root development without risking rot. A small aquarium heater set to 70°F works wonders if you’re propagating multiple cuttings.
Long-Term Care: For plants you keep in water indefinitely, don’t overlook the 2-3 month refresh mentioned in Step 5. I use this time to inspect roots for any dark or mushy spots – early signs of rot. Trim these immediately with clean scissors, and your plant will thank you with vigorous new growth.
Curious about water propagation? Here are the most common questions—and quick answers—to help your plants thrive!
Nope! Most plants can root in water, but only a few (like pothos, lucky bamboo, or mint) thrive long-term. Check if your plant is a true hydroponic candidate or just a temporary propagator before transferring to soil.
Timing varies! Fast-rooters like pothos or coleus show growth in 1–2 weeks, while slower plants (e.g., monstera) may take 4–6 weeks. Warmth, light, and water changes speed up the process.
For short-term propagation, no. But if keeping plants in water long-term, use a diluted liquid fertilizer (¼ strength) every 4–6 weeks to prevent nutrient deficiency. Skip it for cuttings—roots need to grow first!
Yikes—that’s bacteria or algae! Change the water every 3–5 days, use filtered/rainwater, and rinse the container. Add a drop of hydrogen peroxide (3%) to disinfect if needed. Keep the jar in bright, indirect light to slow algae.
You can, but let it sit out 24 hours first to evaporate chlorine. For sensitive plants (e.g., peace lilies), use distilled or rainwater to avoid chemical buildup. Hard water? Try filtered!
Growing plants in water is a simple, rewarding way to expand your green thumb—no soil or fancy tools required! 🌱 With just a jar, clean water, and patience, you can propagate everything from herbs to houseplants in weeks. Whether you’re a beginner or a seasoned gardener, this method proves that anyone can nurture new life with minimal effort.
Ready to dive in? Start with an easy plant like pothos or mint, and watch your confidence (and plant collection!) grow. Happy propagating—your windowsill jungle awaits! 💧✨
