
Beautiful Plants For Your Interior
Beautiful Plants For Your Interior
I never thought I’d harvest 20-pound pumpkins from my apartment balcony, but container growing changed everything. The first year I tried, the vines sprawled across my railing and produced three perfect jack-o’-lanterns—all from a single large pot. This isn’t some miracle technique; it’s about matching the right container, soil, and care to what pumpkins naturally […]
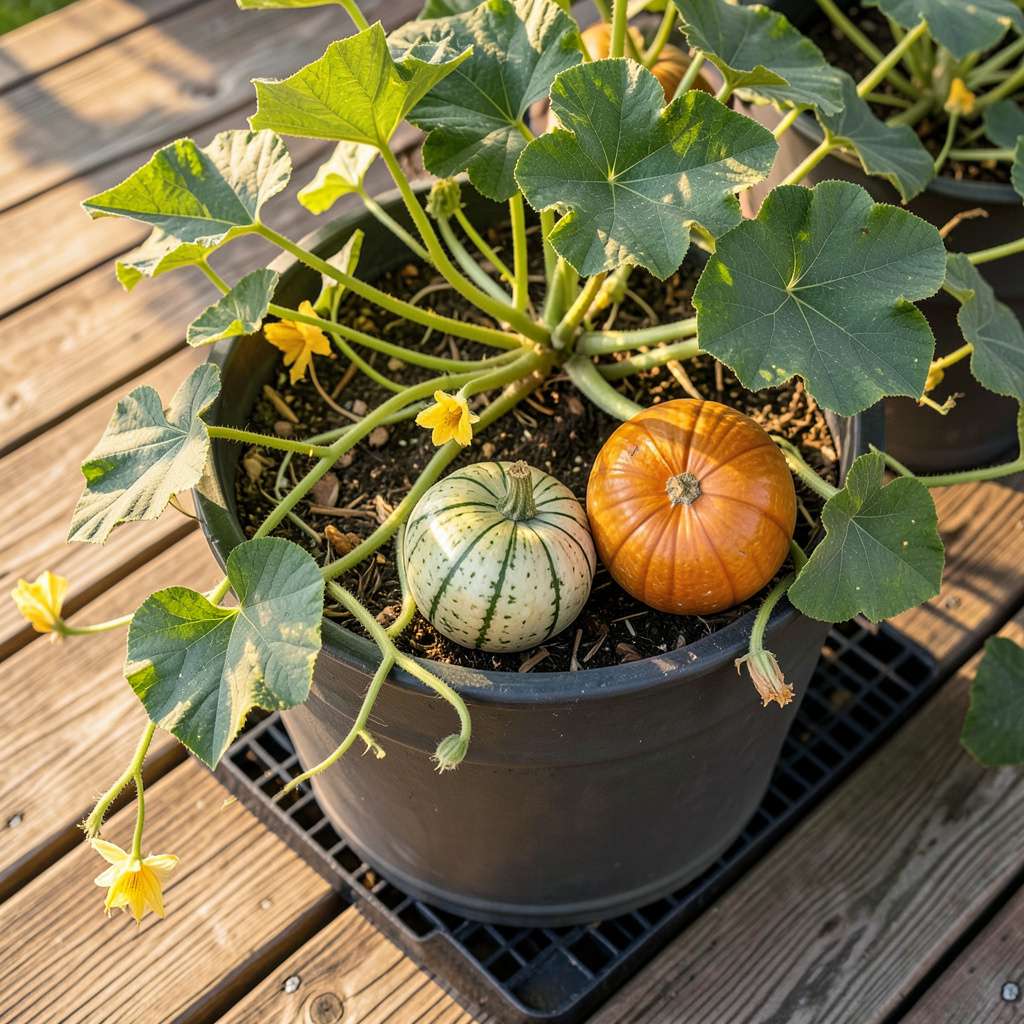
I never thought I’d harvest 20-pound pumpkins from my apartment balcony, but container growing changed everything. The first year I tried, the vines sprawled across my railing and produced three perfect jack-o’-lanterns—all from a single large pot. This isn’t some miracle technique; it’s about matching the right container, soil, and care to what pumpkins naturally need.
Here’s the thing—most people assume pumpkins require acres of land. Not true. With a 15-25 gallon container, proper support for the vines, and consistent moisture, you can grow full-sized pumpkins in surprisingly small spaces. My best results came from bush varieties like ‘Jack Be Little’ and ‘Wee-B-Little’, which produce adorable (but still impressive) fruits on compact vines.
You’ll watch the vines explode with growth—sometimes an inch a day in warm weather—then spot those first golden flowers. Pollination becomes your new fascination as you wait for tiny green globes to appear. By late summer, you’ll have pumpkins developing right before your eyes, their skins hardening in the sun.
Fair warning: this isn’t a set-it-and-forget-it project. Pumpkins demand attention to watering and feeding, but the payoff—homegrown pumpkins you nurtured from seed—makes every minute worthwhile. Whether you’re on a patio, balcony, or small urban lot, the method adapts to your space.
📚 In This Guide
Hand trowel
Mulch (straw or shredded leaves) to retain moisture
With the right approach, you can grow impressive pumpkins even in limited spaces—here’s how I do it.
Choose a container at least 15-20 gallons in size—pumpkins need room to spread. I prefer half-barrel planters or sturdy plastic tubs with drainage holes drilled in the bottom. Position your container in a spot that receives full sun (at least 6-8 hours daily), as pumpkins are sun-worshippers and won’t thrive in partial shade.
The location matters more than you think. A south-facing patio or balcony works best, but avoid windy areas that could damage vines or topple containers. If you’re using a balcony, secure the container to prevent accidents—mature pumpkins become surprisingly heavy.
Fill your container with a well-draining potting mix enriched with compost. Pumpkins are heavy feeders, so I blend in aged manure or worm castings at a ratio of about 1 part amendment to 3 parts soil. The mix should feel loose and crumbly, not dense or clay-like.
Plant 2-3 seeds about 1 inch deep in the center of the container. Water thoroughly after planting, then cover with a clear plastic dome or cloche to retain warmth and moisture. Germination typically occurs within 7-10 days at soil temperatures of 70-90°F. Once sprouts appear, remove the dome immediately to prevent fungal issues.
When vines reach 12-18 inches long, it’s time to guide them. I use soft plant ties to gently train vines along the container’s edge or up a small trellis. This prevents tangling and makes maintenance easier. For bush varieties, no training is needed, but sprawling types like ‘Jack Be Little’ benefit from this early intervention.
Thin to the strongest 1-2 seedlings once they develop 2-3 true leaves. Use clean scissors to snip unwanted seedlings at soil level—never pull them, as this disturbs the roots of remaining plants. At this stage, begin fertilizing weekly with a balanced 10-10-10 liquid fertilizer diluted to half strength.
Pumpkins require pollination to set fruit. In containers, you’ll need to hand-pollinate since natural pollinators may not visit. Use a small paintbrush to transfer pollen from male flowers (long stems) to female flowers (small bulb at base) in the morning when flowers are fully open. I mark pollinated flowers with a twist tie to track progress.
Once fruit forms, support it with a sling made from old pantyhose or fabric strips. This prevents the pumpkin from resting directly on the container edge, which can cause rot or misshapen growth. For mini varieties, a 6-inch square of fabric works well; larger types may need a hammock-style support.
Check soil moisture daily—containers dry out faster than garden beds. Water when the top 1-2 inches of soil feels dry, but avoid wetting the leaves to prevent powdery mildew. I use a moisture meter for precision, especially during hot spells when pumpkins may need water twice daily.
Harvest when the rind hardens and resists puncture from a fingernail, typically 75-100 days after planting depending on variety. Cut the stem with clean pruners, leaving 2-3 inches attached to the pumpkin. This “handle” prevents rot during storage and maintains freshness longer.
Container gardening with pumpkins can be incredibly rewarding when you know these key details that make all the difference.
Container Selection Insight: The 15-20 gallon minimum size mentioned in Step 1 isn’t arbitrary—it’s calculated for root development. I’ve found that half-barrel planters work exceptionally well because their depth accommodates the extensive root system while the width allows vines to spread. If you’re tempted to use something smaller, consider that mature pumpkin plants can develop roots up to 3 feet deep in ideal conditions. The container’s weight when full of wet soil and a growing pumpkin will surprise you, so placement matters more than you might think.
Germination Temperature Nuance: The 70-90°F soil temperature range in Step 2 is critical for timely germination. I use a soil thermometer to verify this at planting depth, not just surface level. If your outdoor temperatures are consistently below this range, consider starting seeds indoors under grow lights. The plastic dome creates a mini greenhouse effect that can boost soil temperature by 5-10 degrees, but remove it immediately when sprouts appear to prevent damping off—a fungal disease that thrives in overly humid conditions.
Vine Training Technique: When your vines reach that 12-18 inch length in Step 3, don’t wait to train them. I’ve had best results using soft fabric strips rather than plastic ties, as they expand with the growing vines without cutting into them. For vertical growing, a simple trellis made from wooden stakes and twine works well. Remember that pumpkin vines grow surprisingly fast—up to 6 inches per day in ideal conditions—so check and adjust your training system every few days during peak growth periods.
Pollination Timing: The hand-pollination process in Step 4 requires perfect timing. Pumpkin flowers typically open before dawn and close by mid-afternoon, so morning is indeed the best time for pollination. I’ve found that marking pollinated flowers with colored twist ties helps track which ones to watch for fruit development. Female flowers are only receptive for about 24 hours, so if you miss that window, you’ll need to wait for the next flower to open.
While giant pumpkins need in-ground space, smaller varieties like ‘Jack Be Little’, ‘Baby Boo’, or ‘Sugar Pie’ thrive in 5–10-gallon containers. Choose bush-type or miniature cultivars for best results—just ensure proper support (like a trellis) for vines and adequate sunlight (6+ hours daily).
Start seeds indoors 3–4 weeks before the last frost (or direct-sow after soil temps hit 70°F+). For fall harvests, plant by early July in most zones. Pro tip: Use biodegradable pots to minimize transplant shock when moving seedlings outdoors!
Yes! Pumpkins are heavy feeders. Use a balanced 10-10-10 fertilizer at planting, then switch to a low-nitrogen, high-phosphorus mix (like 5-10-10) when flowers appear. Organic options: Compost tea or worm castings every 2 weeks for steady growth.
Yellow leaves often signal:
Prune damaged leaves to redirect energy to fruit!
You can, but vines will sprawl 3–6 feet horizontally, hogging space. For small patios, use a sturdy trellis (or even a tomato cage) to train vines upward. Bonus: Vertical growth improves airflow, reducing disease risk and making harvest easier!
Growing pumpkins in containers is not only possible—it’s a rewarding way to enjoy homegrown gourds, even in small spaces! 🎃 With the right container, soil, and care, you can harvest vibrant pumpkins right from your patio or balcony. Whether you’re a beginner or a seasoned gardener, this method proves that big harvests can come from compact setups.
Ready to get started? Pick your favorite pumpkin variety, gather your supplies, and dive in—your future jack-o’-lanterns or pumpkin pies are just a few weeks away! Happy growing! 🌱
