
Beautiful Plants For Your Interior
Beautiful Plants For Your Interior
That moment when you watch delicate leaves crisp under harsh sun is heartbreaking. I’ve lost more seedlings to afternoon scorching than I care to admit—until I figured out how to create shade that actually helps plants thrive, not just survive. The right DIY shade solution can mean the difference between wilted disappointment and lush, productive […]
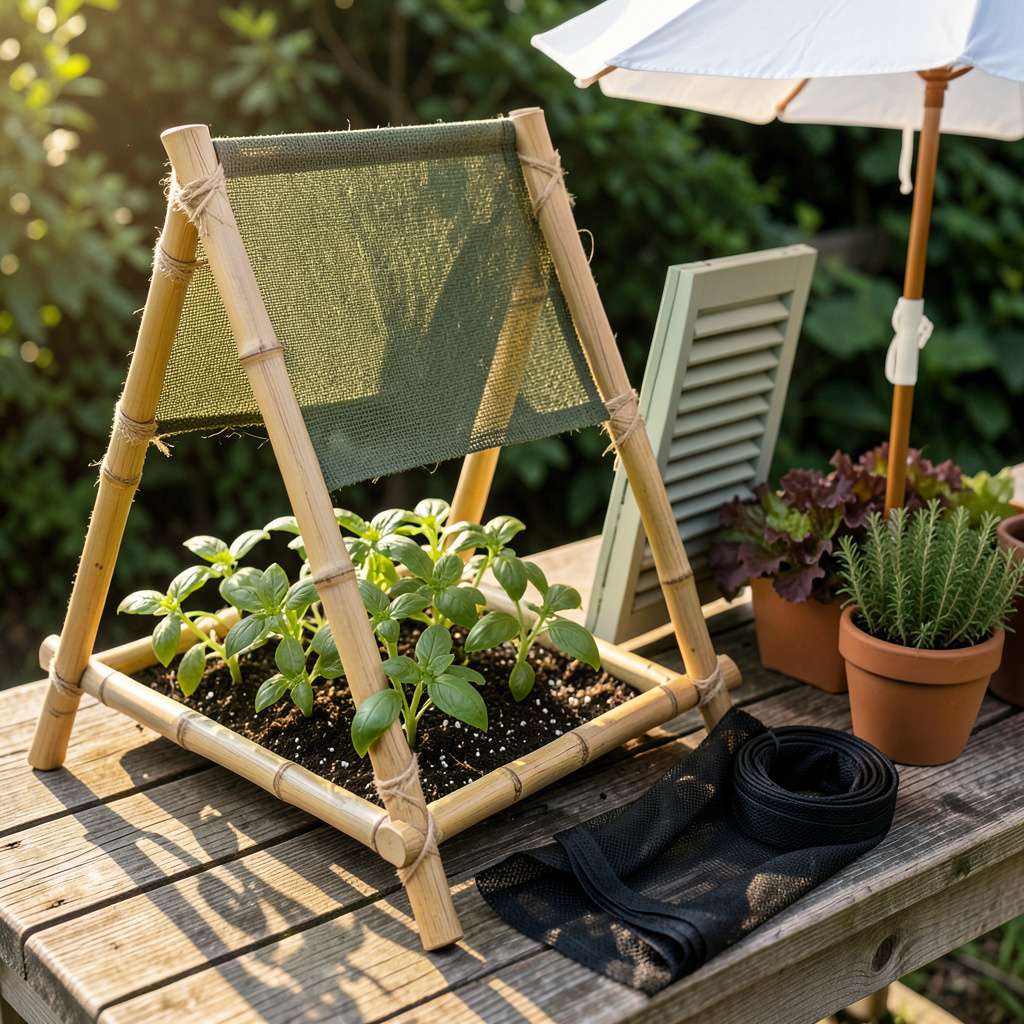
That moment when you watch delicate leaves crisp under harsh sun is heartbreaking. I’ve lost more seedlings to afternoon scorching than I care to admit—until I figured out how to create shade that actually helps plants thrive, not just survive. The right DIY shade solution can mean the difference between wilted disappointment and lush, productive growth.
Here’s the thing—effective shade isn’t about blocking light completely. It’s about filtering the intensity while maintaining airflow. My early attempts with bedsheets and cardboard failed miserably (lesson learned: fabric traps heat, cardboard disintegrates). Now I use materials that diffuse light evenly and last through the season, protecting everything from lettuce to ferns.
You’ll notice the difference within 48 hours: leaves perk up, soil stays moist longer, and new growth emerges stronger. The best part? These solutions cost pennies compared to commercial shade cloth and adapt to any garden size—from container plants to full raised beds. No special tools required, just smart placement and the right materials.
Whether you’re dealing with summer heatwaves or protecting young transplants, this approach works for vegetables, flowers, and even houseplants moved outdoors. The key is matching shade density to your plants’ needs—something I’ll walk you through step by step. Your plants will thank you with their most vibrant growth yet.
📚 In This Guide
Shade cloth (30-50% density, cut to size—measure your plant area first!)
Measuring tape
Sun exposure assessment (know when/where your plants need shade most!)
This method balances protection and light filtration—perfect for seedlings, delicate foliage, or heat-sensitive varieties.
Before building, observe your plants’ current light exposure. Delicate seedlings and leafy greens thrive with 30-50% shade, while flowering plants often need 20-30% shade to prevent scorching. Use a sunlight calculator app or note when leaves show stress (wilting or yellowing) during peak sun hours.
I check the shadow pattern at noon—the shortest shadow indicates maximum sun intensity. If your plants receive 6+ hours of direct sun, they’ll benefit from afternoon shade when temperatures climb above 85°F. This prevents transpiration stress while allowing morning light for photosynthesis.
For temporary shade, I use 30-50% shade cloth (available at garden centers) because it’s breathable and won’t trap heat. For a quick solution, old window screens or sheer curtains work well—just ensure they allow airflow. Permanent structures benefit from wooden lath or bamboo screens spaced 1-2 inches apart to create dappled light.
Cut materials to size, leaving 6 extra inches on all sides for securing. If using fabric, hem the edges to prevent fraying. For wooden structures, sand all surfaces to avoid splinters that could damage stems. Pre-drill holes if you’ll be attaching to posts or frames—this prevents wood splitting when you install it.
Position the shade 12-18 inches above plants to allow air circulation while providing coverage. For cloth or fabric, drape over a simple frame of PVC pipes or wooden stakes, securing with zip ties or staples. Angle the shade slightly toward the south (in northern hemisphere) to block intense afternoon sun while allowing morning light.
Test the setup by placing your hand under the shade at midday—you should feel noticeable temperature difference but still see distinct shadows. Adjust the height or density if plants show signs of etiolation (stretching toward light) or sunburn (bleached spots on leaves). I always check the underside of leaves for crispy edges, which indicate too much exposure.
As the sun’s angle changes, your shade’s effectiveness will too. I mark the ground with a stick at the shade’s edge at noon during installation, then check weekly. When the shadow no longer covers this mark at peak sun, it’s time to adjust the angle or add more material.
Watch for these signs that your shade needs modification: leaves reaching upward excessively (needs more light), soil staying damp too long (needs better airflow), or new growth appearing pale (needs less shade). In fall, you can often reduce shade by 30-40% as temperatures cool, while summer may require adding an extra layer during heatwaves.
After years of protecting delicate plants from harsh sun, here’s what I’ve learned about creating effective shade solutions.
Material Selection Wisdom: The 30-50% shade cloth mentioned in Step 2 is ideal because it provides protection while allowing sufficient light for photosynthesis. I’ve found that cheaper alternatives often degrade quickly under UV exposure. For permanent structures, the 1-2 inch spacing between wooden laths creates that perfect dappled light effect that mimics natural forest canopies.
Installation Precision: When positioning your shade 12-18 inches above plants as specified in Step 3, use a measuring tape for accuracy. This height allows for proper air circulation while providing coverage. I always angle my shade structures slightly southward (in the northern hemisphere) to block the most intense afternoon rays while allowing beneficial morning light.
Seasonal Adjustment Strategy: The weekly check at noon mentioned in Step 4 is crucial. I mark the shade’s edge with a garden stake during installation, then observe how the shadow pattern changes. When the shadow no longer covers this mark, it’s time to adjust. In summer, I often add an extra layer of shade cloth during heatwaves when temperatures exceed 85°F, then reduce coverage by 30-40% in fall as the sun’s angle changes.
Monitoring Technique: Don’t just look at your plants from above. The undersides of leaves reveal the first signs of stress. When checking for sunburn as suggested in Step 3, I gently turn leaves over to inspect for crispy edges or bleached spots. This early detection allows for quick adjustments before permanent damage occurs.
Most delicate plants (like lettuce or ferns) thrive with 30-50% shade when temps exceed 85°F. Succulents and drought-tolerant plants may only need light shade (20-30%) during peak afternoon sun. Monitor leaves—wilting or browning means they’re getting too much direct light. Adjust shade cloth density or positioning as needed!
Repurpose household items! Use old bedsheets, lattice panels, or cardboard propped up with stakes. For small pots, invert a wire basket or colander over plants. Even a folded umbrella works in a pinch. Just ensure airflow to prevent heat buildup—avoid plastic wraps or solid covers.
Yes, but choose lightweight, breathable fabrics like cotton or burlap (avoid polyester—it traps heat). White or light colors reflect sunlight best. Test first: Dense fabrics may block too much light, stunting growth. For long-term use, invest in 30-50% shade cloth for balanced protection.
Prioritize afternoon shade (12 PM–4 PM) when sun intensity peaks. Morning sun is gentler and helps dry dew, reducing fungal risks. If your plants scorch easily (e.g., hydrangeas), add shade by 10 AM. Adjust seasonally—spring/fall may need less coverage than summer.
Check these fixes:
Creating DIY shade for your plants doesn’t have to be complicated—or expensive! With a few simple materials and a little creativity, you can shield delicate leaves from harsh sun while keeping growth on track. 🌱 Whether you opt for repurposed fabrics, lattice panels, or even strategic plant pairings, the key is observing your plants’ needs and adjusting as they grow.
Ready to give it a try? Start with a small project—like shading just one or two sensitive plants—and watch how they thrive! For more inspiration, check out our materials list or experiment with different designs to find what works best for your garden. Happy shading! ✨
