
Beautiful Plants For Your Interior
Beautiful Plants For Your Interior
I’ll never forget the summer my water bill dropped by half—all because of a simple
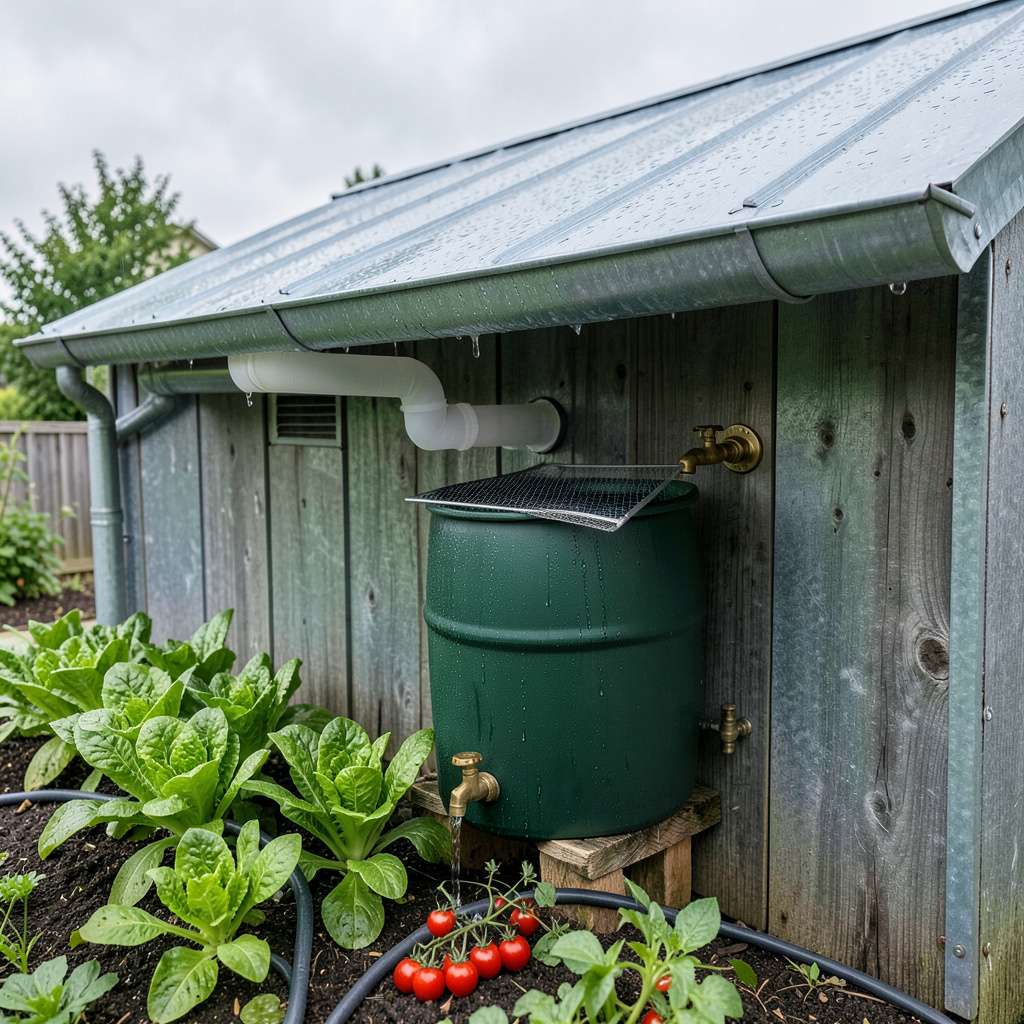
I’ll never forget the summer my water bill dropped by half—all because of a simple Garden Watering System”>rain barrel system. Collecting rainwater isn’t just about saving money; it’s about giving your plants the purest, most natural hydration possible. After years of watching tap water leave mineral deposits on my soil, I switched to rainwater and saw my vegetables grow lush and productive like never before.
The setup is simpler than most people think. A basic 50-gallon barrel, some screening to keep out debris, and a spigot for easy access—that’s all you need to start. I was amazed how quickly the barrel filled during even light showers, providing enough water for my raised beds for days. The best part? Plants thrive on rainwater’s slightly acidic pH, which helps nutrients absorb better than treated tap water.
You’ll notice the difference immediately. Leaves appear more vibrant, soil stays perfectly moist without waterlogging, and you’ll stop worrying about drought restrictions. My tomato plants doubled in size the season I made the switch, and the flavor improvement was undeniable. It’s the kind of garden upgrade that keeps giving back, season after season.
Whether you’re working with a backyard garden or container plants on a patio, this system adapts easily. The initial investment pays for itself in water savings, and you’ll feel good knowing you’re reducing runoff and conserving resources. Here’s how to make it work for your space.
📚 In This Guide
Here’s how I’ve collected and stored rainwater for years—simple, effective, and perfect for garden irrigation.
Start with a clean, non-toxic roof surface like metal, tile, or asphalt shingles. Avoid roofs treated with moss killers or other chemicals that could contaminate your water. I use my backyard shed roof because it’s small, easy to clean, and positioned perfectly for water flow.
Calculate your collection potential: 1 inch of rain on 100 square feet of roof yields about 60 gallons. Measure your roof area and local rainfall averages to estimate your system size. Position your collection area where water naturally flows—don’t fight gravity when setting up your gutters.
Ensure your gutters slope 1/4 inch per 10 feet toward the downspout for proper drainage. Clean them thoroughly before installation—debris will clog your system and reduce efficiency. I use a fine mesh gutter guard to keep leaves out while allowing water to flow freely.
Redirect the downspout to flow into your storage container. You can use flexible downspout extensions or PVC piping. The key is creating a smooth path for water—any sharp turns or dips will slow the flow and cause overflow during heavy rains.
Install a first-flush diverter to capture the initial dirty water that carries dust, pollen, and bird droppings from your roof. This simple device automatically discards the first 1-2 gallons of runoff before clean water enters your storage tank.
I made mine from PVC pipe with a floating ball valve—when the pipe fills, the ball rises and seals the outlet, redirecting clean water to the storage tank. Position it between the downspout and your storage container for maximum effectiveness.
Use food-grade plastic barrels, galvanized metal tanks, or IBC totes for storage. A 55-gallon barrel is perfect for small gardens, while larger systems might need 250-500 gallon tanks. Place your container on a stable, level surface—concrete blocks work well for elevation and stability.
Cover your tank with a fine mesh screen to keep out mosquitoes and debris. I add a small amount of unscented bleach (1/8 teaspoon per gallon) initially to prevent algae growth, then rinse thoroughly before using the water on plants.
Install an overflow pipe near the top of your tank to handle excess water during heavy rains. Direct this to a secondary storage container or to a garden area that can handle extra water. I connect mine to a soaker hose in my vegetable garden for automatic overflow irrigation.
For distribution, use a simple spigot at the base of your tank or connect to a drip irrigation system. Elevate your tank at least 2 feet above ground level to create enough water pressure for gravity-fed systems. Test your setup with a hose before the first rain to check for leaks.
After years of perfecting this system, I’ve learned what makes the difference between a functional setup and one that requires constant maintenance.
Roof Selection Matters: In Step 1, when choosing your collection surface, remember that metal roofs collect water most efficiently while asphalt shingles may leach some chemicals over time. I always recommend cleaning your roof surface with plain water (no detergents) at least twice a year to maintain water quality. The calculation of 60 gallons per inch of rain on 100 square feet is accurate, but remember that real-world collection will be slightly less due to evaporation and minor spillage.
Gutter Slope Precision: The 1/4 inch per 10 feet slope mentioned in Step 2 is critical—this isn’t just a suggestion. I’ve found that using a level and measuring tape to verify this slope prevents 90% of drainage issues. When installing gutter guards, opt for stainless steel mesh rather than plastic; it lasts longer and doesn’t sag under heavy leaf loads. Test your gutter flow with a hose before the first rain to catch any alignment issues.
First-Flush Importance: Don’t underestimate the 1-2 gallons discarded by your first-flush diverter in Step 3. This initial runoff contains the highest concentration of contaminants from your roof. I recommend making your diverter pipe slightly larger than the minimum—about 4 inches in diameter—to handle sudden downpours without overflowing. Position it where you can easily clean it out after storms, as debris accumulates quickly in this component.
Tank Elevation Strategy: The 2 feet elevation mentioned in Step 5 isn’t arbitrary—it creates enough pressure for most drip irrigation systems. I’ve found that placing tanks on concrete blocks not only elevates them but also prevents moisture wicking from the ground that can cause mold. For larger 250+ gallon tanks, consider a more permanent foundation like a concrete pad to prevent shifting over time.
Yes! Rainwater is generally safe for gardens, including edibles, as long as you collect it from a clean, non-toxic roof (avoid asphalt shingles or treated wood). Use a first-flush diverter to skip the initial dirty runoff, and avoid storing it in metal containers that could leach contaminants. When in doubt, test for pH or contaminants—most rainwater is softer and better for plants than tap water!
Stored properly in a dark, sealed container (like a food-grade barrel), rainwater stays fresh for 1–3 months. To extend shelf life:
For longer storage, consider adding non-toxic stabilizers (like hydrogen peroxide in tiny doses).
Start before your rainy season! In most climates, late winter or early spring is ideal—you’ll catch the first heavy rains to fill your system. If you’re in a drought-prone area, set up storage year-round but expand capacity before wet months. Pro tip: Check local rainfall patterns to time your setup perfectly!
For houseplants, absolutely—just filter out debris first. For drinking, only after proper treatment: boil, filter (0.1-micron or reverse osmosis), or disinfect with UV/bleach. Never drink untreated rainwater—it may contain bird droppings, dust, or pollutants. Stick to garden use unless you’re prepared to purify it!
Stagnant water breeds bacteria or algae, causing odors. Fix it by:
Prevent future smells with regular maintenance and a tight-sealing lid.
Collecting and storing rainwater isn’t just a smart way to save money—it’s a powerful step toward sustainable living and a thriving garden! 🌱 By capturing nature’s free resource, you’ll reduce waste, cut utility bills, and give your plants the pure, chemical-free hydration they crave.
Ready to get started? Pick one system—whether it’s a simple barrel or a full-scale setup—and begin with what fits your space and budget. Every drop counts, and your garden (and the planet) will thank you! 💧✨
