
Beautiful Plants For Your Interior
Beautiful Plants For Your Interior
There’s something magical about orchids growing on tree branches—like nature’s own living jewelry. I first tried this after seeing wild epiphytic orchids thriving without soil, and now my oak tree hosts a collection that blooms reliably every spring. The secret isn’t complicated equipment but understanding how these plants naturally attach and absorb moisture from the […]
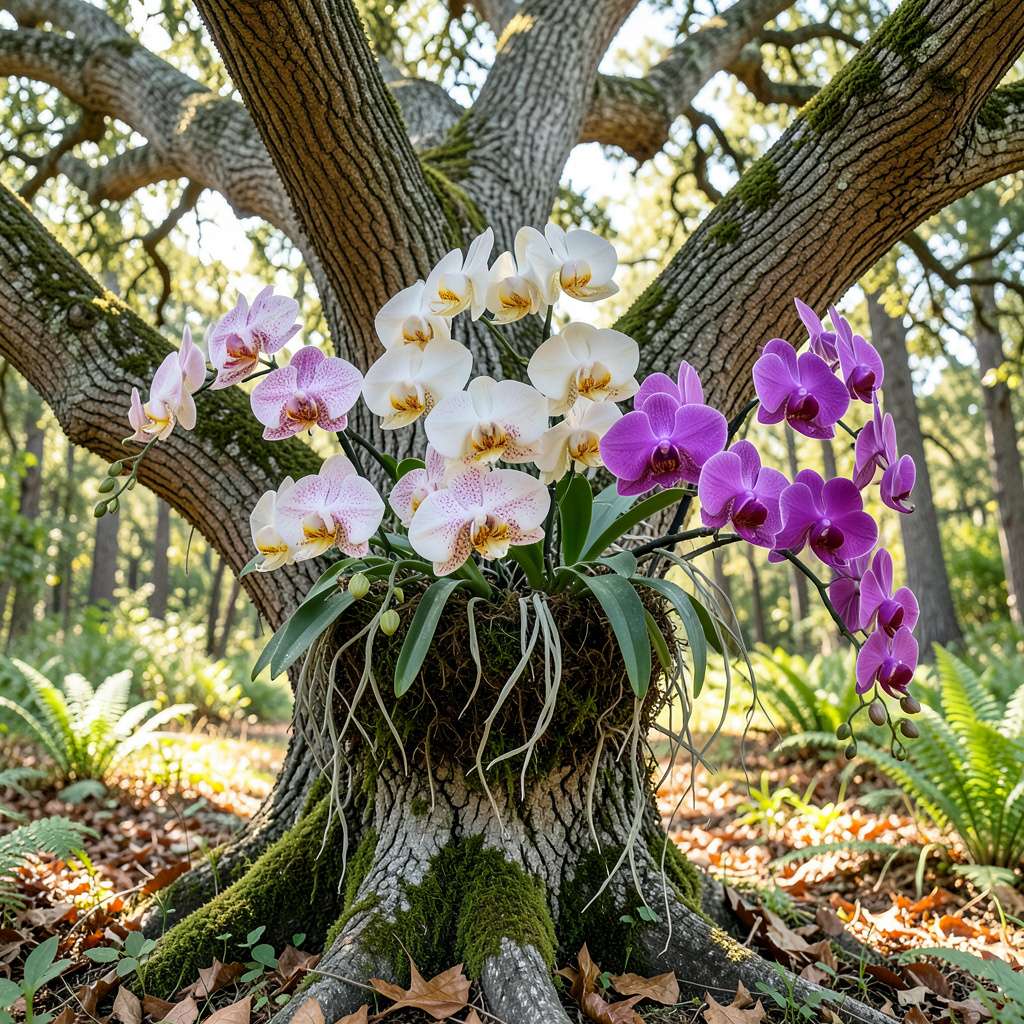
There’s something magical about orchids growing on tree branches—like nature’s own living jewelry. I first tried this after seeing wild epiphytic orchids thriving without soil, and now my oak tree hosts a collection that blooms reliably every spring. The secret isn’t complicated equipment but understanding how these plants naturally attach and absorb moisture from the air.
Most people assume orchids need pots and soil, but many species actually prefer the airflow and natural support of tree bark. You’ll need just a few supplies: the right orchid species (like Phalaenopsis or Cattleya), some sphagnum moss for initial attachment, and a tree with rough bark. The roots will gradually wrap around the branches, creating a stunning display that looks completely natural.
What surprised me most was how little maintenance these require once established. No repotting, no soil to replace—just occasional misting and letting nature do the rest. The blooms appear more vibrant when grown this way, and the plants often live longer than their potted counterparts. It’s like giving your orchids the exact conditions they evolved for.
This method works in most climates where orchids thrive outdoors, from humid southern gardens to protected patio spaces. The key is starting with healthy plants and choosing the right tree—something with sturdy branches and bark that holds moisture. Once you see that first bloom dangling from a branch, you’ll be hooked.
📚 In This Guide
Sphagnum moss (1 small bag, ~4 oz) – for moisture retention.
Sharp sterilized pruners or scissors (1 pair) – for trimming roots/ties.
Balanced orchid fertilizer (20-20-20, 8 oz) – for monthly feeding.
Transforming a tree into a living orchid display is simpler than you think—just follow these natural mounting techniques.
Choose a mature tree with rough, textured bark like oak, cypress, or palm—these surfaces allow orchid roots to grip naturally. Avoid smooth-barked trees or those that drop excessive sap. I’ve found live oaks work particularly well because their furrowed bark holds moisture while still allowing airflow.
For orchids, select epiphytic varieties such as Phalaenopsis, Cattleya, or Dendrobium. These species thrive without soil, absorbing water and nutrients from the air. Inspect your orchid for healthy, silvery-green roots—these indicate it’s ready for mounting.
Gently remove the orchid from its pot and rinse the roots with lukewarm water to clean off any potting medium. Use sharp, sterilized scissors to trim away dead or mushy roots—healthy roots should feel firm and look plump. Let the plant air-dry for 1-2 hours before mounting to prevent rot.
On the tree, select a north- or east-facing spot that receives bright, indirect light for most of the day. Avoid direct afternoon sun, which can scorch leaves. The ideal branch should angle slightly upward to prevent water from pooling at the plant’s base after rain.
Position the orchid against the bark so its roots spread naturally over the surface. Use soft, stretchy material like nylon stockings or specialized orchid mounting clips to hold it in place—never wire, which can cut into stems as the plant grows. I wrap the stocking loosely around the base of the plant and the branch, tying it with a simple knot.
Don’t bury the roots under moss or other materials. The roots need exposure to air and occasional drying between waterings. If the orchid feels unstable, add a second tie higher up, but avoid constricting new growth. Check that the plant sits at a slight angle so water drains away from the crown.
For the first 2-3 weeks, mist the orchid daily with water to encourage root attachment. After that, water deeply 2-3 times per week, simulating a tropical rain shower. Use a hose with a gentle spray or a watering can to soak the roots and bark thoroughly, then let it dry completely before the next watering.
Feed monthly with a balanced, water-soluble orchid fertilizer diluted to half strength. Apply it during your regular watering routine, ensuring the solution reaches both the roots and the bark surface. You’ll know the orchid is adapting well when new roots grow tightly against the tree and take on a greenish tint after watering.
Check the orchid weekly for signs of stress, such as yellowing leaves or shriveled roots. If the leaves develop sunburn spots (light brown patches), the plant needs more shade. Conversely, dark green, floppy leaves suggest it’s not getting enough light. Adjust its position on the tree or add shade cloth if necessary.
After 6-12 months, the orchid’s roots should anchor firmly to the bark, and you can remove the ties. Watch for new growths or flower spikes—these signal the plant is thriving. Once established, your tree-mounted orchid will bloom annually with minimal care, creating a breathtaking natural display.
After years of experimenting with epiphytic orchids, I’ve learned these practical insights will help your tree-mounted plants thrive.
Root Preparation Secret: In Step 2, when you let the orchid air-dry for 1-2 hours, place it in a spot with gentle airflow but no direct sunlight. This drying period is crucial—it prevents rot while allowing the roots to become slightly pliable for better bark adhesion. I’ve found that orchids dried for the full 2 hours attach more securely to the tree surface.
Light Positioning Tip: When selecting your mounting spot in Step 2, remember that north-facing positions receive the most consistent indirect light throughout the year. If you must use an east-facing spot, choose one that gets morning sun but is shaded by the tree’s canopy by 10 AM. This mimics the dappled light conditions orchids love in their natural habitats.
Attachment Technique: For Step 3, I’ve discovered that using two nylon stocking ties—one at the base and one about a third of the way up the plant—provides the best stability without restricting growth. Make the lower tie snug enough to hold the plant in place during wind, but leave the upper tie slightly looser to accommodate new root growth.
Watering Wisdom: During the initial 2-3 weeks of daily misting in Step 4, use room temperature water to avoid shocking the plant. I like to mist in the early morning so the roots have time to absorb moisture before the heat of the day. After this period, when you switch to deep watering 2-3 times per week, soak the entire root system until water runs off the bark—this encourages roots to grow outward and attach to the tree.
Epiphytic orchids (like Phalaenopsis or Cattleya) naturally thrive on tree branches in the wild. They absorb moisture and nutrients from the air, rain, and debris around them—no soil required! Just ensure good airflow and occasional misting to mimic their tropical habitat.
Aim for spring or early summer when orchids enter active growth. Avoid extreme heat or cold, as stress can hinder attachment. Mild, humid conditions help roots establish faster. In frost-prone areas, wait until temperatures stay above 50°F (10°C) at night.
Yes! Without soil, they dry out faster. Water 2–3 times a week in warm weather (daily in extreme heat) by soaking the roots/mount for 5–10 minutes. Use rainwater or distilled water to avoid mineral buildup. Reduce watering in winter when growth slows.
Check these fixes:
Patience is key—some orchids take 1–2 years to adjust!
Definitely! Try:
Avoid treated wood—chemicals can harm roots. Indoor growers can use humidity trays nearby.
Growing orchids on trees opens up a world of natural beauty and low-maintenance elegance! 🌿 By mimicking their epiphytic roots, you create an environment where these stunning plants can thrive with minimal fuss. Whether you’re mounting Phalaenopsis, Dendrobium, or Vandas, the key is balancing moisture, airflow, and gentle care.
Ready to start? Pick a healthy orchid and a suitable tree—then let nature do the rest! For extra confidence, revisit the FAQ section or experiment with a small test mount first. Happy growing! 🌸
