
Beautiful Plants For Your Interior
Beautiful Plants For Your Interior
Moving a Venus fly trap feels like performing surgery on a tiny, carnivorous alien. I’ve learned the hard way that these plants don’t forgive rough handling—one wrong move and you’ll see those dramatic traps turn black overnight. The key is understanding their swampy roots and delicate trigger hairs before you even touch them. After losing […]
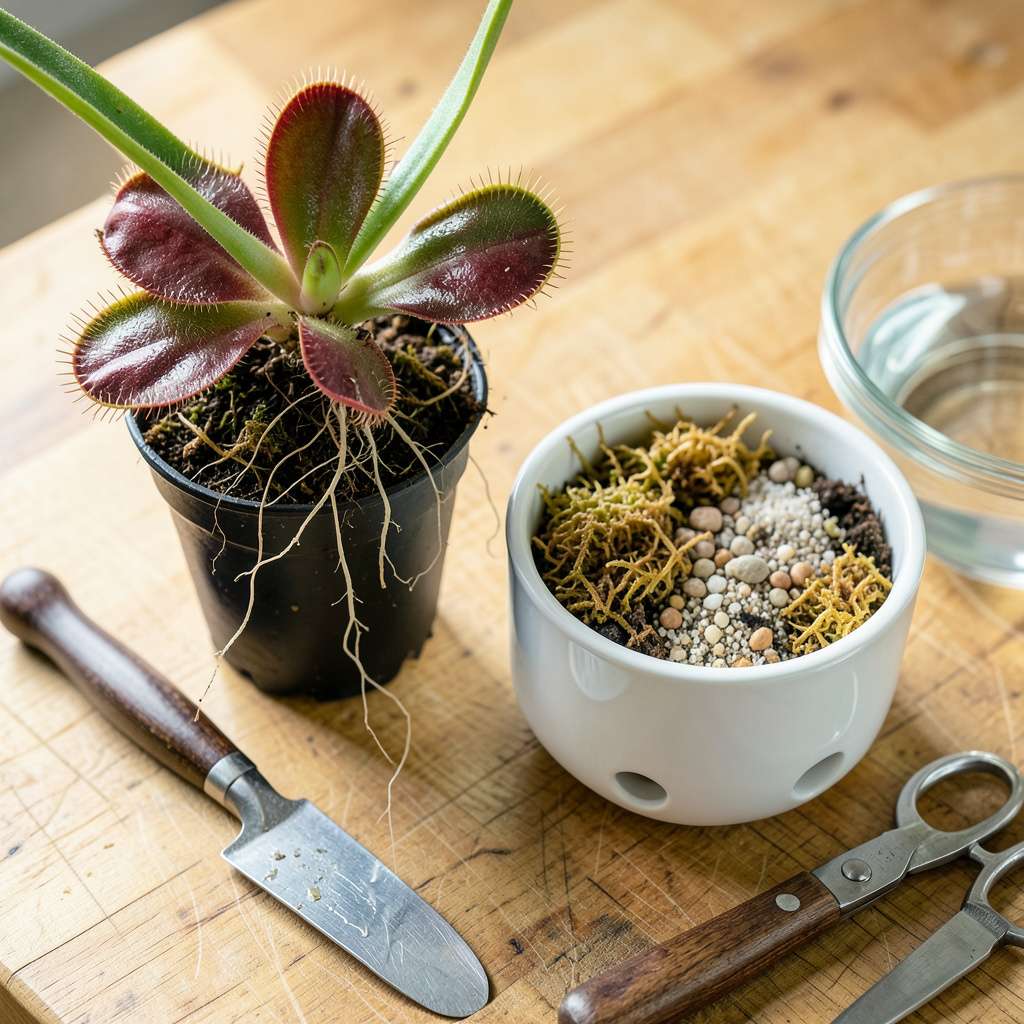
Moving a Venus fly trap feels like performing surgery on a tiny, carnivorous alien. I’ve learned the hard way that these plants don’t forgive rough handling—one wrong move and you’ll see those dramatic traps turn black overnight. The key is understanding their swampy roots and delicate trigger hairs before you even touch them.
After losing three plants to transplant shock my first year, I developed a method that keeps them thriving. You’ll need distilled water, the right soil mix (regular potting soil is a death sentence), and patience during the critical 2-week recovery period. Most guides skip the part about how these plants actually prefer being slightly root-bound.
Done correctly, your fly trap will show new growth within 3-4 weeks, with traps that snap shut faster than before. The difference between a stressed plant and a thriving one comes down to three handling techniques most people get wrong. I’ll walk you through each step so your plant doesn’t just survive—they’ll hunt better than ever.
This works for both mature plants and young divisions, whether you’re upgrading containers or rescuing a big-box store plant from poor conditions. The process takes about 20 minutes but pays off for years with a healthier, more aggressive carnivore.
📚 In This Guide
Moving these fascinating carnivorous plants doesn’t have to be stressful—follow my method for thriving, healthy specimens.
Select a container with drainage holes that’s 2-3 inches deeper than the current pot. Venus fly traps develop long roots, and constricted space leads to stunted growth. I use plastic or glazed ceramic pots—unglazed terra cotta wicks away too much moisture from the carnivorous soil mix.
Fill the new container with a 50/50 blend of sphagnum peat moss and perlite. Never use regular potting soil, compost, or fertilizer—these contain minerals that will burn the sensitive roots. Moisten the mix with distilled or rainwater only until uniformly damp but not soggy.
Water your fly trap thoroughly 1 hour before transplanting to hydrate the roots and reduce shock. Gently squeeze the current pot’s sides to loosen the root ball, then turn it upside down with your hand supporting the plant. The entire root mass should slide out intact—if it resists, run a clean knife around the inner rim.
Inspect the roots for any black, mushy sections (signs of rot) and trim these with sterilized scissors. Healthy roots appear white or tan. Handle the plant by its root ball only—touching the traps may trigger them unnecessarily, wasting the plant’s energy.
Create a planting hole in the new container just deep enough to accommodate the root system at its current depth. Place the fly trap in the hole and gently firm the soil around the base. The crown (where roots meet growth) should sit exactly at soil level—burying it causes rot, while exposing it dries the plant.
Water immediately with 1-2 cups of distilled water until it drains from the bottom. This eliminates air pockets around roots. Position the pot in bright, indirect light for the first 3-5 days—direct sun during recovery can scorch stressed leaves.
Keep the soil consistently moist but never waterlogged. I check daily by pressing my finger 1 inch into the soil—it should feel damp like a wrung-out sponge. Use only the tray method (place pot in ½ inch of water) or top-water with distilled water.
Expect some leaf blackening—this is normal transplant stress. New growth should appear within 2-3 weeks. Resume feeding only after you see healthy new traps forming. Avoid fertilizers completely; these plants derive nutrients from insects, and synthetic products will kill them.
After 5-7 days in indirect light, begin acclimating your fly trap to full sun exposure. Move it to morning sun only for 3 days, then gradually increase to 6+ hours of direct sunlight daily. Watch for leaf scorch (brown, crispy edges)—if this occurs, reduce exposure by 1 hour daily until the plant adjusts.
Full sun intensifies the red coloration in the traps and strengthens the plant. In hot climates (consistently above 90°F), provide afternoon shade to prevent heat stress. Your fly trap will show its appreciation with vigorous growth and more effective trapping.
Transplanting carnivorous plants requires special attention to detail, but these insights from years of hands-on experience will help ensure your Venus fly trap thrives in its new home.
Root Handling Protocol: In Step 2, when removing the plant, resist the urge to rush this process. The 1-hour pre-watering is critical as it makes the root ball more cohesive and less prone to damage. I’ve found that using room-temperature distilled water for this pre-soak reduces transplant shock more effectively than cold water. Always support the root mass from below—never pull by the stems or leaves.
Soil Level Precision: Step 3’s instruction about crown placement at soil level cannot be overstated. I use a simple trick: after positioning the plant, I lay a ruler across the pot to verify the crown sits exactly flush with the soil surface. Even being off by ¼ inch can lead to rot or desiccation. Gently firm the soil around the base using your fingertips rather than pressing down, which can compact the delicate 50/50 peat-perlite mix too much.
Recovery Environment Control: The 3-5 day indirect light period in Step 4 is when most failures occur. Create a humidity dome using a clear plastic bag supported by stakes (not touching the plant) for the first 48 hours. This mimics the plant’s natural bog environment while allowing light penetration. Remove it for 1 hour daily to prevent mold. Keep the pot away from drafts, air vents, or temperature fluctuations during this critical recovery window.
Water Quality Vigilance: Throughout the process, but especially in Step 1 and Step 3, water quality makes or breaks success. I maintain a dedicated distilled water jug just for my carnivorous plants. Even filtered tap water often contains enough minerals to cause tip burn over time. If you must use rainwater, collect it only after 10 minutes of steady rain to avoid atmospheric contaminants washing into your collection container.
No, avoid transplanting while your plant is digesting prey. The stress of relocation can disrupt digestion and weaken the trap. Wait until the trap reopens (usually 5–12 days) before moving it. If urgent, gently remove the bug with tweezers to minimize shock.
Early spring (March–April) is ideal, as the plant exits dormancy and enters active growth. Avoid transplanting in winter (dormancy) or peak summer heat, which can stress the plant. If repotting in fall, do it at least 4–6 weeks before dormancy begins.
Never use standard potting soil—it’s too nutrient-rich and will kill your plant! Stick to a 1:1 mix of peat moss and perlite (or silica sand). Avoid fertilizers, compost, or minerals. Carnivorous plants thrive in low-nutrient, acidic, and well-draining soil.
Don’t panic! Mild wilting is normal for 1–2 weeks as the plant adjusts. Keep it in bright, indirect light, maintain high humidity, and avoid triggering traps. If wilting persists beyond 3 weeks, check for root rot or overwatering (use distilled water only!).
Yes! If your plant has multiple growth points (crowns), you can gently separate them during repotting. Use sterilized scissors to cut connecting rhizomes, then pot each division individually. Do this in spring for best results—avoid dividing weak or dormant plants.
Transplanting your Venus fly trap doesn’t have to be intimidating! With the right soil, gentle handling, and a little patience, your plant will thrive in its new home. 🌱 Remember, consistent moisture and bright, indirect light are key to helping it recover and grow stronger.
Now that you’ve mastered the basics, why not track its progress over the next few weeks? Watch for new traps forming—that’s your plant’s way of saying “Thanks for the upgrade!” If you’re feeling adventurous, explore propagation techniques to expand your carnivorous collection. Happy growing! 🌿
