
Beautiful Plants For Your Interior
Beautiful Plants For Your Interior
That moment when your orchid’s roots have fused to its clay pot is enough to make any grower pause. I’ve been there—staring at what looks like an impossible situation, worried about tearing those delicate roots. The good news? With the right approach, you can separate them safely and give your plant a fresh start in […]
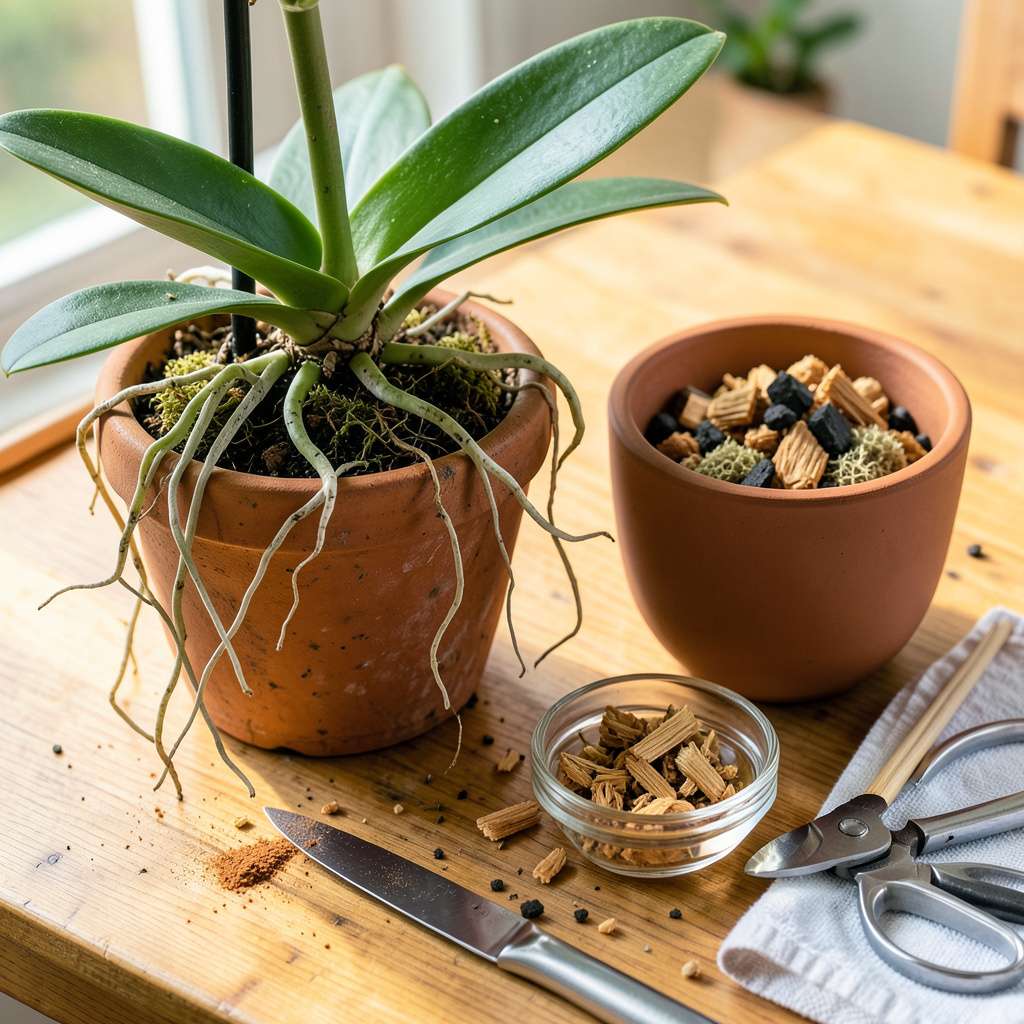
That moment when your orchid’s roots have fused to its clay pot is enough to make any grower pause. I’ve been there—staring at what looks like an impossible situation, worried about tearing those delicate roots. The good news? With the right approach, you can separate them safely and give your plant a fresh start in a better home.
Clay pots create this problem because roots grow into the porous surface over time. My first attempt ended with broken roots and a stressed plant, but I learned the trick is patience, not force. Soak the pot first to loosen things up, then work gently with tools designed for orchid care. The process takes 10-15 minutes of careful work, not brute strength.
What you’ll end up with is an orchid ready to thrive in fresh media, with roots that can finally breathe and absorb moisture properly. That first new leaf or flower spike after repotting makes the whole process worth it—your plant will thank you with healthier growth and more blooms.
This method works for phalaenopsis, cattleyas, or any orchid that’s become one with its container. Whether you’re dealing with a stubborn old plant or just want to upgrade its home, here’s how to do it without the drama.
📚 In This Guide
Pruning shears or sterilized scissors (for trimming dead roots).
This method ensures your orchid transitions smoothly to its new home with minimal stress and maximum root protection.
Gather everything you’ll need before starting: a clean work surface, sterile pruning shears, fresh orchid bark mix, and a new pot that’s just 1-2 inches larger than the current one. I lay out newspaper or a towel to catch debris—orchid roots are delicate, and you don’t want to lose track of any pieces.
Fill a bowl with lukewarm water to soak the clay pot later. This softens any stubborn root attachments. Have a spray bottle ready with clean water to keep roots hydrated during the process. Dry roots become brittle and snap easily, so misting prevents damage.
Submerge the entire clay pot in the lukewarm water for 10-15 minutes. This softens the clay and makes root removal easier. You’ll feel the pot become slightly slippery—that’s your cue it’s ready. Gently wiggle the orchid base while supporting the pot; often, the roots release with minimal effort.
If roots remain stuck, don’t pull. Instead, use a sterile butter knife or plastic plant tag to carefully slide between the clay and roots. Work slowly around the perimeter. You’ll hear a soft “pop” as roots detach—this is normal. Never force it; patience prevents tearing healthy roots.
Once free, rinse the root ball under room-temperature water to remove old bark and debris. Healthy roots are firm and silver-green when dry, turning green when wet. Use your fingers to gently untangle roots, but don’t worry about perfect separation—some clumping is natural.
With sterile shears, trim any mushy, black, or hollow roots (these are dead or diseased). Cut just above the damaged section at a 45-degree angle. I always disinfect my tools with rubbing alcohol between cuts to prevent spreading infections. Leave healthy roots intact, even if they look slightly discolored.
Place a 1-inch layer of fresh orchid bark mix in the new pot. Position the orchid so the base sits just below the rim, then fill around the roots with more mix. Gently tap the pot on the table to settle the medium—don’t press down, as this compacts the bark and suffocates roots.
The crown (where leaves meet roots) should sit ½ inch above the medium to prevent rot. Water lightly to help the mix settle, then add more bark if needed. You’ll know it’s right when the orchid stands upright without wobbling but isn’t packed tightly in the pot.
Keep the orchid in bright, indirect light (east or north windows work well) and maintain 60-70°F temperatures. Avoid direct sun for 7-10 days—newly repotted orchids are sensitive to stress. Mist the leaves daily but don’t water again until the bark feels dry to the touch (usually 5-7 days).
Watch for new root growth (silver tips emerging) within 2-3 weeks—this confirms successful repotting. If leaves wrinkle slightly, that’s normal as the plant adjusts. Don’t fertilize for 4 weeks; fresh bark contains enough nutrients, and overfeeding shocks recovering roots.
Repotting an orchid from clay requires patience and attention to detail. Here’s what I’ve learned from years of experience to make the process smoother.
Water Temperature Matters: In Step 2, using lukewarm water for the 10-15 minute soak is crucial. I’ve found that water that’s too hot can shock the roots, while cold water won’t soften the clay effectively. The perfect temperature should feel comfortable on your wrist—like warm bathwater. This gentle warmth helps loosen the roots without causing stress to the plant.
Tool Sterilization is Key: When trimming roots in Step 3, I always keep a small container of rubbing alcohol nearby. Between each cut, I quickly dip my shears to sterilize them. This might seem excessive, but it prevents spreading any potential infections from damaged roots to healthy ones. A quick dip and wipe takes seconds but makes a huge difference in your orchid’s recovery.
Potting Depth Precision: In Step 4, getting the crown position exactly right is more important than you might think. I use a simple trick: place a ruler across the pot’s rim to measure that ½ inch gap above the medium. This small detail prevents crown rot, which is one of the most common reasons repotted orchids fail to thrive. The orchid should sit securely but never feel buried.
Post-Repotting Environment: During the 7-10 day adjustment period mentioned in Step 5, I’ve noticed that maintaining consistent 60-70°F temperatures is vital. Even small fluctuations can stress the plant. If your home runs cooler, consider using a Seedling Heat Mat Alternative: Some Budget-friendly Options for You”>seedling heat mat under the pot (not directly touching) to maintain that ideal range. The gentle bottom warmth encourages root recovery without overheating the leaves.
Most orchids need repotting every 1-2 years or when roots overcrowd the pot. For clay-attached orchids, check for root circling, broken clay pieces, or degraded medium. If the plant looks healthy but the clay pot is intact, you can wait—just refresh the top potting mix annually.
Yes! Clean the pot thoroughly with hot water and a 10% bleach solution (rinse well) to remove salts, algae, or pests. Inspect for cracks—clay pots with large fractures may not support proper drainage. If reused, soak it in water for 1 hour before repotting to prevent moisture theft from roots.
Don’t force it! Soak the pot in lukewarm water for 10-15 minutes to soften roots and medium. Gently wiggle the plant while supporting the base. For stubborn roots, sacrifice the pot: carefully break the clay in sections to free the plant without tearing roots.
If the orchid is thriving, try a “pot-in-pot” method: place the clay pot (with drainage holes) inside a slightly larger decorative container. Fill gaps with sphagnum moss to retain humidity. This avoids repotting stress while refreshing the growing environment.
Wilting is common due to transplant shock. Ensure the pot has drainage, avoid direct sun for 1 week, and mist leaves daily. If wilting persists, check for overwatering or damaged roots—trim black/mushy roots and repot in fresh bark mix. Keep humidity at 50-70% to aid recovery.
Repotting an orchid from a clay pot doesn’t have to be stressful! With the right tools, patience, and gentle techniques, you can safely detach your plant while keeping its roots healthy and intact. 🌱 Remember, the key is slow and steady—rushing can lead to damage, but a careful approach ensures your orchid thrives in its new home.
Now that your orchid is free and repotted, give it some extra TLC by monitoring its adjustment over the next few weeks. Check the moisture levels, avoid overwatering, and watch for new growth. Ready to take your orchid care to the next level? Explore our guide on post-repotting care to keep your beauty blooming for years!
