
Beautiful Plants For Your Interior
Beautiful Plants For Your Interior
That moment when you spot a keiki on your orchid is pure magic. I still remember the first time I noticed those tiny leaves and roots forming on the flower spike—like the plant was giving me a bonus gift. Repotting that baby orchid properly makes all the difference between a thriving new plant and one […]
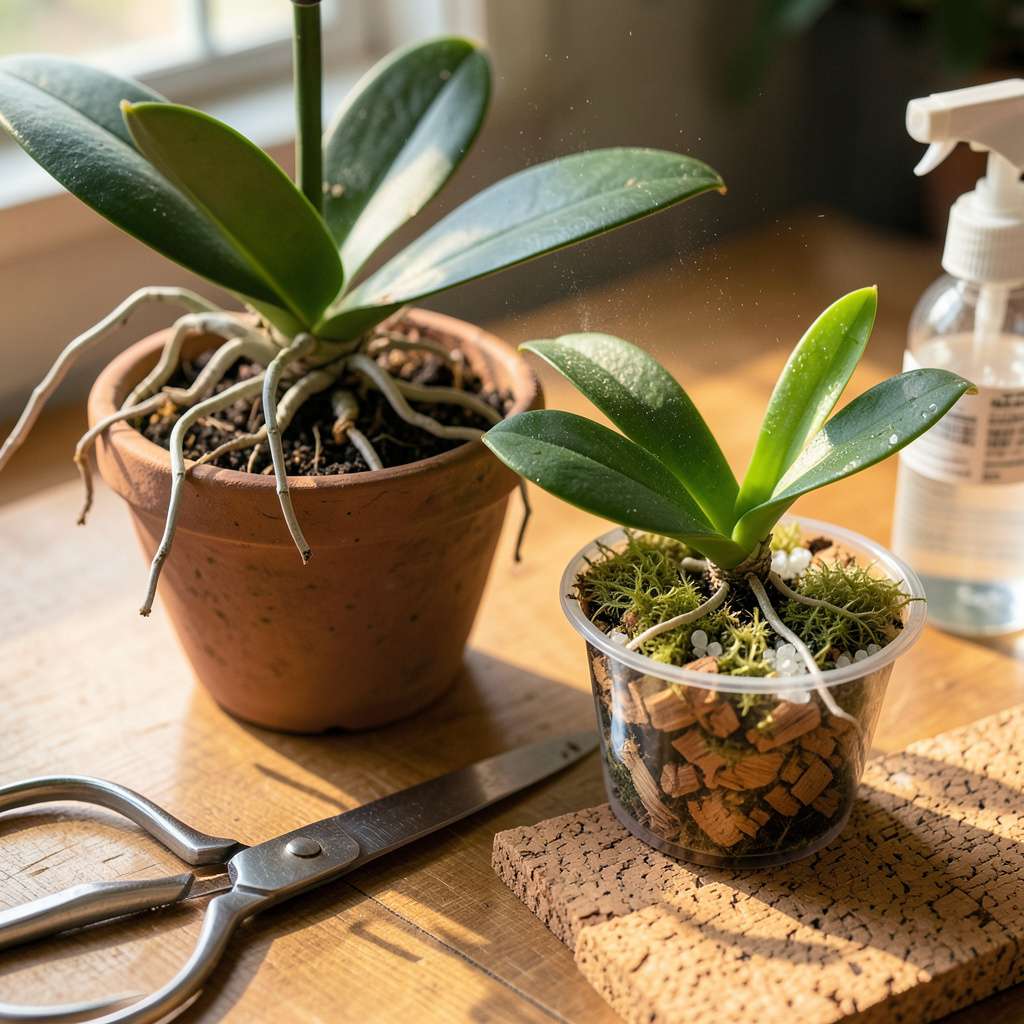
That moment when you spot a keiki on your orchid is pure magic. I still remember the first time I noticed those tiny leaves and roots forming on the flower spike—like the plant was giving me a bonus gift. Repotting that baby orchid properly makes all the difference between a thriving new plant and one that struggles to take off.
Here’s the thing—most people rush this process. I learned the hard way that timing matters just as much as technique. You want those roots to be 2-3 inches long before making the move, and the right potting mix (not regular soil) prevents rot while giving the keiki room to grow. The whole operation takes about 20 minutes with the right supplies.
What you end up with is a second orchid that will bloom in 12-18 months, identical to its parent plant. The satisfaction of watching that first new leaf unfurl after repotting never gets old. Plus, you avoid the heartbreak of a keiki that withers because it wasn’t separated properly.
Works for Phalaenopsis, Dendrobium, or any orchid that produces keikis. The method scales whether you’re dealing with your first baby orchid or your twentieth. Let’s walk through exactly how to do it right—no guesswork, no wasted keikis.
📚 In This Guide
This simple process ensures your baby orchid thrives in its new home—let’s get started.
Wait until your keiki has developed 3-4 mature leaves and 2-3 inches of root growth. You’ll notice the roots look silvery when dry and turn green when watered—that’s your sign they’re active and ready. Repotting too early stresses the plant and can stunt growth.
I always check for roots that are at least 1 inch long before making the move. If the keiki is still attached to the mother plant, you’ll need to separate it first by making a clean cut with sterilized scissors, leaving about 1 inch of stem on either side.
Choose a small pot—3-4 inches in diameter works perfectly for most keikis. Orchid pots with slits or holes provide the best airflow. I prefer clear plastic pots because they let me monitor root health without disturbing the plant.
Use a well-draining orchid mix (never regular potting soil). I like a blend of fir bark, perlite, and sphagnum moss in equal parts. Soak the medium in lukewarm water for 10 minutes before using—this prevents it from drawing moisture away from the roots during the first watering.
Place the keiki in the center of the pot, spreading its roots gently over a small mound of your prepared medium. The base of the plant should sit just above the pot’s rim—this prevents crown rot. Hold it steady while you add more mix around the roots.
Don’t bury the roots completely. I leave about 20% exposed to encourage airflow. Gently tap the pot to settle the medium, but don’t press down—orchid roots need loose, airy conditions. If the keiki wobbles, use a small stake and soft tie to secure it until roots establish.
After repotting, water lightly until moisture just begins to drip from the bottom. Let all excess water drain completely—soggy roots are the fastest way to kill a keiki. I place my newly potted keikis in bright, indirect light (an east-facing window works perfectly) with temperatures between 65-75°F.
Resist the urge to water again for 5-7 days. This gives any damaged roots time to heal and prevents rot. You’ll know the plant is adjusting well when new root tips appear (they’ll be bright green) and existing leaves stay firm. Mist the leaves lightly every other day to maintain humidity during this critical period.
Check the keiki daily for the first two weeks. Healthy signs include firm leaves, silvery-green roots with green tips, and no yellowing. If leaves wrinkle slightly, that’s normal—it’s using stored energy to grow new roots.
After 2-3 weeks, begin your normal orchid care routine. Water when the medium feels almost dry (usually every 7-10 days), and fertilize with a quarter-strength orchid fertilizer every other watering. You’ll see noticeable new growth within 4-6 weeks if conditions are right.
Repotting a keiki is delicate work, but these practical insights will help you avoid common pitfalls and set your baby orchid up for success.
Root Readiness Check: In Step 1, don’t rush the process—waiting for those 2-3 inches of root growth is crucial. I’ve learned that roots shorter than 1 inch often struggle to establish in new medium. The silvery-to-green color change when watered is your best indicator of active growth. If you’re separating from the mother plant, that 1 inch of stem on either side gives the keiki stability while preventing rot at the cut site.
Medium Preparation Secret: The 10-minute soak for your orchid mix in Step 2 makes all the difference. I skipped this once and watched my keiki struggle with moisture stress for weeks. Lukewarm water (not hot) helps the bark and moss absorb just enough moisture without becoming waterlogged. When you squeeze the prepared medium, it should hold together briefly then crumble—this texture gives roots the perfect balance of moisture and airflow.
Positioning for Success: Step 3’s instruction to leave 20% of roots exposed isn’t just about airflow—it lets you monitor root health. I use clear plastic pots specifically for this visibility. When positioning your keiki, create that small mound first so the base sits slightly above the rim. This prevents crown rot while still allowing roots to access moisture. A gentle tap to settle the medium is better than pressing—trust me, I’ve compacted roots by being too enthusiastic with this step.
Post-Repotting Patience: The 5-7 day waiting period in Step 4 tests every gardener’s patience, but it’s non-negotiable. I’ve ruined keikis by watering too soon—those damaged root tips need time to callous. During this period, focus on maintaining 65-75°F temperatures and bright indirect light. The east-facing window suggestion is perfect; direct sun can scorch stressed leaves. When you do resume watering, remember that “almost dry” means the top inch of medium should feel dry to the touch.
Yes! You can repot a keiki while it’s still attached if it has 3–4 roots (2–3 inches long) and 2–3 leaves. This method reduces stress since the mother plant continues supplying nutrients. Just ensure the keiki’s roots are long enough to anchor in the new pot. Snip the connecting stem only after repotting if needed.
Spring or early summer is ideal—when orchids enter active growth. Avoid repotting in winter or during blooming, as the keiki may struggle to adapt. If roots are rotting or overcrowded, repot immediately regardless of season, but provide extra humidity and gentle care afterward.
Standard potting soil suffocates orchid roots. Use a chunky, well-draining mix (e.g., fir bark, sphagnum moss, or coconut husk chips). For tiny keikis, add extra sphagnum moss to retain moisture without waterlogging. Avoid dense mixes—airflow is key to preventing rot!
Wilting often signals shock or overwatering. Check if the mix is too wet (let it dry slightly between waterings) or if roots were damaged during repotting. Move the keiki to indirect light and mist leaves lightly. If roots look mushy, trim rotten parts and repot in fresh mix.
Yes, but it’s riskier! Semi-hydroponics (e.g., LECA or clay pellets) works if you monitor water levels closely. Pure water culture often fails long-term due to lack of nutrients/anchor points. If trying this, use a nutrient solution and transition to bark mix once roots establish (3–6 months).
Repotting an orchid keiki doesn’t have to be intimidating—just follow the steps, stay patient, and trust the process! 🌱 With the right tools, gentle handling, and a cozy new home, your baby orchid will thrive and reward you with stunning blooms in no time. Remember, every keiki is a fresh start and a chance to grow your orchid family.
Now that your keiki is snug in its new pot, keep an eye on its progress and adjust your care routine as needed. Ready to take your orchid skills further? Explore our guide on fertilizing young orchids to give your keiki the best possible growth boost!
