
Beautiful Plants For Your Interior
Beautiful Plants For Your Interior
I killed three orchids before realizing the problem wasn’t me—it was the potting mix. Store-bought blends often pack too densely, suffocating those delicate roots that need to breathe like they would clinging to a tree in the wild. The right mix changes everything: healthier roots, more blooms, and plants that thrive for years instead of […]
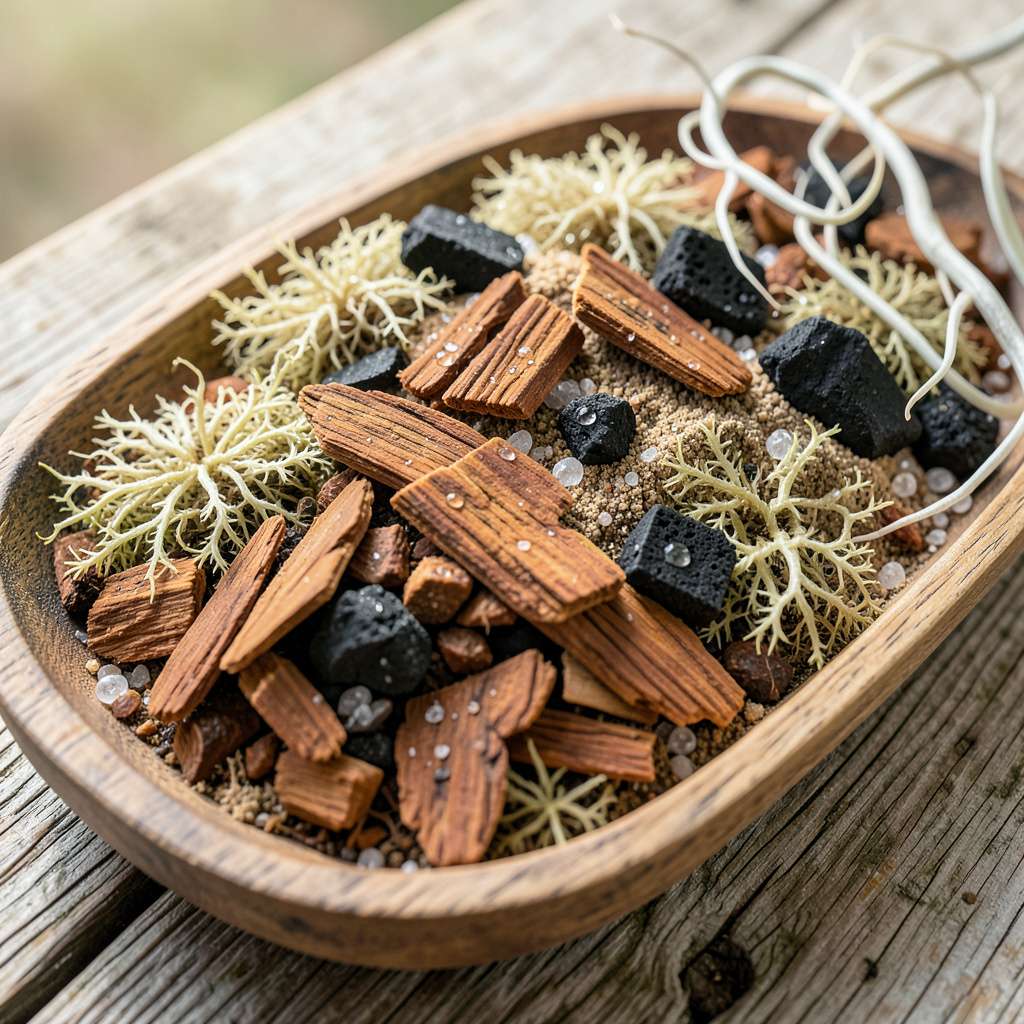
I killed three orchids before realizing the problem wasn’t me—it was the potting mix. Store-bought blends often pack too densely, suffocating those delicate roots that need to breathe like they would clinging to a tree in the wild. The right mix changes everything: healthier roots, more blooms, and plants that thrive for years instead of weeks.
After testing a dozen combinations (and losing a few more plants to science), I landed on a foolproof formula. It’s not about fancy ingredients—just the right balance of chunky bark for airflow, perlite for drainage, and charcoal to keep things fresh. My phalaenopsis now pushes out new leaves every 6 weeks and blooms like clockwork twice a year.
What you’ll end up with is a mix that mimics an orchid’s natural habitat: loose, airy, and fast-draining. No more soggy roots, no more mysterious yellow leaves, just steady growth and those stunning flowers we’re all after. The best part? It costs about half what those tiny bags of “orchid mix” do at garden centers.
Works for phalaenopsis, cattleyas, oncidiums—pretty much any orchid you’d grow at home. Here’s exactly how to blend it, what ratios matter most, and why your orchids will thank you with bigger, longer-lasting blooms.
📚 In This Guide
Fir or pine bark (½–1 inch chunks) – 3–4 cups (sterilized, aged, or pre-packaged orchid bark)
Coconut husk chips – ½ cup (extra aeration)
Large mixing bowl or bucket (2+ gallons)
Clean workspace (sterilize tools with rubbing alcohol)
This is the blend I’ve used for years to keep orchids healthy and blooming—no complicated formulas, just what works.
Start with three parts fir bark (I prefer medium-grade, about 1/2 to 1-inch pieces) as your primary component. This provides the air circulation orchid roots need while retaining just enough moisture. Avoid using pine bark—it breaks down too quickly and can make the mix too acidic over time.
Add one part charcoal (either horticultural charcoal or plain hardwood lump charcoal). This isn’t just for show—it absorbs impurities in the water, prevents souring of the mix, and helps control odor. The pieces should be about the same size as your bark chunks for even distribution.
Mix in one part sphagnum moss (either New Zealand or Chilean works well). This holds moisture near the roots without creating soggy conditions. I tear it into loose pieces rather than using it in dense clumps—you want it to integrate evenly throughout the mix.
For orchids that prefer slightly more moisture (like Phalaenopsis), you can add one part perlite. This improves drainage while still holding some water in its porous structure. The perlite should be coarse-grade, not the fine dusty type used for seed starting.
Include a handful of coarse sand (about 1/4 part) to improve drainage further and add weight to stabilize top-heavy plants. I use horticultural sand rather than playground sand to avoid salt buildup. The grains should be visible to the naked eye—nothing powdery.
Finally, sprinkle in a tablespoon of dolomite lime per gallon of mix to balance pH and provide calcium and magnesium. This is especially important if you’re using rainwater or reverse osmosis water, which can be slightly acidic over time.
Mix all components thoroughly in a clean bucket or wheelbarrow. I like to wear a dust mask during this step because the fine particles can be irritating. The finished mix should feel chunky and loose—when you squeeze a handful, it should barely hold together before falling apart.
Store your blend in a breathable container (a paper bag or open plastic bin works) until ready to use. Never compress it—keep it fluffy. This mix will last about 18-24 months before the bark starts breaking down too much and needs replacing.
Before committing to repotting all your orchids, test the mix with one plant. Water it normally and observe for 7-10 days. You’re looking for roots that appear silvery-green when dry and plump when watered—this tells you the moisture balance is right.
If the roots stay soggy or the mix smells sour, add more bark and charcoal to improve drainage. If it dries out too quickly, increase the sphagnum moss slightly. Remember that different orchid types have different needs—this blend works perfectly for most common varieties like Phalaenopsis and Cattleya.
After years of testing different blends, I’ve learned these key details make all the difference between an orchid that struggles and one that thrives.
Component Ratio Matters: The three parts fir bark to one part each of charcoal and sphagnum moss isn’t arbitrary—this balance creates the ideal air-to-moisture ratio. I’ve found that reducing the bark makes the mix too dense, while increasing it dries out too quickly. When measuring, use the same container for all parts to maintain consistency. The medium-grade bark pieces (about 1/2 to 1-inch) are particularly important as they create just the right air pockets without compacting.
Texture Test: In Step 4 when combining everything, the finished mix should feel like a chunky cereal—loose enough that when you squeeze a handful, it barely holds together before falling apart. This texture ensures proper drainage while still retaining enough moisture. If it feels too dense, add more bark; if it’s too loose, incorporate a bit more sphagnum moss. Remember, orchid roots need air circulation as much as they need water.
Storage Wisdom: The 18-24 month lifespan mentioned in Step 4 assumes proper storage. I keep my mix in open paper bags or loosely covered plastic bins to allow airflow—never in sealed containers. Over time, even the best bark breaks down, so I always check the texture before using older mix. If it feels powdery or compacts easily when squeezed, it’s time to make a fresh batch regardless of how long it’s been stored.
Testing Protocol: The 7-10 day test period in Step 5 is crucial. I recommend choosing a healthy but not currently blooming orchid for testing—this way you can observe root health without worrying about disrupting flowers. Watch for roots that turn silvery-green when dry and plump up nicely after watering. If you notice any sour smell during this period, that’s your signal to increase the charcoal and bark ratio in your next batch.
No! Regular potting soil suffocates orchid roots by holding too much moisture. Orchids need chunky, airy mixes (like bark, perlite, or coconut husk) to mimic their natural epiphytic habitat. Stick to orchid-specific blends for healthy roots and blooms!
Repot every 1–2 years or when the mix breaks down (turns mushy or compacted). Spring is ideal—just after flowering—so roots recover during active growth. Overdue? Look for roots circling the pot or poor drainage as red flags!
Try coconut husk chips (holds moisture but drains well) or LECA (clay pebbles) for semi-hydroponics. Other options: charcoal (antibacterial), perlite (aeration), or sphagnum moss (for moisture-loving orchids like Phalaenopsis). Avoid peat—it compacts too fast!
Mold thrives in overwatered, poorly draining mixes. Fix it by: 1) Repotting with fresh, chunky mix, 2) Adding cinnamon powder (natural antifungal), or 3) Increasing airflow around the plant. Water only when the top inch feels dry!
Not recommended—old mix loses structure, harbors pests, and depletes nutrients. If reusing, sterilize it by baking at 200°F for 30 minutes (let cool!). Better yet, compost it and start fresh for happier orchids!
Creating your own orchid potting mix doesn’t have to be complicated—just remember the golden rule: balance drainage, aeration, and moisture retention! 🌱 With the right blend of bark, perlite, charcoal, and a touch of sphagnum moss, your orchids will have the perfect home to grow strong roots and stunning blooms.
Now that you’ve got the know-how, grab your supplies and mix up a batch today. Your orchids will thank you with vibrant, long-lasting flowers! For next steps, try repotting one of your plants and watch how it thrives in its fresh, custom mix. Happy growing! 🌸
