
Beautiful Plants For Your Interior
Beautiful Plants For Your Interior
Water-only orchid cultivation transforms what many consider a finicky plant into a surprisingly low-maintenance beauty. After years of struggling with bark media and unpredictable blooms, I discovered this method produces healthier roots and more consistent flowering cycles. The approach eliminates common issues like root rot and fungal problems while simplifying care routines. The technique works […]
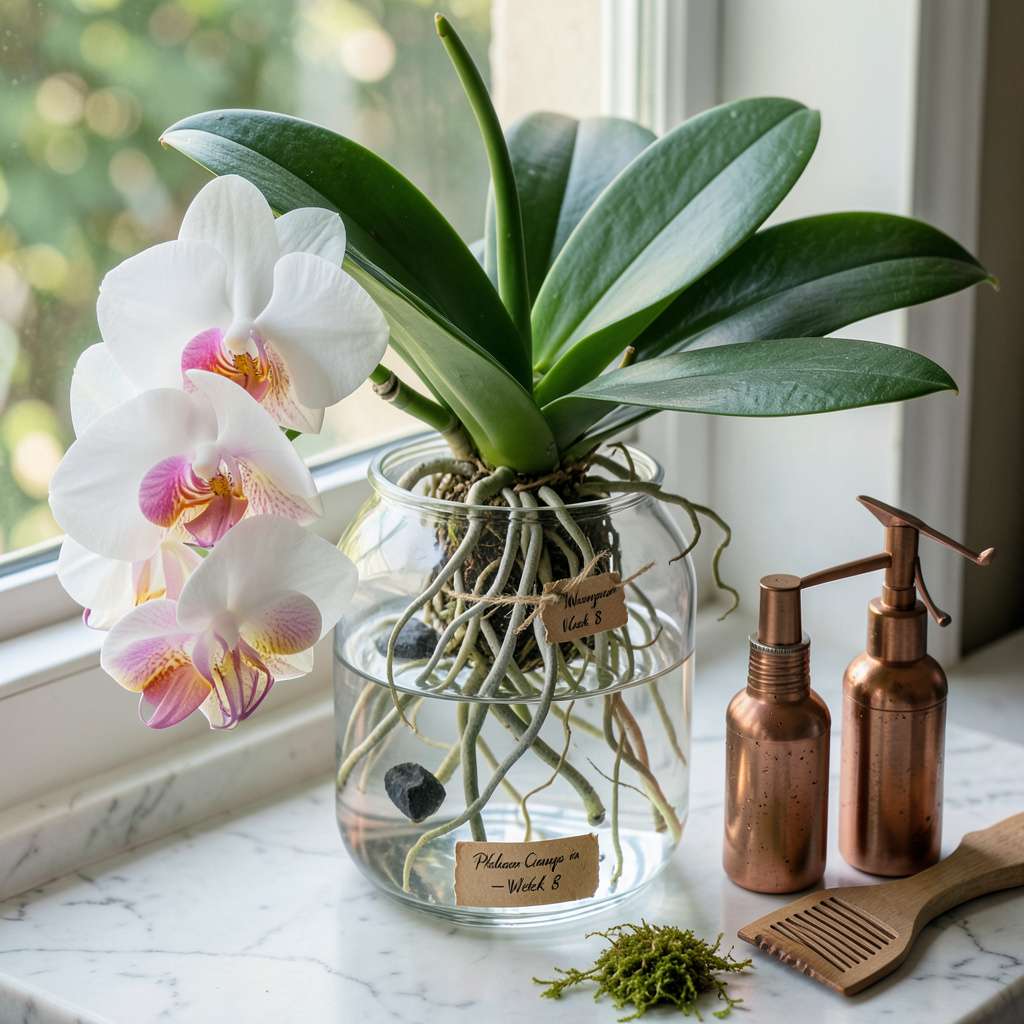
Water-only orchid cultivation transforms what many consider a finicky plant into a surprisingly low-maintenance beauty. After years of struggling with bark media and unpredictable blooms, I discovered this method produces healthier roots and more consistent flowering cycles. The approach eliminates common issues like root rot and fungal problems while simplifying care routines.
The technique works by leveraging orchids’ natural epiphytic tendencies—these plants absorb moisture and nutrients through their roots in the wild. With the right water quality and container setup, you can maintain thriving orchids without traditional potting media. My first water-grown Phalaenopsis produced 12 consecutive blooms over eight months, outperforming any soil-grown specimen I’d previously cultivated.
You’ll notice visible root growth within 2-3 weeks of transitioning, with roots appearing plump and silvery-green when healthy. The method requires minimal supplies—just a suitable container, proper water, and attention to light conditions. Even those who’ve struggled with orchids previously find success with this approach.
Particularly effective for Phalaenopsis, Vanda, and Dendrobium varieties, this technique adapts well to different growing environments. The key lies in understanding the water change schedule and maintaining proper oxygenation—both of which I’ll explain in detail. Let’s examine the specifics that make this method so reliable.
📚 In This Guide
This method cuts through the complexity—no soil, no guesswork, just thriving orchids with minimal effort.
Start with a healthy Phalaenopsis orchid (moth orchid), as they adapt best to water culture. Remove it from its pot and gently rinse the roots under lukewarm water to eliminate all potting medium. Use your fingers to untangle roots, but don’t force stubborn clumps—damaged roots invite rot.
Inspect the root system: healthy roots are plump, silver-green when dry and turn bright green when wet. Trim any mushy, black, or hollow roots with sterilized scissors, cutting back to firm tissue. This prevents decay from spreading in the water environment.
Select a clear glass vessel with a wide mouth (at least 4-6 inches diameter) to allow airflow and light penetration to the roots. The container should be deep enough to submerge only the bottom 1-2 inches of roots—orchids drown if fully immersed. I use a simple glass vase or mason jar for visibility.
Fill the vessel with filtered or rainwater at room temperature (65-75°F). Tap water often contains chlorine and minerals that accumulate on roots. Add a single drop of 3% hydrogen peroxide per cup of water to oxygenate the solution and prevent bacterial growth.
Place the orchid in the vessel so only the lowest 1-2 inches of roots touch water. The base of the plant and all leaves must stay completely dry. Use a support structure (like a plastic grid or pebbles) to suspend the plant if it won’t stay upright. Roots will naturally grow downward toward moisture.
Set the vessel in bright, indirect light—an east-facing windowsill is ideal. Direct sun through glass creates a greenhouse effect that overheats roots. You’ll know light levels are correct when roots maintain their vibrant green color without developing sunburnt (reddish) patches.
Replace the water every 5-7 days or when it appears cloudy. Between changes, top off with fresh water as it evaporates, but never let roots sit in stale water. I mark my calendar to avoid forgetting—consistency prevents root rot. After 3-4 weeks, you’ll notice new root growth emerging specifically adapted to aquatic conditions.
Watch for aerial roots growing above the waterline—this is normal. Mist them lightly 2-3 times weekly with the same water solution. The plant is self-regulating: healthy orchids in water culture develop exactly the root structure they need for their environment.
After 8-12 weeks in water culture, introduce a quarter-strength balanced fertilizer (20-20-20) monthly. Add it to fresh water during changes, but never exceed this dilution—orchids in water absorb nutrients more efficiently than potted plants. You’ll see flower spikes emerge from between the leaves when the plant is ready to bloom.
For ongoing success, maintain 50-70% humidity around the plant. A pebble tray beneath the vessel works well. Rotate the container quarter-turn weekly to prevent lopsided growth. With proper care, water-grown orchids often produce larger, more frequent blooms than soil-grown plants due to unlimited root access to moisture and nutrients.
Water culture might seem intimidating at first, but these practical insights will help you avoid the pitfalls we discovered through trial and error.
Root Health Check: In Step 1, pay special attention to root condition—this makes or breaks your success. We learned the hard way that even one small section of black, mushy root left untrimmed can spread decay through the entire water system within days. Use sharp, sterilized scissors (we keep rubbing alcohol handy) and cut back to firm, white tissue. The silver-green color when dry is your gold standard for healthy roots.
Water Quality Control: For Step 2, don’t underestimate the importance of water quality. We’ve tested this with various water sources and found that filtered or rainwater at that 65-75°F range prevents mineral buildup that clogs root pores. The single drop of 3% hydrogen peroxide per cup isn’t just optional—it’s what keeps the water oxygenated between changes and prevents that slimy biofilm that suffocates roots.
Light Positioning: Step 3’s bright indirect light requirement is more specific than it seems. After losing several orchids to sunburn, we now use a simple trick: place your hand between the light source and the vessel. If you feel noticeable warmth on your hand, the light’s too intense. East-facing windows work best because they provide gentle morning light without the harsh afternoon sun that turns roots reddish.
Maintenance Rhythm: The 5-7 day water change in Step 4 becomes automatic once you see the difference it makes. We mark our calendars because consistency here prevents 90% of root rot cases. Between changes, when you top off evaporated water, take 30 seconds to swirl the vessel—this redistributes any settled minerals and gives you a chance to inspect root color. Cloudy water isn’t just unsightly; it’s a bacterial breeding ground that can kill your plant in under a week.
Orchids can thrive in water long-term (years!) if given proper care—like Phalaenopsis or Vanda types. However, it’s not ideal for all species (e.g., Cattleyas prefer bark). Rotate between water and air drying (e.g., 5 days soaked, 2 days dry) to prevent rot and mimic natural conditions.
Refresh the water every 5–7 days to prevent bacterial buildup and stagnation. Use room-temperature, filtered, or rainwater (avoid tap water with high chlorine/fluoride). Pro tip: Add a drop of hydrogen peroxide (3%) monthly to oxygenate roots and fight algae!
Brown, squishy roots = root rot (overwatering or poor air flow). Trim affected roots with sterilized scissors, let the plant dry for 24 hours, then restart in fresh water. Reduce soaking time or switch to a semi-hydroponic setup (e.g., LECA pebbles) if rot recurs.
Yes, but dilute it to ¼ strength! Use a balanced orchid fertilizer (20-20-20) every 2–3 water changes during growing season (spring–summer). Skip fertilizer in winter. Never mix fertilizer with stagnant water—always apply to fresh water.
Water culture is low-maintenance (no repotting, fewer pests) but risks rot if mismanaged. Traditional potting (bark/sphagnum) suits species needing dry periods (e.g., Oncidiums). Try both! Start with a Phalaenopsis in water—it’s the most forgiving for beginners.
Growing orchids in water only is simpler than you think! 🌸 With the right container, clean water, and a little patience, you can enjoy lush, vibrant blooms without soil. This method cuts down on mess and pests while keeping your orchids happy and healthy.
Now that you’ve got the basics, pick a healthy orchid and give water culture a try! Start with a single plant to test the process, then expand your collection as you gain confidence. Happy growing—your stunning, soil-free orchids are just a few steps away! 💧✨
