
Beautiful Plants For Your Interior
Beautiful Plants For Your Interior
Glass containers transform orchid care from finicky to foolproof. I’ve grown orchids in everything from clay pots to plastic, but glass changed the game—roots stay visible, moisture levels become obvious, and the plants thrive with less guesswork. The secret isn’t fancy equipment but understanding how glass alters the growing environment. My first glass-grown orchid bloomed […]
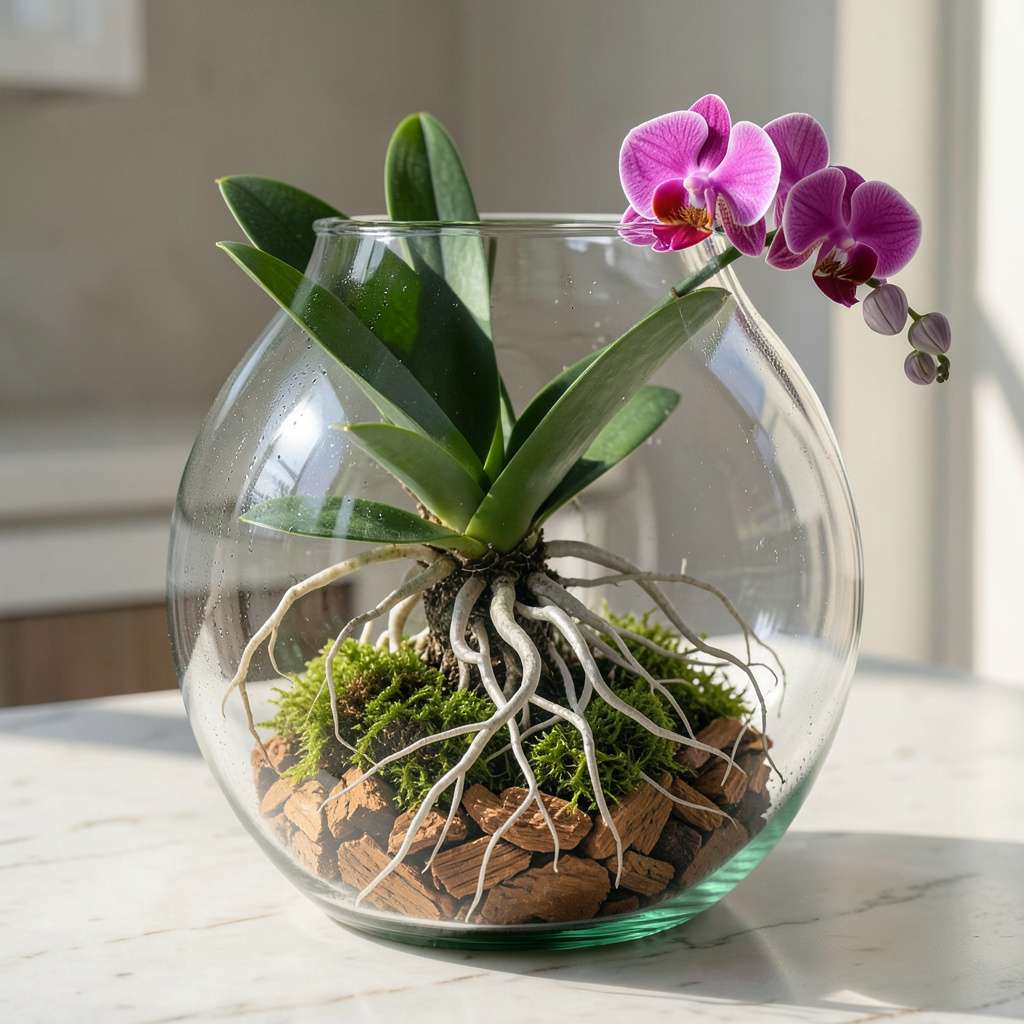
Glass containers transform orchid care from finicky to foolproof. I’ve grown orchids in everything from clay pots to plastic, but glass changed the game—roots stay visible, moisture levels become obvious, and the plants thrive with less guesswork. The secret isn’t fancy equipment but understanding how glass alters the growing environment.
My first glass-grown orchid bloomed for 12 weeks straight after switching from traditional pots. The transparent walls let me monitor root health at a glance, while the enclosed space maintains just-right humidity. You’ll need just three things to start: the right glass container, proper orchid mix, and a bright-but-indirect light spot.
Within 4-6 weeks, you’ll see new root growth and stronger stems. The blooms arrive bigger and last longer than in standard pots. I check moisture by watching for condensation on the glass—no more overwatering disasters. Even my previously struggling phalaenopsis rebounded after the switch.
This method works for any indoor space with decent light. Whether you’re rescuing a grocery-store orchid or starting fresh, glass containers reveal exactly what your plants need. Here’s how to set it up right the first time.
📚 In This Guide
This method transforms glass containers into thriving orchid homes—simple steps with dramatic results.
Choose a clear glass vessel with wide openings (at least 6 inches in diameter) to allow airflow and prevent fungal growth. Phalaenopsis or Vanda orchids adapt best to glass culture—their aerial roots tolerate the humidity while still needing air circulation. Avoid narrow-necked vases; stagnant air suffocates roots.
The glass should be thick and sturdy to maintain consistent temperature. I avoid colored glass because it blocks light that roots need for photosynthesis. Test by holding the container up to light—you should see clear, undistorted outlines through the walls.
Line the bottom with 1-2 inches of expanded clay pebbles or coarse gravel. This creates an air gap that prevents root rot by keeping the base of the orchid above any accumulated water. The pebbles also stabilize the plant and allow excess moisture to drain away from the roots.
Add a thin layer of sphagnum moss over the pebbles—just enough to cushion the roots but not so much that it retains excessive moisture. The moss should feel slightly damp to the touch, never soggy. This layer mimics the orchid’s natural epiphytic growing conditions on tree branches.
Gently place the orchid in the container, allowing the roots to spread naturally over the moss layer. The base of the plant should sit 1-2 inches above the moss to prevent crown rot. Use soft plant ties or clear fishing line to anchor the orchid to the container’s sides if needed.
The roots should have room to breathe—don’t pack them tightly. You’ll see healthy roots as plump, silver-green when dry and vibrant green when hydrated. If any roots appear mushy or black, trim them with sterilized scissors before positioning the plant.
Place the glass container where it receives bright, indirect light (east or north-facing windows work best). Direct sun through glass creates a greenhouse effect that can scorch leaves. You’ll know the light is right when leaves maintain a rich green color without yellowing or developing sunburn spots.
Mist the roots and moss lightly every 2-3 days with room-temperature water. The glass walls will show condensation when humidity is adequate—if droplets disappear within an hour, increase misting frequency. Never let water pool at the base; tilt the container slightly after watering to drain excess.
Check root health weekly—healthy roots should feel firm and show active growth tips. In winter, reduce watering to every 5-7 days as growth slows. You’ll see new leaves and flower spikes emerge from the base when conditions are ideal.
Every 4-6 months, remove the orchid and refresh the moss layer. This prevents salt buildup from water and fertilizers. The glass container itself only needs cleaning if algae forms—use a 10% bleach solution to sterilize, then rinse thoroughly before replanting.
Growing orchids in glass containers creates a stunning display, but a few key details make all the difference between thriving plants and disappointing results.
Container Selection Insight: The 6-inch minimum diameter mentioned in Step 1 isn’t arbitrary—it ensures proper airflow around the roots. I’ve found that containers with vertical sides work better than bowls because they allow roots to spread naturally without crowding. Test your container by placing your hand inside; if it feels cramped, your orchid will too. Thick glass maintains temperature stability, which is particularly important for Vanda orchids that prefer consistent warmth.
Moisture Management Technique: When implementing Step 2’s base layer, here’s what changed my success rate dramatically: after adding the 1-2 inches of clay pebbles, rinse them thoroughly before use. Dust on new pebbles can clog the air gaps we’re trying to create. The sphagnum moss layer should be just damp enough that when you squeeze a handful, only a drop or two of water comes out—this prevents the root suffocation that plagues many glass-grown orchids.
Root Health Monitoring: Step 5 mentions weekly root checks, but here’s how to make them truly effective: use a small flashlight to examine roots through the glass. Healthy roots will show a green glow when light passes through them (thanks to chlorophyll). If roots appear gray or hollow, it’s time to adjust your watering—usually a sign you’re misting too frequently despite the 2-3 day guideline. Remember that roots should feel like firm grapes, not soft mushrooms.
Seasonal Adjustment Strategy: The winter watering reduction to every 5-7 days in Step 5 is crucial, but watch for this often-overlooked sign: if new leaves emerge wrinkled or accordion-pleated, your orchid needs more humidity. During winter, I place my glass containers on trays with wet pebbles to create a microclimate that compensates for dry indoor air without overwatering the roots directly.
Yes! Glass containers lack drainage, so water sparingly—only when roots turn silvery-gray (about every 10–14 days). Use room-temperature distilled or rainwater to avoid mineral buildup. After watering, tilt the container to drain excess or use a pipette for precision. Overwatering is the #1 killer of glass-grown orchids!
Stick with epiphytic orchids like Phalaenopsis (moth orchids) or Vanda—they thrive in airy, humid environments. Avoid terrestrial orchids (e.g., Cymbidium), which need soil. Miniature or young orchids adapt best to glass due to their compact roots. Pro tip: Start with a healthy, pest-free plant for success!
Mold/algae love stagnant moisture. Boost airflow by leaving the container uncapped or using a mesh lid. Add a thin layer of activated charcoal (½ inch) at the base to absorb excess moisture and fight bacteria. Clean the glass monthly with a 1:10 vinegar-water mix to inhibit growth.
Aim for bright, indirect light (east/west windowsills or 12–14 hours under LED grow lights). Avoid direct sun—glass magnifies heat, scorching leaves! Rotate the container weekly for even exposure. Yellowing leaves? Too much light. Dark green leaves? Not enough—adjust accordingly.
Clear plastic (with drainage holes) mimics glass humidity but is lighter. Glazed ceramic (unglazed wicks away moisture) works too—just monitor roots closely. Avoid opaque containers; roots need light for photosynthesis. Glass just showcases the process beautifully!
Growing orchids in glass is simpler than it seems—just pair the right container with proper light, moisture, and airflow! 🌱 With minimal effort, you’ll enjoy stunning blooms that thrive in their elegant, self-contained ecosystem. Start small with a hardy variety like Phalaenopsis, and watch your confidence (and orchid collection) grow.
Ready to begin? Pick up a clear glass vessel and your favorite orchid today—your first lush bloom is just weeks away! 🌸
